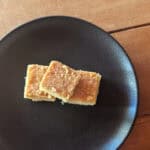
• Skip to primary navigation
  • Skip to main content
High Desert Table

High Desert Table

Your everyday guide to Southwestern cooking

  • Home
  • Recipes
  • About
  • Shop
  • Private Events
  • Contact
  • Show Search
Hide Search

winter

Old Plaza Cocktail: The High Desert Vieux Carré

Marianne Sundquist · January 17, 2025 · Leave a Comment

In 1938, Walter Bergeron, head bartender of the Carousel Bar in the Monteleone Hotel riffed on the Manhattan cocktail (rye whiskey, sweet vermouth, bitters), taking it to the next level in an homage to the romance of New Orleans. His changes were small but mighty. He added cognac (French Brandy) and Benedictine (a French herbal liquor made up of 27 plants and spices) and both Peychauds (light, candied cherry, orange) and Angostura (deep, spicy and savory) bitters. He named it “Vieux Carré”, French for “Old Square”, a nod to the French Quarter neighborhood in New Orleans which he saw as romantic, reminiscent of another time.

A High Desert Twist: Mezcal & Pine Liquor

I only know about the Vieux Carré because it happens to be my husband’s favorite cocktail. So I’ve learned to not only make it, but to also appreciate its mysterious and nuanced complexity. With the holidays approaching, I wanted to make a special version with notes of the high desert throughout that also acknowledges the magic of the historic plaza at the center of Santa Fe. To do this, I only make two main alterations to the classic— instead of rye whiskey, we add mezcal. And we swap out sweet vermouth for pine liquor.

Optional Infusion: Elevating the Flavors

If you want to take this version to the next level (which is impossible for me to resist) you can gently infuse the mezcal a few days in advance with dried red chiles, juniper berries and lavender. This is entirely optional but delightful. If you skip the infusion, you can make this cocktail in about five minutes.

Serving Suggestions: Straight Up or On the Rocks

This is a strong cocktail, so it’s important to know that you have options when it comes to serving. In the classic style, the cocktail is served straight, stirred with ice, strained into a cocktail glass and garnished with a lemon twist. But there is nothing wrong with serving it with ice or even ice and a splash of soda to lighten it up. I like to multiply this recipe by four and keep a jar in the fridge. Because there is no juice, it will keep for a long time in the fridge.

Print

Old Plaza Cocktail: The High Desert Vieux Carré

Old Plaza Cocktail - in a cocktail glass
Print Recipe
Pin Recipe

5 Stars 4 Stars 3 Stars 2 Stars 1 Star

No reviews

The Old Plaza Cocktail is a smoky and spicy twist on the classic Vieux Carré cocktail. It uses mezcal and pine liquor in place of rye whiskey and sweet vermouth, with optional infusions of red chiles, juniper berries, and lavender.

  • Author: Marianne Sundquist
  • Prep Time: 30 mins
  • Cook Time: 5 mins
  • Total Time: 35 minutes
  • Yield: 1 cocktail
  • Category: cocktail
  • Method: mix
  • Cuisine: New Orleans

Ingredients

Units

For the infused Mezcal:

  • 5 New Mexico Red Chiles, seeded (optional) & stemmed
  • 2 c. mezcal
  • 1 t. dried lavender buds
  • 1 t. dried juniper berries

For the cocktail:

  • 3/4 oz. infused mezcal
  • 3/4 oz. cognac
  • 1/2 oz. pine liquor
  • 1/2 oz. benedictine
  • 2 dashes peychauds bitters
  • 2 dashes angostura bitters
  • 1 lemon peel, for garnish

Instructions

Making the infusion

3-5 days before you want to make the cocktail, infuse the mezcal. Place a dry skillet over medium heat. Quickly sear the red chiles on all sides just until their oils activate and the chiles soften. Turn off the heat. Transfer the chiles to a glass jar. Add the mezcal, lavender and juniper berries. Put a tight fitting lid on the jar and place it somewhere cool and dark, giving it a shake every day. After infusing, strain the mezcal through a fine mesh strainer and now it’s ready for use.

Old Plaza Cocktail - Infusion in a jar

To make the cocktail

Fill a large glass with ice. Add the infused mezcal, cognac, pine liquor, benedictine and both bitters. Stir for around ten seconds and strain into a chilled cocktail glass. Garnish with a lemon peel and serve immediately.

Additional Option

You can also strain the cocktail into a rocks glass with ice and a splash of soda water for a lighter version.


Did you make this recipe?

Tag @highdeserttable on Instagram so we can cheer you on! 🌟

Nutrition values are estimates only. See the disclaimer here.

Homemade Danish Apple Kringle

Marianne Sundquist · January 3, 2025 · Leave a Comment

This week’s recipe is a special one because I get to introduce you to the Pastry Bandit, aka my husband Hans, who comes from a Swedish family in Minnesota and has been enjoying kringles since he was a child. Being that flour makes him sneeze, he wears a bandana whenever baking and inevitably we all gather to see what creations this masked character is mixing, rolling, and shaping. The kringle he grew up eating the most is the one his mom still makes to this day, filled with an almond filling. Here, because we had exactly six granny smith apples in the fridge, we decided to try a fruit filling this year instead. It was a great decision!

What is a Kringle?

Kringles are known for their flakey, buttery pastry and almond or fruit fillings, often glazed and sprinkled with nuts or sugar. This classic Danish dough is incredibly easy to make (only four ingredients) and is a dream to work with, especially after resting in the fridge overnight. In this recipe, we skip the glaze but if you want to add a boost of sweetness, simply whisk together one cup of powdered sugar with two tablespoons of milk and you are ready to drizzle away until your heart’s content.

If you want to get creative with the fruit filling, go for it! You could add blueberries, dried fruits like cherries or currants, or chopped nuts. We love to make the dough and the filling the day before we plan on rolling it out and baking. This is perfect for breakfast, dessert, or a mid-day snack break and is wonderful with tea and coffee.

Print

Homemade Danish Apple Kringle

Danish Apple Kringle - out of the oven on a cutting board
Print Recipe
Pin Recipe

5 Stars 4 Stars 3 Stars 2 Stars 1 Star

No reviews

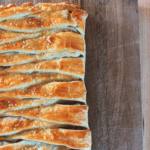
Learn how to make a delicious and easy homemade Danish Apple Kringle with this simple recipe. This classic Danish pastry is flaky, buttery, and perfect for any occasion.

  • Author: Marianne Sundquist
  • Prep Time: 1 hour
  • Cook Time: 40 mins
  • Total Time: 1 hour 40 minutes
  • Yield: 12 servings
  • Category: dessert, breakfast
  • Method: bake
  • Cuisine: danish

Ingredients

Units

for the dough:

  • 2 c. all-purpose flour
  • pinch of salt
  • 1 c. cold butter, diced
  • 1 c. sour cream

for the filling:

  • 6 medium-sized firm apples, peeled, cored, and diced into 1/2” pieces
  • 1/2 c. packed brown sugar
  • 1 T. cornstarch
  • 2 t. pumpkin spice or cinnamon
  • 2 t. vanilla extract
  • pinch of salt

for building:

  • 1 egg, for egg wash
  • 2 T. decorating sugar or sugar in the raw

Instructions

The day before, make the dough: In the bowl of a stand mixer with the paddle attachment, add the flour, salt, butter, and sour cream. Mix this on medium speed until the dough comes together and comes away from the side of the bowl. It will feel just slightly sticky but easily form into a ball. Wrap the dough in plastic wrap and refrigerate for at least overnight.

Making the Apple Filling

To make the filling, add the apples, brown sugar, cornstarch, pumpkin spice, vanilla, and salt to a large saute pan. Let this mixture simmer over medium heat until the apples release their juice and the mixture slightly thickens, resembling apple pie filling, around 30 minutes. Let this cool completely.

Assembling the Kringle

To build and bake the kringle, preheat the oven to 375 F. and line a large baking sheet with a silicone baking mat or parchment paper.  On a lightly floured, clean, and dry surface, roll out the dough to a rectangle, roughly 24” wide and 14” high. Carefully transfer this rectangle of dough to your baking sheet.

Danish Apple Kringle - rolling and prepping the dough

Make sure to leave a 12-inch wide rectangle of rolled-out dough in the middle, and cut 1-inch wide strips along both sides of the rectangle. Spread the apple filling in the center rectangle of the pastry.

Danish Apple Kringle - cutting the strips

Danish Apple Kringle - folding the strips

Then, alternating sides, fold each strip of cut dough over the apple filling until all of the apple is covered and all the strips are folded over.

Danish Apple Kringle - before baking

Baking the kringle

In a small bowl, whisk the egg and brush it over the pastry. Sprinkle the top with decorating sugar and bake for around 35-40 minutes, or until the pastry is golden brown.

Danish Apple Kringle - egg wash and decorative sugar

Transfer to a cutting board and let cool for ten minutes before slicing and serving.

Danish Apple Kringle - sliced and plated


Did you make this recipe?

Tag @highdeserttable on Instagram so we can cheer you on! 🌟

Nutrition values are estimates only. See the disclaimer here.

Hearty Beef, Squash, and Red Chile Soup

Marianne Sundquist · December 4, 2024 · Leave a Comment

I’m not calling this a breakfast soup even though the photo has a fried egg floating on top, but this soup is so versatile, warming, and nourishing it can easily be enjoyed any time of the day. On the day I made this hearty beef and red chile soup it simmered away on the stove all afternoon and we had it for dinner. But the next morning, things got really exciting. Some leftover soup warmed up with an egg on top seemed like the breakfast that made the most sense on a cold morning. And wow, we were right.

A New Mexican Inspiration

So this story really begins because I picked up a new chile ristra and have been looking for a way to utilize some of the brilliantly red dried chiles hanging in my kitchen like a warmth-inducing chandelier. So in making this soup, New Mexico Red Chile is where I began.

The Power of Pantry Staples

Then of course, I looked around to see what needed to be used up in my kitchen. I noticed some zucchini squash in the fridge that I had purchased but then forgot to use. This is the way it goes and I have to admit, I love when these parameters come into play and combinations I may have never thought of simmer to the surface. And that’s what happened here. If I had a completely blank page in front of me I can imagine myself thinking about making a different soup altogether. Maybe I would have added beans or cauliflower or pumpkin. But in that moment, I had zucchini and I’m grateful I did.

A Squash for All Seasons

You’ll notice that I am using the broader name “Squash” in the title of this recipe. It’s important to mention because you can use any variety of squash here. Especially being that we are smack dab in the middle of winter squash season. Whatever squash you want to use, consider how you want to prepare it before adding it to the soup.

For a summer squash like zucchini, it can just be diced and added to the soup. If you use Butternut, you can trim it, peel it with a vegetable peeler, take the seeds out and then dice it for soup. For Kabocha or Delicata squash varieties, you can simply trim off the ends, slice it in half to remove the seeds, then dice it leaving the edible skin on before adding it to the soup. If you wanted to use a pumpkin, you could cut the pumpkin into quarters or wedges (depending on size), roast the pumpkin in the oven with a drizzle of olive oil, salt, and pepper before peeling it and dicing the roasted pumpkin. If you use cooked squash, you can add it towards the end of the cooking process, about 15 minutes before serving.

This soup can be served on its own, or garnished with cilantro or chives. I would recommend some warm bread or tortillas on the side.

Print

Hearty Beef, Squash, and Red Chile Soup

Beef and Red Chile Soup with fried egg
Print Recipe
Pin Recipe

5 Stars 4 Stars 3 Stars 2 Stars 1 Star

No reviews

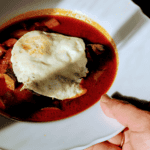
A versatile and warming soup that can be enjoyed any time of day. This hearty beef, squash, and red chile soup is perfect for using up winter squash and red chiles.

  • Author: Marianne Sundquist
  • Prep Time: 1 hour
  • Cook Time: 2 hours
  • Total Time: 3 hours
  • Yield: 8-10 servings
  • Category: Soup, Fall, Winter, Stew
  • Method: Simmer
  • Cuisine: New Mexican

Ingredients

for the chile sauce:

  • 2 dried New Mexico red chiles
  • 3 dried guajillo chiles
  • 2 dried chipotle chiles
  • 1 T. butter
  • 1 small red onion, sliced
  • 4 garlic cloves, thinly sliced
  • 3 c. water
  • 2 T. honey
  • Salt and pepper, to taste


For the meat:

  • 3 lb. beef eye of round steak, trimmed and cut into ½” pieces
  • Salt and pepper
  • High smoke point oil for searing (grapeseed, avocado or vegetable)


For the soup:

  • 2 T. butter
  • 1 large onion, diced
  • 2–4 garlic cloves, thinly sliced
  • 1 T. high desert herbs
  • 2 t. ground coriander
  • 1, 14-oz. can fire-roasted diced tomatoes
  • 4 c. diced zucchini or butternut squash
  • 2 qt. (4 cups) beef broth

Instructions

First, let’s make the chile sauce.

Fill a medium saucepan with water and bring to a boil over high heat. Now place a large, heavy-bottomed soup pot over low heat.

Prepping the Chiles

Remove the stems and seeds from each of the dried chiles and break them into pieces. Transfer the chile pieces to the dry large pot and cook them over low heat for a couple of minutes to activate their flavor, stirring occasionally. Transfer the lightly seared chiles to the pot of hot water. It doesn’t matter if it is boiling yet, just throw them in and let them take a hot bath for ten minutes before straining and reserving the reconstituted chiles.

While they are in the water, add the butter to the soup pot along with the onion. Let the onions cook for around five minutes until they are starting to caramelize. Add the garlic, cook another minute or so more, and transfer this mixture to a blender. Add to the blender the reserved chiles, water, honey, and a pinch of salt and pepper. (Note: whenever measuring honey, with your finger, lightly rub the inside of the measuring spoon with oil before adding the honey to help it come out easier). Blend until completely smooth, taste, adjusting seasoning as needed and reserve.

Turn up the heat

Turn the heat up to medium-high and add 1 T. of the oil for searing to the pot. Generously season the diced beef with salt and pepper, and working in batches so as not to overcrowd the pan, sear the beef on all sides and transfer to a bowl. Repeat this process until all of the beef is seared. Reserve.

Now to the same pot add the butter. Add the onion and cook, stirring frequently until the onions are beginning to caramelize, around five minutes. Add the garlic and cook another minute more. Add the High Desert Herbs and coriander. Stir and let cook for a minute or so.

Simmer until tender

Now add the tomatoes to deglaze and scrape the bottom of the pan, making sure to incorporate all of the caramelized goodness into the chili. Add the chile sauce, seared meat, squash, and beef broth. Bring this to a boil and lower the heat to a simmer. Let this simmer for around two hours, or until the beef is tender. Taste and adjust seasoning as needed.


Did you make this recipe?

Tag @highdeserttable on Instagram so we can cheer you on! 🌟

Nutrition values are estimates only. See the disclaimer here.

Green Chile Stacked Enchiladas

Marianne Sundquist · January 24, 2024 · Leave a Comment

It’s a humbling and majestic thing to live in New Mexico as an Italian chef from the Midwest. It’s like landing on a different culinary planet. A planet where flavors transcend, reach deeply into the land and sky, and then reappear in a simmering pot of green chile sauce.

Enchanted lavender

A good example of this is lavender. I mostly had experienced lavender in restaurant kitchens as an unexpected flavor profile meant to wow guests, or by getting a whiff from a lotion or candle in a city shop. For almost twenty years I considered it to be my least favorite smell and taste. Then four years ago I moved to New Mexico. There were two different varieties of lavender in my yard and they smelled nothing like I expected. The high floral notes were grounded with traces of grass and wood, soft musk, and worn leather. The flowers were not alone like I had often seen them. They were part of a family, connected to long green stalks and twisting roots. They were growing next to chives and mint. Honeysuckle grew a few feet away. Sometimes there were other scents too, like roasting chiles and pinion fires wafting around and through wooden fence slats from neighboring yards. In the summer with all these high desert scents bumping and bouncing off each other, for the first time, lavender didn’t just make sense and smell good. I was enchanted. It became one of my favorite flavors of all time.

The Southwest is a melting pot

Because of this interconnected Southwest ecosystem where history, ingredients, landscape, and people meet, learning about New Mexican food feels like an extraordinary gift. With Christmas around the corner, I wanted to share a very special recipe from a very special Chef. Over the past number of months, I have had the privilege of learning about Native New Mexican cuisine from Dr. Lois Ellen Frank and Walter Whitewater through virtual culinary tours hosted by Heritage Inspirations. Lois has spent over 25 years documenting the foods and lifeways of Native American tribes from the Southwest and regions throughout the Americas. In 2007, she started a Native American Cuisine catering company named Red Mesa. I’m so grateful she was willing to share her recipes for Green Chile sauce, Tortillas, and Stacked Enchiladas with us here.

Since the pandemic Red Mesa has gone virtual and is offering hands-on cook-along cooking classes, demonstration-style cooking classes, and holiday family classes, along with a beautiful collection of local food products, cookbooks, and posters available on the website.

“When you cook together as a family, it unifies your bond and calls in the wisdom of the ancestors.”

Lois Ellen Frank
 Lois Ellen Frank and Walter Whitewater
Print

Green Chile Stacked Enchiladas

Green Chile Stacked Enchiladas - Plated with sauce
Print Recipe
Pin Recipe

5 Stars 4 Stars 3 Stars 2 Stars 1 Star

No reviews

Spice up your dinner routine with this easy-to-follow and mouthwatering green chile stacked enchiladas recipe. This authentic recipe features roasted New Mexico or Anaheim Green Chiles, flavorful corn tortillas, succulent rotisserie chicken, and a generous layer of melted Jack Cheese.

  • Author: Marianne Sundquist
  • Prep Time: 1 hour
  • Cook Time: 30 mins
  • Total Time: 1.5 hours
  • Yield: 10-12 servings
  • Category: Dinner
  • Method: Bake
  • Cuisine: New Mexican

Ingredients

Units

For the Green Chile Sauce: 

  • 6 cups New Mexico or Anaheim Green Chiles, Roasted, Peeled, & Chopped
  • 1 28 oz can chopped tomatoes
  • 1 Tablespoons Sunflower Oil
  • 1 Medium White Onion, diced (approximately 2 cups)
  • 1 Tablespoon chopped garlic (approximately 6 to 8 cloves)
  • 2-teaspoons kosher salt
  • 1/4 teaspoon freshly ground black pepper
  • 2 cups water


For the Corn Tortillas: 

  • 3 cups Corn Masa Flour for Tortillas (this can be found in your supermarket in the Latin food section)
  • 1 1/2 teaspoons kosher salt (or to taste)
  • 1 1/2 cups warm water


For the Enchiladas: 

  • 1 Rotisserie Chicken, (meat picked from the bones)
  • 4 3/4 cups Jack Cheese, grated

Instructions

Make the Green Chile Sauce

Using the open flame method, roast the green chiles until completely charred and then place in a glass or metal bowl covered with plastic wrap to allow the chiles to sweat and cool down. Once the chiles have cooled, peel, seed, and chop them.

In a medium size saucepan, heat the sunflower oil until hot but not smoking. Sauté the onion over medium to high heat until it begins to brown. About 3 minutes. Add the garlic and sauté for another minute. Add the tomatoes and cook for another 5 minutes stirring to prevent burning. Add the chopped green chile and sauté for another 3 minutes. Add the water and bring to a boil. Reduce the heat and simmer for approximately 15 minutes.

Add the salt and pepper to taste. Remove from heat.

In a blender place half the sauce and blend on high for several minutes until completely smooth. Return the blended mixture to the saucepan with the unblended sauce. Makes approximately 2 ½ quarts sauce for the enchiladas with some sauce on the side.


For the Corn Tortillas

In a medium-sized mixing bowl, combine the corn flour, salt, and water and mix together until you have formed a dough. You can do this with a spoon, but I always use my hands. After the ingredients are completely mixed, use your hands to form balls just smaller than a golf ball and set aside. Preheat your seasoned cast iron skillet so that it is very hot.

In a tortilla press, place one ball in the center of the tortilla press and press together to make one corn tortilla. I use a plastic bag that I cut in half leaving a seam on one side so that I can place the corn masa ball inside the plastic so that it doesn’t stick to the tortilla press. Remove the tortilla from the plastic place it on the cast iron skillet and cook the first side of the tortilla for 30 to 45 seconds, then turn it over and cook for approximately 30 to 40 seconds and cook until it puffs and that is the sign that the tortilla is done.

Place the cooked tortilla in a kitchen towel inside a basket or bowl and prepare the next tortilla following the same steps. Stack the tortillas on top of each other to keep them warm inside the towel. Makes approximately 21 tortillas.

Homemade Tortillas in a bowl

Bake

Preheat your oven to 350 degrees. In a casserole pan or half-hotel pan, layer some green chile sauce to cover the bottom of the pan. Place tortillas on top of sauce (approximately 7 tortillas). Spoon more of the green chile sauce on top of the corn tortillas. Evenly place 1/3 the amount of shredded cooked chicken on top of the green chile sauce and then top with 1 ½ cups of the shredded jack cheese.

Begin another layer. First the corn tortillas (approximately 7 tortillas). Spoon some green chile sauce on top of the tortillas. Evenly place the second 1/3 of the shredded cooked chicken on top of the sauce. Top with another 1 ½ cups of the shredded jack cheese.

Begin the final layer. Place the corn tortillas on top to start the next layer (approximately 7 tortillas). Spoon some green chile sauce on top of the tortillas. Evenly place the final 1/3 of the shredded cooked chicken on top of the sauce. Top with the final amount 1 ¾ cups of shredded jack cheese. Place in the pre-heated oven and bake until the cheese browns and you see bubbles on the side of the pan approximately 30 minutes. Serve immediately.

Notes

The bones can be made into chicken stock. Here is a recipe for homemade rotisserie chicken stock.

Did you make this recipe?

Tag @highdeserttable on Instagram so we can cheer you on! 🌟

Nutrition values are estimates only. See the disclaimer here.

This Rotisserie Chicken Stock - in a bowl

Rotisserie Chicken Stock

Create a rich and flavorful chicken stock by simmering a leftover Rotisserie chicken with aromatic vegetables, such as onions, carrots, and celery. This Rotisserie Chicken Stock is a savory and versatile base for soups, stews, and sauces.

Get the Recipe

Rotisserie Chicken Stock

Marianne Sundquist · January 6, 2024 · Leave a Comment

This Rotisserie Chicken Stock is a savory and versatile base for soups, stews, and sauces. It’s so easy and simple, there’s not a lot to say. Enjoy!

Print

Rotisserie Chicken Stock

This Rotisserie Chicken Stock - in a bowl
Print Recipe
Pin Recipe

5 Stars 4 Stars 3 Stars 2 Stars 1 Star

No reviews

Create a rich and flavorful chicken stock by simmering a leftover Rotisserie chicken with aromatic vegetables, such as onions, carrots, and celery. This Rotisserie Chicken Stock is a savory and versatile base for soups, stews, and sauces.

  • Author: Marianne Sundquist
  • Prep Time: 30 mins
  • Cook Time: 1 hour
  • Total Time: 1.5 hours
  • Yield: around 8 cups
  • Category: Soups
  • Method: Simmer
  • Cuisine: Essentials

Ingredients

Units
  • Bones from Rotisserie chicken, broken into pieces
  • 1 Tablespoon sunflower oil
  • 1 onion, chopped
  • 3 carrots, loosely chopped
  • 3 celery, loosely chopped
  • 8 cups water

Instructions

  1. In a soup pan, heat oil until hot but not smoking.
  2. Add the onion and sauté the onion until it starts to turn brown approximately 3 to 4 minutes.
  3. Add the carrots and celery and sauté for another 5 minutes, stirring to prevent burning.
  4. Add the chicken bones and cook for another 5 minutes, stirring to prevent burning.
  5. Add the 8 cups of water. Bring to a boil, then reduce heat and simmer for 1 hour.
  6. Strain and discard the contents of the strainer.
  7. Refrigerate for up to 3 days or freeze.

Did you make this recipe?

Tag @highdeserttable on Instagram so we can cheer you on! 🌟

Nutrition values are estimates only. See the disclaimer here.

  • Page 1
  • Page 2
  • Page 3
  • Go to Next Page »

High Desert Table

Copyright © 2025 · High Desert Table

  • Privacy Policy
  • Nutrition Disclaimer