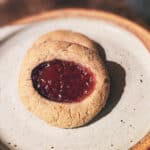
• Skip to primary navigation
  • Skip to main content
High Desert Table

High Desert Table

Your everyday guide to Southwestern cooking

  • Home
  • Recipes
  • About
  • Shop
  • Private Events
  • Contact
  • Show Search
Hide Search

baking

High Altitude Chocolate Cake with Cream Cheese Frosting

Marianne Sundquist · April 24, 2023 · Leave a Comment

High-altitude baking can be a challenge. If I had a video camera in my kitchen since moving to Santa Fe, there have been a few times when the footage could be used to make a sitcom or reality show. I mean, this is some real popcorn-worthy material—a cake overflowing out of the pan, the little bubbling bits catching fire on a sheet tray in the oven, and the hilarity that ensues as everyone in the house reacts. The kids, the husband, the baker (aka me), and even Saturn the dog comes to life from his nap spot on the couch as cake pans are quickly brought outside in a plume of smoke and tossed on cold rocks to cool down. Even though my bakes usually result in whiffs and sighs of delightful success, now when I set out to bake a cake, there’s a new joke in our house. My well-meaning family members wish me luck, my brow furrows as I pour the batter into the pan, and I whisper a little prayer with no idea of what will happen in the 30 minutes to follow. I think some of this has been a bit of bad luck but another part of it was me in denial about the reality of what high altitude does to baking. This year, I have set out to not only bake better cakes but more importantly learn about why making adjustments to leavening agents, liquid, temperature and time makes a meaningful difference. This cake is the result of my exploration and discovery. The days of my cake-making dramas are (hopefully) over. 

High-altitude baking

Santa Fe sits at just over 7,000 feet at its lowest points. And since baking is affected as low as 3,000 feet in elevation, there is no way of getting around it here. The first thing I learned when setting out to conquer my cake-making fiascos, is that as we travel higher in elevation, air pressure decreases. And air pressure is what makes our understanding of general baking rules, proportions, time, and temperatures what it is. Low air pressure is what causes water to boil at lower temperatures (at 7000 feet, 198.9 F. to be exact) and in baking it does two main things: it causes liquids to evaporate faster and makes baked goods rise faster and easier. I now understand that my exploding cakes were the result of high pressure rising so quickly that the cell walls inflated and burst. Oh, how I feel understood and seen by air pressure science! 

This recipe takes these small but mighty elevation details into account and I played with many variables until I landed on a luscious cake full of bounce and rich chocolate flavor. I experimented with the amount of liquid, egg, sugar, and baking powder and also the temperature and time of the bake. 

Super simple frosting

For this cake, I include a recipe for a simple cream cheese frosting which was a great choice since eventually, we turned the top of the cake into a panda face for River’s tenth birthday. But I think a whipped cream cream cheese frosting would be just as delicious and a bit lighter. You can make this cake into two or three layers, whichever you prefer. And feel free to get creative with what you spread inside the layers. This recipe keeps it simple and just uses frosting, but it’s also a great way to add another layer of flavor to the cake. You could use any flavor jam (raspberry is a favorite), even apple or pumpkin butter.

If you make a cake or cupcakes, just keep in mind that baking times will be less for cupcakes. Keep an eye on it as it bakes and keep a small knife, skewer, or toothpick ready for testing. After all of the care that goes into making a cake or cupcakes, the last thing you want to happen is for it to overbake and get dry and crumbly. We are all in this together, so happy baking!

Print

High Altitude Chocolate Cake with Cream Cheese Frosting

High Altitude Chocolate Cake with Cream Cheese Frosting
Print Recipe
Pin Recipe

5 Stars 4 Stars 3 Stars 2 Stars 1 Star

No reviews

Baking at higher elevations can be an unpredictable challenge. This luscious chocolate cake is perfect for your high-elevation baking adventures.

  • Author: Marianne Sundquist
  • Prep Time: 60 mins
  • Cook Time: 40 mins
  • Total Time: 1 hour 40 minutes
  • Yield: 1, 9” 2 or 3-layer cake or 24 cupcakes
  • Category: Dessert
  • Method: Baking
  • Cuisine: Southwest

Ingredients

for the cake:

  • butter, for coating the pans
  • parchment paper, for lining the bottom of the pans
  • 2 c. (250 g.) all-purpose flour, plus more for pans
  • 1 ¾ c. (350 g.) granulated sugar
  • 3/4 c. (75 g.) dutch processed cocoa powder
  • 2 t. baking soda
  • 3/4 t. baking powder
  • 1 t. kosher salt
  • 1 1/4 c. buttermilk
  • 1/2 c. vegetable oil
  • 3 large eggs, at room temperature
  • 2 t. vanilla extract
  • 1 c. freshly brewed hot coffee

for the frosting:

  • 3 c. powdered sugar, sifted
  • 2, sticks unsalted butter, room temperature
  • 2, 8 oz. packs of cream cheese, at room temperature
  • 2 t. vanilla extract

Instructions

First, preheat the oven to 375 F. Generously rub butter all over the inside of your two or three cake pans. Now place around a tablespoon of flour into one of the pans. Moving around in the circle, tap the pan so the flour coats the bottom and sides of the pans evenly. Now tap all of the excess flour into the next pan and repeat this process. If you are using a third pan, repeat this again, otherwise, tap out any extra flour into the sink. Now line each cake pan with parchment paper on the bottom. To do this, cut a piece of parchment paper at least the size of the cake pan and fold it in half. Now fold it in half again. Now fold the triangle again and hold it over the cake pan so the corner reaches the center. Cut the outer edge of the paper so it matches the curve of the circular pan, unfold the parchment and it should fit in the bottom perfectly. If you are making cupcakes, line your cupcake pan with paper liners.

Add the wet ingredients into the dry ingredients and whisk together until the batter is incorporated.

To make the batter, in a large, dry bowl whisk together the flour, sugar, cocoa powder, baking soda, baking powder and salt. In a separate medium bowl whisk together the buttermilk, vegetable oil, eggs, vanilla, and hot coffee. Add the wet ingredients into the dry ingredients and whisk together until the batter is incorporated. Pour the batter evenly between your pans or into your cupcake liners. Bake for 20-25 minutes (for a cake) and 15-20 minutes (for cupcakes), or until a small knife or skewer inserted into the center comes out clean.

chocolate cake layers cooling
Let the cakes cool for 15 minutes before carefully inverting them onto a large plate lined with parchment paper.

Let the cakes cool for 15 minutes before carefully inverting them onto a large plate lined with parchment paper. The way I like to do this is to place a piece of parchment paper on top of the cake. Place a large plate over the parchment paper and while holding everything tightly together, carefully flip it over. Remove the cake pan and parchment paper stuck to the bottom of the cake. Let the cake cool completely before layering and frosting.

Once the cakes are cool, lay one cake on a platter or pedestal and generously frost the top. Repeat this with the remaining layers and then frost the entire outside of the cake. Enjoy!

Did you make this recipe?

Tag @highdeserttable on Instagram so we can cheer you on! 🌟

Nutrition values are estimates only. See the disclaimer here.

Biscochito French Toast 

Marianne Sundquist · April 17, 2023 · 1 Comment

Table of Contents

  • The crumble topping
  • Why corn?
  • The gift of living and cooking in New Mexico
  • Brunch for a crowd

This Biscochito French Toast  recipe is entirely inspired by the state cookie of New Mexico, the biscochito (or bizcochito), and more specifically its spice combination of cinnamon, sugar, and ground anise seeds. I don’t often make individual slices of french toast, but I’m a huge fan of baked french toast, where extra egg mixture is poured over layers of bread resulting in a custardy-bread-pudding-like consistency. Before it goes into the oven, it’s topped with a pecan crumble and when it emerges from the oven a caramel-hued golden brown, it’s topped with red chile mascarpone. The italian cream cheese begins melting instantly and for the finishing touch, the french toast is drizzled with a warm concoction of melted butter whisked with maple syrup. I usually serve some kind of salad with this decadent dessert for breakfast and feel good about all of it.

The crumble topping

Most crumble toppings will include a flour of some kind to bind the nuts, sugar, and butter together. In the recipe, I give three options because they all work providing varying degrees of texture, and most importantly I want you to feel freedom to use what you can find or have on hand.  This could be all-purpose flour, nut flours, or in this case, cornmeal. 

Why corn?

For a moment, let’s talk about corn. I chose to use it because it is a food that’s cultivated and cared for in abundance here, more than anywhere else I have lived. I try to buy posole, chicos, and corn meal from local, small farms whenever possible. Working as a chef mostly in large cities, I used to think I knew so much about food. I don’t make that mistake anymore. Corn is just one of the foods that helped me realize I will be a student here for the rest of my life, no matter how many methods and techniques I learn along the way.

The gift of living and cooking in New Mexico

I remember as a young cook, working in restaurants where ingredients were sourced from far-off places. Once they arrived, we would make them into creams, purees, powders, foams, and gelees. In our pressed white jackets, there was often a collective pride about our innovative inventions, as if we were painters and each dish was our own work of art. I cringe a little now and also remember these days with great fondness. We worked so hard, with so much creative, passionate energy. Then recently I found a notebook filled with old sketches of dishes that I had either pitched to chefs I worked for or later made myself when I was writing my own restaurant menus. From my kitchen table, sipping on piñon coffee and hearing the wind chimes sing in the yard, I couldn’t help but notice that most of the ideas felt a bit flat. This is the gift of living and cooking in New Mexico. There is nothing flat about a blue corn enchilada topped with red chile, or better yet both red and green. I’m thinking of a few chefs here who take a contemporary approach to these ingredients, deconstructing them, and fitting them back together with an artist’s eye and heart. Still, the contextual richness remains. These foods reach deep into our sandy and silted soil, carrying with them a living history steeped in story, responsibility, family, and landscape.  

A finely ground cornmeal will have a flour-esque consistency and act as a soft binder with the pecan mixture, while a medium-ground cornmeal will add a little more crunch to the topping. You could also use masa harina (dough flour), where field corn is nixtamalized (cooked and soaked in an alkaline lime solution also called “cal”  which is calcium hydroxide, or sifted wood ash) before being dehydrated and pulverized into a powder. This process, invented by indigenous Mesoamericans more than 3,500 years is a culinary marvel—it makes niacin, also known as B-3, bioavailable, a vitamin that turns food into energy. Amino acids come to life, myotoxins and fungi are destroyed and what was once considered a risk to eat in large quantities, is now a nutrient filled food source. If you choose to use masa harina in your crumble topping, you can expect more depth of flavor as opposed to the brighter and lighter corn flavor or cornmeal. 

Brunch for a crowd

This is the perfect dish when you’re cooking breakfast or brunch for a crowd. I like to build it the night before, wrap it and keep it in the fridge. The next morning, while the oven is preheating, I remove the baking dish from the fridge so it can warm up a bit. This protects our baking dish from a drastic shift in temperature (cold to hot) which could cause damage to the baking dish.

Biscochito French Toast top view with fresh fruit
Print

Biscochito French Toast 

Biscochito French Toast another top view
Print Recipe
Pin Recipe

5 Stars 4 Stars 3 Stars 2 Stars 1 Star

5 from 1 review

This Biscochito French Toast recipe is entirely inspired by the state cookie of New Mexico, the biscochito (or bizcochito), and more specifically its spice combination of cinnamon, sugar, and ground anise seeds. This is the perfect dish when you’re cooking breakfast or brunch for a crowd.

  • Author: Marianne Sundquist
  • Prep Time: 15 mins
  • Cook Time: 45 mins
  • Total Time: 1 hour
  • Yield: 8-10 servings
  • Category: Breakfast
  • Method: baking
  • Cuisine: New Mexican

Ingredients

Units

for the crumble topping:

  • 1/2 c. pecans
  • 2 T. cornmeal (fine or medium grind), corn flour or masa harina
  • 1/2 c. packed brown sugar
  • 2 t. ground cinnamon
  • 3 T. butter, melted


for the french toast:

  • 2 T. butter, softened
  • 8 large eggs
  • 2 c. whole milk
  • 2 T. maple syrup
  • 1 T. vanilla bean paste or extract
  • pinch of salt
  • 1 t. ground anise seeds
  • 1 loaf challah bread, cut into 1-inch slices


for the mascarpone:

  • 8 oz. mascarpone cheese
  • 1/4 c. powdered sugar
  • 1–2 t. New Mexico red chile powder, depending on the heat
  • 2 t. Vanilla bean paste or extract


for serving:

  • Maple syrup with a few nubs of butter melted in a saucepan

Instructions

Preheat the oven to 375 F. Rub softened butter all over the bottom and sides of a large cast iron pan or 9×13 baking dish. First, make the crumble topping: In a small bowl, stir together the pecans, corn flour, brown sugar, cinnamon, and melted butter. Sprinkle half of the crumble topping across the bottom of your prepared pan. Reserve the rest.

Biscochito French Toast Prep
Prepping the crumble into the buttered pan

Now, prepare the egg mixture: In a bowl, whisk together the eggs, milk, maple syrup, vanilla, salt, and anise. Soak each slice of bread in the mixture and let it soak for around 15 seconds on each side. Transfer the slices to your buttered pan as you go and layer as you see fit depending on the size and shape of your pan. If there’s any remaining egg, pour it over the bread. Sprinkle the remaining crumble topping over the bread pieces and transfer this to the oven to bake for 45 minutes.

While the French toast is baking, make the mascarpone: whisk together the mascarpone, powdered sugar, red chile powder, and vanilla.

When the french toast comes out of the oven, either dollop the mascarpone over the top and serve family style, or you can cut pieces of the French toast and dollop each piece with the mascarpone. Drizzle with warm buttery maple syrup and enjoy!

Biscochito French Toast pouring maple syrup
Drizzle warm maple syrup over the dish before serving

Did you make this recipe?

Tag @highdeserttable on Instagram so we can cheer you on! 🌟

Nutrition values are estimates only. See the disclaimer here.

Rhubarb, Lavender, and Red Chile Crisp

Marianne Sundquist · April 3, 2023 · Leave a Comment

Aside from the perfectly ripe nectarine or plum, my favorite fruit for any baked good is rhubarb. It’s naturally tart and easily transitions into a perfect combination of sweet & sour with the addition of something sweet, in this case, brown sugar. If the idea of rhubarb on its own is too pucker-inducing for you, feel free to add strawberries, blueberries, apricots, or a sweet apple variety to mix it up. 

fresh rhubarb

There are a handful of flavors that go exceptionally well with rhubarb, so I would encourage you to think about what sounds exciting to you. Flavors like lemon, black pepper, ginger, rose, coconut, cardamom, cinnamon, and caramel are some of the first that pop to mind. In this version, I love bringing in elements of the Southwest in the form of lavender and red chile powder to the crisp topping. The floral notes from the lavender and the slight heat from the chile bounce off the bright fruit that has mellowed and melted into a decadent, slightly caramelized saucy delight.

fresh rhubarb
fresh rhubarb chopped and ready to go

Because the window for growing rhubarb outdoors is short, when I see it at the grocery store or the market it’s hard for me to pass up. It’s a fruit celebration of early spring and a reminder of the bounty of summer fruits ahead when rhubarb days will be a distant memory. When I make this at home we usually have it for dessert the first night with vanilla ice cream or fresh whipped cream. As if that is not wonderful enough, the next morning we pull the leftovers out of the fridge and have it for breakfast with a spoon of greek yogurt and a drizzle of raw honey. I still can’t decide which is my favorite.

Print

Rhubarb, Lavender and Red Chile Crisp

Rhubarb Lavender Red Chile Crisp with whipped cream
Print Recipe
Pin Recipe

5 Stars 4 Stars 3 Stars 2 Stars 1 Star

No reviews

The floral notes from the lavender and the slight heat from the chile bounce off the bright fruit that has mellowed and melted into this decadent, slightly caramelized rhubarb crisp.

  • Author: Marianne Sundquist
  • Prep Time: 25 mins
  • Cook Time: 50 mins
  • Total Time: 1.25 hours
  • Yield: 6 servings
  • Category: dessert
  • Method: baking
  • Cuisine: American

Ingredients

Units

for the filling:

  • 1 T. butter
  • 2# rhubarb, cut into 2” pieces
  • 1/2 c. brown sugar
  • 1 orange, zested

for the crisp:

  • 1 c. flour of your choice (All Purpose, coconut flour or almond flour)
  • 2 t. ground cinnamon
  • 2 t. New Mexico mild or medium red chile powder
  • 2 t. ground dried culinary lavender
  • 1 c. brown sugar
  • 1 c. rolled oats
  • 1/2 c. almond or pecan pieces
  • 1/2 c. melted butter

Instructions

Preheat the oven to 375 F. Butter a 9-10” baking dish, cast iron, or other oven-safe skillet.

In a large bowl mix together the rhubarb, brown sugar, and orange zest. Transfer this mixture to your buttered pan.

Rhubarb Lavender Red Chile Crisp - Dry Ingredients
Dry Ingredients

With your hands or a wooden spoon, stir together the flour, cinnamon, red chile powder, lavender, brown sugar, oats, nuts, and melted butter. With your hands, crumble this evenly over the top of the fruit.

Rhubarb Lavender Red Chile Crisp - pre baked
The rhubarb lavender red chile crisp prepped before baking

Bake the crisp for around 50 minutes or until the fruit is bubbling and the top is golden brown. Let it cool for ten minutes before spooning it into bowls and serving.

Rhubarb Lavender Red Chile Crisp - Baked
The crisp cooling in the skillet after baking

Did you make this recipe?

Tag @highdeserttable on Instagram so we can cheer you on! 🌟

Nutrition values are estimates only. See the disclaimer here.

Molten Chocolate Chile Cakes

Marianne Sundquist · March 13, 2023 · Leave a Comment

When it comes to dessert making, I have one thing on my mind: ease. Many variables are at play so let’s be honest, a lot can go wrong. There’s time, temperature, humidity, elevation, not to mention texture and stability to keep in mind. I think the key is to make desserts you love, make them often enough so it doesn’t feel like an invasive species has descended upon your kitchen, and try to do as much preparation in advance as you’re able. 

Of course, it’s fun to try new things. I am reminded of this every year when my boys announce their birthday cake requests. At some point very early on in parenthood (I think we thought it was cute?) I’d ask the kids what kind of cake they wanted. Then we started getting their answers and by then it was too late to turn back. “An ocean with fish”, “a volcano with lava”, “a 3-D droid”, etc. We have tried, and we have failed, but by some miracle, according to their delighted faces we have always managed to succeed. There is a time and place for all of that. But this isn’t it.

Here is one of the simplest desserts to make. This isn’t one of those dessert recipes that cuts a bunch of corners so regular folks can do it. This is a true pastry triumph. Not only is it easy to make, but it’s perfection lies in its simplicity. For chocolate lovers and valentine lovers, you can’t go wrong. My favorite thing about this recipe is that you can make the batter in the morning, and pull it out of the fridge an hour before you want to bake it. Then when everyone is finishing dinner, you throw them in the oven for 12 minutes or so, and voila! You’re suddenly transported to a French bistro for dessert.

This recipe launches off the sturdy foundation of the classic molten cake recipe from world-renowned French Chef Jean-Georges Vongerichten. The story goes that his wife fell for him when she tasted his Molten Chocolate Cake. The only variation here is the addition of cinnamon and red chile to give it that Southwestern high desert touch.

Print

Molten Chocolate Chile Cakes

Molten Chocolate Chile Cake Plated
Print Recipe
Pin Recipe

5 Stars 4 Stars 3 Stars 2 Stars 1 Star

No reviews

  • Author: Marianne Sundquist
  • Prep Time: 45 mins
  • Cook Time: 12 mins
  • Total Time: 1 hour
  • Yield: 4 individual cakes
  • Category: Dessert
  • Method: Baking

Ingredients

Units

For the cakes:

  • 1 stick, 4 oz. unsalted butter
  • 6 oz. bittersweet chocolate
  • 2 eggs
  • 2 egg yolks
  • 1/4 c. sugar
  • 1 t. Salt
  • 2 t. ground cinnamon
  • 2 t. ground red chile powder, depending on heat level
  • 2 T. All-Purpose Flour

For the ramekins

  • 4, 6 oz. ovenproof ramekins
  • 1 T. softened butter
  • 1 T. AP flour

Instructions

The batter can be made any time during the day and kept in the fridge until an hour before you are ready to bake. To make the batter, the first thing we are going to do is set up a double boiler. A double boiler is a medium saucepan filled with a couple of inches of simmering water. Then place a heat-proof bowl in the pot. You want to use a bowl that is small enough to slightly sink into the pot, but it should be 2-3 inches above the simmering water. You also don’t want to choose a bowl that’s so big it just balances precariously on top. The idea here is that we want to heat the bowl with steam.

Once your double boiler is ready to go, add the butter and chocolate to the bowl until melted. Whisk this melted mixture until smooth.

Molten Chocolate Chile Cake Folding Step 1

In a separate bowl beat the eggs, egg yolks, sugar, salt, cinnamon, and red chile vigorously with a large whisk, or at high speed with an electric mixer until the mixture is thick and pale. Turn off the heat, carefully remove the bowl from the double boiler and fold the egg mixture into the chocolate mixture, along with the flour.

Molten Chocolate Chile Cake Folding Step 2 and 3
Carefully folding the egg mixture into the chocolate mixture

The batter should be baked right away, or if made ahead of time, brought to room temperature before baking. They only take around 12 minutes to bake, so you will want to throw these in the oven towards the end of a meal.

Preheat the oven to 450 F. Prepare 4, 6 oz. oven-proof ramekins by spreading butter on the inside of each and dusting with flour. Tap out any excess flour. Set the prepared ramekins on a baking sheet. Spoon the batter evening between the four ramekins and bake for around 12 minutes, or until you see the sides of the cake start to firm up, but the centers still look soft. Let them cool for a minute and cover each one with an inverted dessert plate. Carefully turn them over, let them stand for 15 seconds and unmold them. Serve with fruit, whipped cream, or ice cream on the side.

Did you make this recipe?

Tag @highdeserttable on Instagram so we can cheer you on! 🌟

Nutrition values are estimates only. See the disclaimer here.

Simple Cinnamon Rolls

Marianne Sundquist · March 12, 2023 · Leave a Comment

Is it frivolous to spend a morning cooking or baking when the world seems to be falling apart? Not one bit. One of my favorite things about cooking is its ability to ground us — to home, to people around us, to ourselves, to gratitude, to our senses. It gets us away from the computer and into the kitchen. It quiets our minds, even for a bit. Normally, cinnamon rolls in our house are reserved for holidays or birthdays. But these days, I’m looking for every excuse to celebrate. A couple of weeks ago we made Thanksgiving dinner just for fun (and of course to eat leftovers throughout the week). I knew cinnamon rolls for breakfast would be the perfect way to kick things off. Starting the day with a batch of these beauties is sure to turn an ordinary day into an extraordinary one.

Variations to consider if you want to get creative: Sometimes I poke a hole in the dough before baking and fill them with spiced pastry cream, or add finely chopped almonds or pecans to the filling to add more texture. I would suggest making the dough and shaping them the night before you want to bake them. Then all you have to do is wake up in the morning, let them warm up a bit, and throw them in the oven.

Print

Simple Cinnamon Rolls

Simple Cinnamon Rolls Plated
Print Recipe
Pin Recipe

5 Stars 4 Stars 3 Stars 2 Stars 1 Star

No reviews

These easy cream cheese frosted cinnamon rolls can be prepped the night before with an overnight rise or made the morning of for a delicious breakfast treat.

  • Author: Marianne Sundquist
  • Prep Time: 2 hours
  • Cook Time: 25 minutes
  • Total Time: 3
  • Yield: 12 rolls
  • Category: Breakfast
  • Method: Baking

Ingredients

Units

for the rolls:

  • 3/4 cup milk, warmed
  • 2 1/4 teaspoon active yeast (1/4-ounce package yeast)
  • 1/4 cup granulated sugar
  • 1 egg plus 1 egg yolk, at room temperature
  • 1/4 cup butter, melted
  • 3 cup flour

for the filling:

  • 2/3 cup brown sugar
  • 1 1/2 tablespoon ground cinnamon
  • 1/4 cup butter, softened

for the cream cheese frosting:

  • 8 ounces cream cheese, softened to room temperature
  • 2 tablespoons butter, softened, softened to room temperature
  • 4 tablespoons real maple syrup
  • 1 teaspoon vanilla extract
  • Pinch of salt

Instructions

Make the dough: Add milk to the bowl and sprinkle yeast on top. The yeast will begin to foam in around five minutes. Add sugar, egg, egg yolk, and butter. Mix well. Add flour, salt, and stir with a wooden spoon until a dough begins to form. On a floured surface, knead the dough with your hands for 8-10 minutes. Transfer the dough ball to a buttered bowl, and cover it with a kitchen towel. Rise for one hour.

While the dough is rising make the filling: Mix together the butter, brown sugar & cinnamon in a small bowl. Reserve.

Make the frosting: In the bowl of a stand mixer fitted with a whisk, beat the cream cheese and butter together on medium speed until smooth, about 2 minutes. Add the maple syrup, vanilla, and a pinch of salt. Beat for 2 minutes. You can also make this by hand with a wooden spoon and some elbow grease.

Shape and bake the rolls: Transfer dough to a well-floured clean surface and roll out into a 14-by-9-inch rectangle. Spread filling on the dough, leaving a ¼-inch border. Tightly roll the dough up, starting from the long side, and place the seam side down. Cut into 2-inch slices with a sharp knife. You should yield 12 rolls.

Simple Cinnamon Rolls - cutting the rolled dough

Line a large cast iron pan or 9” baking dish with parchment paper. Place rolls in the dish and cover with plastic wrap and let rise again for 30 minutes. (At this point you could also put them in the fridge overnight and then pull out the next day 30 minutes before baking.) Bake in a 350 degree oven for 25 minutes or until just slightly golden but cooked through. Allow them to cool for around five minutes before frosting.

Simple Cinnamon Rolls before baking

Did you make this recipe?

Tag @highdeserttable on Instagram so we can cheer you on! 🌟

Nutrition values are estimates only. See the disclaimer here.

  • « Go to Previous Page
  • Page 1
  • Page 2
  • Page 3

High Desert Table

Copyright © 2025 · High Desert Table

  • Privacy Policy
  • Nutrition Disclaimer