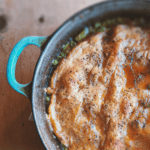
• Skip to primary navigation
  • Skip to main content
High Desert Table

High Desert Table

Your everyday guide to Southwestern cooking

  • Home
  • Recipes
  • About
  • Shop
  • Private Events
  • Contact
  • Show Search
Hide Search

baking

Green Chile Stacked Enchiladas

Marianne Sundquist · January 24, 2024 · Leave a Comment

It’s a humbling and majestic thing to live in New Mexico as an Italian chef from the Midwest. It’s like landing on a different culinary planet. A planet where flavors transcend, reach deeply into the land and sky, and then reappear in a simmering pot of green chile sauce.

Enchanted lavender

A good example of this is lavender. I mostly had experienced lavender in restaurant kitchens as an unexpected flavor profile meant to wow guests, or by getting a whiff from a lotion or candle in a city shop. For almost twenty years I considered it to be my least favorite smell and taste. Then four years ago I moved to New Mexico. There were two different varieties of lavender in my yard and they smelled nothing like I expected. The high floral notes were grounded with traces of grass and wood, soft musk, and worn leather. The flowers were not alone like I had often seen them. They were part of a family, connected to long green stalks and twisting roots. They were growing next to chives and mint. Honeysuckle grew a few feet away. Sometimes there were other scents too, like roasting chiles and pinion fires wafting around and through wooden fence slats from neighboring yards. In the summer with all these high desert scents bumping and bouncing off each other, for the first time, lavender didn’t just make sense and smell good. I was enchanted. It became one of my favorite flavors of all time.

The Southwest is a melting pot

Because of this interconnected Southwest ecosystem where history, ingredients, landscape, and people meet, learning about New Mexican food feels like an extraordinary gift. With Christmas around the corner, I wanted to share a very special recipe from a very special Chef. Over the past number of months, I have had the privilege of learning about Native New Mexican cuisine from Dr. Lois Ellen Frank and Walter Whitewater through virtual culinary tours hosted by Heritage Inspirations. Lois has spent over 25 years documenting the foods and lifeways of Native American tribes from the Southwest and regions throughout the Americas. In 2007, she started a Native American Cuisine catering company named Red Mesa. I’m so grateful she was willing to share her recipes for Green Chile sauce, Tortillas, and Stacked Enchiladas with us here.

Since the pandemic Red Mesa has gone virtual and is offering hands-on cook-along cooking classes, demonstration-style cooking classes, and holiday family classes, along with a beautiful collection of local food products, cookbooks, and posters available on the website.

“When you cook together as a family, it unifies your bond and calls in the wisdom of the ancestors.”

Lois Ellen Frank
 Lois Ellen Frank and Walter Whitewater
Print

Green Chile Stacked Enchiladas

Green Chile Stacked Enchiladas - Plated with sauce
Print Recipe
Pin Recipe

5 Stars 4 Stars 3 Stars 2 Stars 1 Star

No reviews

Spice up your dinner routine with this easy-to-follow and mouthwatering green chile stacked enchiladas recipe. This authentic recipe features roasted New Mexico or Anaheim Green Chiles, flavorful corn tortillas, succulent rotisserie chicken, and a generous layer of melted Jack Cheese.

  • Author: Marianne Sundquist
  • Prep Time: 1 hour
  • Cook Time: 30 mins
  • Total Time: 1.5 hours
  • Yield: 10-12 servings
  • Category: Dinner
  • Method: Bake
  • Cuisine: New Mexican

Ingredients

Units

For the Green Chile Sauce: 

  • 6 cups New Mexico or Anaheim Green Chiles, Roasted, Peeled, & Chopped
  • 1 28 oz can chopped tomatoes
  • 1 Tablespoons Sunflower Oil
  • 1 Medium White Onion, diced (approximately 2 cups)
  • 1 Tablespoon chopped garlic (approximately 6 to 8 cloves)
  • 2-teaspoons kosher salt
  • 1/4 teaspoon freshly ground black pepper
  • 2 cups water


For the Corn Tortillas: 

  • 3 cups Corn Masa Flour for Tortillas (this can be found in your supermarket in the Latin food section)
  • 1 1/2 teaspoons kosher salt (or to taste)
  • 1 1/2 cups warm water


For the Enchiladas: 

  • 1 Rotisserie Chicken, (meat picked from the bones)
  • 4 3/4 cups Jack Cheese, grated

Instructions

Make the Green Chile Sauce

Using the open flame method, roast the green chiles until completely charred and then place in a glass or metal bowl covered with plastic wrap to allow the chiles to sweat and cool down. Once the chiles have cooled, peel, seed, and chop them.

In a medium size saucepan, heat the sunflower oil until hot but not smoking. Sauté the onion over medium to high heat until it begins to brown. About 3 minutes. Add the garlic and sauté for another minute. Add the tomatoes and cook for another 5 minutes stirring to prevent burning. Add the chopped green chile and sauté for another 3 minutes. Add the water and bring to a boil. Reduce the heat and simmer for approximately 15 minutes.

Add the salt and pepper to taste. Remove from heat.

In a blender place half the sauce and blend on high for several minutes until completely smooth. Return the blended mixture to the saucepan with the unblended sauce. Makes approximately 2 ½ quarts sauce for the enchiladas with some sauce on the side.


For the Corn Tortillas

In a medium-sized mixing bowl, combine the corn flour, salt, and water and mix together until you have formed a dough. You can do this with a spoon, but I always use my hands. After the ingredients are completely mixed, use your hands to form balls just smaller than a golf ball and set aside. Preheat your seasoned cast iron skillet so that it is very hot.

In a tortilla press, place one ball in the center of the tortilla press and press together to make one corn tortilla. I use a plastic bag that I cut in half leaving a seam on one side so that I can place the corn masa ball inside the plastic so that it doesn’t stick to the tortilla press. Remove the tortilla from the plastic place it on the cast iron skillet and cook the first side of the tortilla for 30 to 45 seconds, then turn it over and cook for approximately 30 to 40 seconds and cook until it puffs and that is the sign that the tortilla is done.

Place the cooked tortilla in a kitchen towel inside a basket or bowl and prepare the next tortilla following the same steps. Stack the tortillas on top of each other to keep them warm inside the towel. Makes approximately 21 tortillas.

Homemade Tortillas in a bowl

Bake

Preheat your oven to 350 degrees. In a casserole pan or half-hotel pan, layer some green chile sauce to cover the bottom of the pan. Place tortillas on top of sauce (approximately 7 tortillas). Spoon more of the green chile sauce on top of the corn tortillas. Evenly place 1/3 the amount of shredded cooked chicken on top of the green chile sauce and then top with 1 ½ cups of the shredded jack cheese.

Begin another layer. First the corn tortillas (approximately 7 tortillas). Spoon some green chile sauce on top of the tortillas. Evenly place the second 1/3 of the shredded cooked chicken on top of the sauce. Top with another 1 ½ cups of the shredded jack cheese.

Begin the final layer. Place the corn tortillas on top to start the next layer (approximately 7 tortillas). Spoon some green chile sauce on top of the tortillas. Evenly place the final 1/3 of the shredded cooked chicken on top of the sauce. Top with the final amount 1 ¾ cups of shredded jack cheese. Place in the pre-heated oven and bake until the cheese browns and you see bubbles on the side of the pan approximately 30 minutes. Serve immediately.

Notes

The bones can be made into chicken stock. Here is a recipe for homemade rotisserie chicken stock.

Did you make this recipe?

Tag @highdeserttable on Instagram so we can cheer you on! 🌟

Nutrition values are estimates only. See the disclaimer here.

This Rotisserie Chicken Stock - in a bowl

Rotisserie Chicken Stock

Create a rich and flavorful chicken stock by simmering a leftover Rotisserie chicken with aromatic vegetables, such as onions, carrots, and celery. This Rotisserie Chicken Stock is a savory and versatile base for soups, stews, and sauces.

Get the Recipe

Discover Santa Fe’s Sweet Haven: Chainé’s Piñon Chocolate Chip Cookies

Marianne Sundquist · December 20, 2023 · Leave a Comment

A few blocks west of the plaza, nestled between Palace Avenue and San Francisco Street you’ll find Burro Alley, paved with cobblestones and the resonance of old Santa Fe. At one point the alley served as a place for burros to park and unload firewood. Now it’s a quiet, pedestrian-friendly, just off-the-beaten-path home for a handful of local businesses.

One of my favorite shops in town, Modern Folk Ware owned by potter Jennie Johnsrud, recently moved next door to Chainé, a dessert shop owned by Chainé Pena with creative, made-from-scratch, small-batch French macarons and cookies. Both shops have loyal and passionate followings so it feels almost too good to be true that now they are right next door to each other.

Chaine - Speciality Cookies Shop in Santa Fe
photo credit Chaine Pena

On the day I walked in with my kids to celebrate their last day of school for the year, Pena, a 6th generation Santa Fean, had just pulled a batch of biscochitos from the oven. Her mom was helping her in the open kitchen, while my boys carefully eyed an array of generously portioned cookies and row after row of colorful macarons. They eventually both made the same choice — a bright red “Santa” macaron, filled with a chocolate cookie & mint cream.

So when Pena offered to share her famous Pinon & Chocolate Chip Cookie recipe with all of us here, it felt like such a gift. Pena started baking as a hobby before she took a macaron baking class in France where she fell in love with this technically intricate cookie. When she began posting her creations on social media and people started asking if they could place orders, it’s then she knew she was on the right path. Pena says,

Chaine Pena with macaron - Santa Fe
photo credit Isaiah Hererra

Unexpected flavors

“I love that cookies are a straightforward treat that most people love. What really makes me excited about my cookie offerings is playing with texture and flavor to create something a little different like our lemon meringue cookie or creme brulee. It’s fun to pack an unexpected dessert flavor into a few inches of a cookie.”

Thankfully for us, she is giving us one of her most beloved recipes for the always classic chocolate chip cookie spiked with a hefty dose of piñon nuts.

Chainé is open 11am-3pm Wednesday through Saturday at 38 Burro Alley. Macarons and Cookies can also be preordered on the Chainé website or via email at chainescookies@gmail.com.

Chaine Macarons with flowers
photo credit Chaine Pena
Print

Discover Santa Fe’s Sweet Haven: Chainé’s Piñon Chocolate Chip Cookies

Pinon Chocolate Chip Cookies - hand holding a stack of cookies
Print Recipe
Pin Recipe

5 Stars 4 Stars 3 Stars 2 Stars 1 Star

No reviews

Explore the charming Burro Alley in Santa Fe, where Modern Folk Ware and Chainé create a sweet haven for locals. Dive into the story of Chainé Pena’s passion for desserts and her famous Piñon Chocolate Chip Cookies. Learn the art of baking these treats at home with Chainé’s exclusive recipe.

  • Author: Marianne Sundquist
  • Prep Time: 1.25 hours
  • Cook Time: 15 minutes
  • Total Time: 1.5 hours
  • Yield: Around 30 cookies
  • Category: Dessert
  • Method: bake

Ingredients

Units
  • 1 c. unsalted butter, room temperature, and the best quality you can get your hands on
  • 3/4 c. light brown sugar, loosely packed
  • 1/2 c. granulated sugar
  • 2 large eggs
  • 2 t. vanilla paste or extract
  • 2 1/2 c. all-purpose flour, her favorite is Bob’s Red Mill
  • 1 t. baking powder
  • 1 t. baking soda
  • 1/2 t. sea salt, she uses pink
  • 2 t. cornstarch
  • 2 c. semi-sweet chocolate chips, her favorite is Ghirardelli 5mm baking chips
  • 2 c. piñon nuts, unsalted & shelled

Instructions

In a stand mixer with a paddle attachment (or with a wooden spoon by hand), cream together the butter, brown sugar, and granulated sugar until it’s fluffy and fully incorporated.

Stir in the eggs and vanilla. Scrape the sides of the bowl one to two times between mixing to ensure all the butter and sugar remnants combine with the eggs.

In a separate bowl, using a sifter or a fine mesh strainer, sift the flour, baking powder, baking soda, sea salt, and cornstarch. Add ¾ of the dry mixture to the wet. Mix just until it slightly comes together. Add the chocolate chips and the nuts to the remaining flour mixture and give them a toss. (this step helps the chocolate and nuts disperse evenly throughout the dough).

Using a cookie scooper, a large tablespoon, a ¼ c. measuring cup, or a scale (about 2 oz) portion out rounds of dough. Refrigerate pre-portioned cookie dough for 45 min to one hour.

Time to bake! Preheat your oven to 375. On a parchment-lined cookie sheet place your cookies and give them plenty of room to grow. Bake for about 11 – 13 minutes until the edges and top are just browned. Allow cookies to cool for at least 10 minutes. Store in an airtight container.


Did you make this recipe?

Tag @highdeserttable on Instagram so we can cheer you on! 🌟

Nutrition values are estimates only. See the disclaimer here.

Chaine - Speciality Cookies Shop Santa Fe - Macarons
photo credit Chaine Pena

Easy Apple Crisp Crumble: Quick, Delicious, and Perfectly Sweet

Marianne Sundquist · December 4, 2023 · Leave a Comment

There are few desserts as satisfying as an apple crisp. Within minutes of hitting the oven, the scent of baking apples, spice, and toasted oats fills the kitchen in the most delightful way. Over the last week I’ve been in the kitchen cooking all kinds of foods and out of everything I made last week, this easy apple crisp crumble not only emerged as the favorite sweet treat at dessert time, it was also the easiest and fastest thing I made. It comes together in less than 30 minutes and then takes another hour in the oven. I love to build it the day before and pull it from the fridge 30 minutes before baking it the next day.

You’ll notice that this recipe calls for a light sprinkle of High Desert Salt right before it goes in the oven. This is a blend I make and includes flakey sea salt, lavender, red chile, and green chile powders, but feel free to experiment with any combination of these ingredients you have on hand.

Naturally Sweet

The entire recipe uses only one cup of brown sugar and makes a crisp that fills the largest size of all my baking dishes, a 9”x13” rectangle. Because of the natural sweetness of the apples, this is all that’s needed and I think it’s a pretty special dessert for this reason alone. Hot from the oven, we spooned vanilla ice cream on top, and over the next few days, we enjoyed leftovers cold for breakfast with plain greek yogurt.

Easy Apple Crisp Crumble - Fresh Apples on a marble slab
Print

Easy Apple Crisp Crumble: Quick, Delicious, and Perfectly Sweet

Easy Apple Crisp Crumble in a ceramic bowl with ice cream
Print Recipe
Pin Recipe

5 Stars 4 Stars 3 Stars 2 Stars 1 Star

No reviews

Indulge in the delightful aroma of baked apples with this easy apple crisp crumble recipe. A quick and satisfying dessert that takes less than 30 minutes to assemble, featuring a delicious blend of spices and a crunchy topping. Perfect for any occasion, and the natural sweetness of the apples makes it a special treat. Try it with a sprinkle of High Desert Salt for an extra flavor kick!

  • Author: Marianne Sundquist
  • Prep Time: 30 mins
  • Cook Time: 1 hour
  • Total Time: 1 hour 30 minutes
  • Yield: 8-10 servings
  • Category: dessert
  • Method: bake
  • Cuisine: American

Ingredients

Units

For the filling:

  • 8 good-sized firm apples, peeled, cored, and diced
  • 1/2 c. packed brown sugar
  • 1 T. vanilla extract
  • 1/4 c. all-purpose flour
  • 1 T. pumpkin spice blend (or a mix of cinnamon, nutmeg, clove)
  • pinch of salt

For the topping:

  • 1 c. old fashioned oats
  • 1/2 c. all purpose flour
  • 1/2 c. cornmeal
  • 1/2 c. packed brown sugar
  • 1 t. ground cinnamon
  • 1 stick of salted butter, melted

For assembling:

  • 2 T. butter, room temperature
  • Sprinkle of High Desert Salt (optional)

Instructions

Preheat the oven to 350 f.

Easy Apple Crisp Crumble - peeled apples - PIN

First, make the filling

In a large bowl stir together the apples, brown sugar, vanilla, all-purpose flour, pumpkin spice blend, and a pinch of salt.

Easy Apple Crisp Crumble - chopped ingredients in a dish

Next, make the topping

In a medium bowl, stir together the oats, all-purpose flour, cornmeal, packed brown sugar, ground cinnamon, and melted butter.

Easy Apple Crisp Crumble - ready for the oven

Assemble the crisp

Rub butter all over the bottom and sides of a 9”x13” baking dish (or one of a similar size). Pour in the filling and top with the crisp mixture. Sprinkle the top of the crisp with High Desert Salt (if using) and bake for around one hour, or until the top is golden brown and the sides are bubbling. Let cool for ten minutes before serving.

Easy Apple Crisp Crumble in a ceramic bowl with ice cream

Did you make this recipe?

Tag @highdeserttable on Instagram so we can cheer you on! 🌟

Nutrition values are estimates only. See the disclaimer here.

New Mexico-Inspired Thumbprint Cookies with Pecans and Raspberry Jam

Marianne Sundquist · November 10, 2023 · 2 Comments

We are entering the time of year when the smell of cookies baking in the oven just feels right. Yesterday I started making these New Mexico-Inspired Thumbprint Cookies as my husband and kids were getting ready to run some errands around town. The dough came together so quickly that by the time I put it in the fridge to rest, the kids were still getting dressed. Those of you with kids will understand when I say that thirty minutes later the cookie dough was fully rested and ready for rolling into balls, and my kids were looking for their socks and shoes.

All of this is to say that making these cookies is easier than you might expect and takes less time than it takes some people to get dressed. I did notice both my husband and the kids keeping an eye on the kitchen timer, so maybe they were carefully planning the timing the whole time. After all, they all were able to grab a warm cookie on their way out the door.

An Unexpected Love for Thumbprint Cookies

I’ve been thinking about thumbprint cookies for a long time. I never really thought about how much I love these buttery, jam-filled cookies until I had one of Dolina’s Polish Tea Cookies filled with either orange marmalade or raspberry jam. As with many food (and life) discoveries, sometimes it takes one extraordinary moment of noticing to change how you see something forever. I know this sounds dramatic but it’s true. Since I do not have much of a sweet tooth, my mind doesn’t gravitate toward desserts the way it does to cheese, fresh bread, popcorn, or butter. Before tasting this cookie at Dolina, I had never given this style of cookie a second thought. But since then, a new room in my mind went under construction and recently opened, dedicated entirely to this delightful cookie.

I learned that while many people call them Thumbprints, they are also referred to as Polish Tea Cakes, Jam Drops, Butter Balls, Hallongrotta (Swedish for “raspberry caves”), and Niçois Suns, a French version made with almond paste, apricot jam, and pistachios.

The version here touches on the classic approach to a shortbread-esque type of cookie but we handle it a bit differently and include an egg yolk for stability and a very slight textural chew.

The Importance of Precision: Weighing Ingredients for Baking

You’ll notice that I include the weight measurement in grams for both the flour and the pecans. So if you happen to have a scale, I encourage you to use it. If not, don’t worry. Weighing ingredients is the most accurate method of measuring and this is particularly important in baking. If you use a measuring cup for the flour, just be sure to scoop a heaping amount into your measuring spoon and scrape off the excess with a butter knife.

Infusing New Mexico Flavors

I had lots of fun thinking about the flavors of New Mexico and this specific time of year. I used pecans from CLC Pecans grown in Lovington, New Mexico, and filled each cookie with a small spoonful of Heidi’s Raspberry Jam, both of which I purchased at The Santa Fe Farmers Market. I added cinnamon, anise (inspired by the beloved biscochito cookie), and a touch of lavender to the dough. The final result might be my new favorite holiday cookie.

Thumbprint Cookies - with a jar of Heidi's Raspberry Jam

This particular recipe is relatively small. The cookies I made were on the bigger side and the recipe yielded 16 cookies. I could have made them smaller and the yield could have easily jumped to around 20. This is entirely up to you. The size of the cookies you make will directly influence the time it takes to bake. So I would say that 15-25 minutes is the window. Keep an eye on them and trust your instincts. You want to look for golden brown bottom edges and remember—they will firm up as they cool.

Print

New Mexico-Inspired Thumbprint Cookies with Pecans and Raspberry Jam

New Mexico-Inspired Thumbprint Cookies - plated with raspberry jam
Print Recipe
Pin Recipe

5 Stars 4 Stars 3 Stars 2 Stars 1 Star

5 from 1 review

Discover a delightful twist on a classic with these New Mexico-inspired thumbprint cookies. This recipe incorporates pecans and Heidi’s Raspberry Jam for a unique holiday treat. Learn how to achieve the perfect texture and taste, and explore the versatility of this beloved cookie style.

  • Author: Marianne Sundquist
  • Prep Time: 35 mins
  • Cook Time: 25 mins
  • Total Time: 1 hour
  • Yield: 12-20 cookies
  • Category: dessert
  • Method: bake
  • Cuisine: New Mexican

Ingredients

Units

for the cookies:

  • 1 1/4 c. (150 g.) all purpose flour
  • 1 c. (120 g.) pecan pieces
  • 1 t. kosher salt
  • 1 t. ground cinnamon
  • 1 t. anise seed
  • 1/2 t. dried culinary lavender buds (optional)
  • 1/2 c. (1 stick) unsalted butter, softened to room temperature
  • 2 large egg yolks
  • 1 t. vanilla extract or paste
  • 2/3 c. granulated sugar

for the filling:

  • 1/4 c. jam of your choice

Instructions

Line a large baking tray with a silicone baking mat or parchment paper.

Thumbprint Cookies - Ingredients prepped and ready to mix

In a very dry blender, add the flour, pecans, salt, cinnamon, anise seed and lavender. Blend until the flour mixture looks relatively smooth. It’s ok if you see a few pecan pieces throughout.

Mixing the ingredients

In the bowl of a stand mixer with the paddle attachment (or a large bowl with a wooden spoon), beat together the butter, egg yolks, vanilla, and sugar until light and fluffy. You will need to use a rubber spatula to scrape the sides down a couple of times until the mixture comes together. Add the flour mixture and mix until the dough just comes together. If it looks a little crumbly, it’s ok. It will come together more as it rests. Cover and let the dough rest in the fridge for 30 minutes.

Thumbprint Cookies - dough balls on a baking sheet

Making the thumbprints

Preheat the oven to 350 f.  After the dough has rested, use your hands to roll pieces of dough into (evenly sized) balls and place them around 2 inches apart on your prepared baking sheets. Make an indentation around halfway down the dough with your thumb or the back of a wooden spoon. Fill each “cave” with jam.

Thumbprint Cookies - making the thumb prints and adding the jam

Baking the cookies

Bake for 15-25 minutes, until the bottom edges are turning golden brown. Remove from the oven and let sit for a few minutes. Use a spatula to transfer them to a wire cooling rack. Let cool for at least five minutes before taking a bite as the jam will be piping hot.

Did you make this recipe?

Tag @highdeserttable on Instagram so we can cheer you on! 🌟

Nutrition values are estimates only. See the disclaimer here.

High Altitude Pumpkin Spice & Olive Oil Bundt Cake

Marianne Sundquist · October 14, 2023 · Leave a Comment

This weekend I went on a hike with a friend and saw the first cluster of leaves turning gold. I stopped at the store, picked up a can of pumpkin puree, and headed home, knowing that I’d have all of the other ingredients I needed to whip up this hearty dose of pumpkin and spice.

It’s true, the basic components for this recipe are foods you probably already have hanging around. But over the past couple of years, after a few too many sitcom-worthy basking fiascos, I have taken a deep dive into baking at high altitude. 

High elevation technique

Santa Fe sits at just over 7,000 feet at its lowest points. And since baking is affected as low as 3,000 feet in elevation, there is no way of getting around it here. The first thing I learned is that as we travel higher in elevation, air pressure decreases. And air pressure is what makes our understanding of general baking rules, proportions, time, and temperatures what it is. Low air pressure is what causes water to boil at lower temperatures (at 7000 feet, 198.9 F. to be exact) and in baking it does two main things: it causes liquids to evaporate faster and makes baked goods rise faster and easier. I now understand that my exploding cakes were the result of high pressure rising so quickly that the cell walls inflated and burst.

To remedy this I employ a few well-known high elevation techniques: I decrease leavening agents (here the baking powder and baking soda) and sugar a bit, I increase liquid, and just for added cellular structure, I usually add an extra egg. Then I send the cakes into the oven with hope and good wishes and try my very best not to open the oven door to take a peek until it’s time. 

Weighing ingredients

A good pastry chef almost always weighs their ingredients instead of measuring them since this is the most accurate way to bake. I love the idea of this and agree that it’s undoubtedly the best way to ensure consistent bakes. I approach a hybrid version, where I weigh the ingredients that are most likely to vary between weighing and measuring. Here, it’s the flour. It doesn’t take much for flour to settle into a measuring cup and significantly alter the final amount being used. I keep a small digital scale in a drawer and pull it out for this very reason. Other baking ingredients like cane sugar and even packed brown sugar are more measuring cup friendly.  

No bundt, no problem

I’m happy to report that this Pumpkin and olive Oil Cake responded well and finished baking at exactly the one-hour mark. If you don’t have a bundt cake pan, it’s ok! A loaf pan, two regular cake pans, or even a 9×13 baking dish will work. A number of years ago, my mother-in-law gifted me this heavy-duty bundt pan, so I love any excuse to put it to use. 

An autumn glaze

For the glaze, I keep it simple with brown butter and pumpkin spice, but if I’m honest, I wanted to add some red chile powder. I didn’t want my kids’ noses to turn up at “mama’s spicy cake” so I left it out this time. Another addition that would be lovely, is a light sprinkling of pumpkin seeds, pinon nuts, or pecans on top of the glaze right after it’s poured and before it’s had a chance to dry.

I’ll leave these important decisions up to you.

Print

High Altitude Pumpkin Spice & Olive Oil Bundt Cake

Glazed Pumpkin Bundt Cake
Print Recipe
Pin Recipe

5 Stars 4 Stars 3 Stars 2 Stars 1 Star

No reviews

This olive oil bundt cake recipe contains a hearty dose of pumpkin and spice making it the perfect dessert treat for fall with friends. 

  • Author: Marianne Sundquist
  • Prep Time: 1.5 hours
  • Cook Time: 1 hour
  • Total Time: 3 hours
  • Yield: 1 bundt cake
  • Category: dessert
  • Method: bake
  • Cuisine: american

Ingredients

for the cake:

  • 3 c. (360 g.) all-purpose flour
  • 1 t. baking soda
  • 1 1/2 t. baking powder
  • 1 T. pumpkin spice
  • 1 1/2 c. brown sugar
  • 3/4 c. olive oil
  • 3 eggs, room temperature
  • 3/4 c. sour cream
  • 1 (15 oz.) can of pumpkin puree

for preparing the pan:

  • olive, coconut or avocado oil spray
  • 1/4 c. can sugar

for the brown butter glaze:

  • 2 T. salted butter
  • 1/4 c. maple syrup
  • 1 c. powdered sugar

Instructions

Preheat the oven to 350 F.

In a medium bowl, whisk together the flour, baking soda, baking powder, and pumpkin spice. 


In a separate bowl of a stand mixer with a whisk attachment, add the brown sugar, olive oil, and eggs. Whisk over medium speed until the mixture is light and fluffy, around five minutes. 


Turn off the mixer and add the sour cream and pumpkin puree. Whisk again for a couple of minutes. Turn off the mixer again and add the flour mixture. Turn on the mixture for just another minute or so, until everything comes together.


Right before you are ready to bake the cake, prepare the bundt pan: Generously spray the inside of the bundt pan with the oil spray. Now sprinkle the can of sugar all around and knock out any excess in the sink. Pour in the batter, using a spoon or spatula to help guide you around the center of the pan. Bake for one hour, or until a paring knife inserted comes out clean.


Let the cake rest in the pan for 15 minutes before inverting it onto a cake stand or a cooling rack. Let the cake cool completely before pouring on the glaze.


After the cake is cool, make the glaze (so it doesn’t harden):  In a small saucepan over medium heat, melt the butter. Let it start to bubble until the color shifts from golden yellow to golden brown. When folks first make brown butter it can be tempting to stop as soon as you see the color start to change. I encourage you to keep a close eye on the butter, but let it deepen just a shade or two more. We don’t want it to turn black and burn, but your patience will be rewarded if you can hold out for a deeper brown, trust me. Turn off the heat and carefully pour the brown butter into a bowl or pitcher. Whisk in the maple syrup and powdered sugar until smooth. The glaze should be thick but pourable.  

Pumpkin Bundt Cake - pouring the frosting glaze
Pumpkin Bundt Cake – pouring the frosting glaze

Pour the glaze over the top of the cake, slowly turning the cake stand or plate as you go. Wherever you want the glaze to drip down, just slightly pause moving the cake stand before continuing around to glaze the entire cake.

A Slice of Pumpkin Bundt Cake

Did you make this recipe?

Tag @highdeserttable on Instagram so we can cheer you on! 🌟

Nutrition values are estimates only. See the disclaimer here.

  • « Go to Previous Page
  • Page 1
  • Page 2
  • Page 3
  • Go to Next Page »

High Desert Table

Copyright © 2025 · High Desert Table

  • Privacy Policy
  • Nutrition Disclaimer