• Skip to primary navigation
  • Skip to main content
High Desert Table

High Desert Table

Your everyday guide to Southwestern cooking

  • Home
  • Recipes
  • About
  • Shop
  • Private Events
  • Contact
  • Show Search
Hide Search

dinner

Grilled Pork & Pineapple Tacos with Ancho Chile Marinade

Marianne Sundquist · July 8, 2025 · Leave a Comment

Grill season is here, and I notice it changes how I think about meals for the week. What can we grill up on the Cowboy Cauldron so we don’t have to think about cooking for a while, is how it sounds in my head. This recipe for Grilled Pork and Pineapple Tacos will fly at any kind of party, but also last a few days for a single household. It takes a little time to make the ancho marinade, but it should be noted that this component can easily be doubled or even tripled (with very little extra time added) and then put in containers in the freezer for other cooking scenarios in the future, like rubbing over a whole chicken before roasting, or marinating beef or chicken.

The Inspiration: A Nod to Tacos Al Pastor

This recipe is completely inspired by my love of Tacos Al Pastor, a method of taco making that came to life in the 1930s in Puebla, Mexico, when Lebanese immigrants introduced their shwarma-making, vertical cooking spits to the area. Eventually, lamb turned to pork marinated in chiles and anchiote, the earthy, slightly peppery seed of the evergreen Bixa orellana shrub, which gives cheese, Cochinita Pibil Tacos, and Tacos Al Pastor their distinct orange color. 

chef-grilling-pork-pineapple-tacos

There is something magical that happens when cooking meat on a vertical spit. There is also something magical that happens when I cook anything on the Cowboy Cauldron. 

You’ll notice that you can either use thinly sliced pork shoulder (the classic choice) or pork tenderloin. The tenderloin is a leaner cut and holds the marinade well.

pork-on-the-cowboy-cauldron

The Power of Pineapple & Fire-Roasted Chiles

Here, I focus on dried ancho chiles as the base of the marinade and add fire-roasted green chile to the mix of grilled pork and pineapple. Feel free to add sour cream, cheese, or avocado if you want, but simply topping it with cilantro and onion gets the job done.

pineapple-on-the-grill
Print

Grilled Pork and Pineapple Tacos with Ancho Chile Marinade

grilled-pork-and-pineapple-in-bowl
Print Recipe
Pin Recipe

5 Stars 4 Stars 3 Stars 2 Stars 1 Star

No reviews

A vibrant summer recipe inspired by Tacos Al Pastor—these Grilled Pork & Pineapple Tacos feature an ancho chile marinade, charred pineapple, and roasted green chiles for a flavor-packed twist on tradition.

  • Author: Marianne Sundquist
  • Prep Time: 1 hour
  • Cook Time: 30 mins
  • Total Time: 1 hour 30 minutes
  • Yield: 6-8 servings
  • Category: bbq
  • Method: grilling
  • Cuisine: Mexican

Ingredients

Units

for the marinated pork

  • 6 dried ancho chiles, stemmed and seeded
  • 6 cloves of garlic, peels left on
  • 2 t. high desert herbs or oregano
  • 2 t. kosher salt
  • 1 t. ground coriander
  • 1/2 t. ground black pepper
  • 1/2 t. ground Mexican canela or cinnamon
  • 1/4 c. apple cider vinegar
  • 1/4 c. olive oil or vegetable oil
  • 1 T. agave or honey
  • 1/4 pineapple, peeled, cored, and sliced
  • 2 lb. pork shoulder or pork tenderloin, sliced into 1/4” slices

for the tacos

  • 5 fire-roasted New Mexico green chiles, ananehim, or poblanos, stemmed, peeled, seeded, diced
  • The remaining 3/4 of the pineapple, cut into wide slices
  • 1 medium white onion, minced
  • 1 bunch of cilantro leaves, minced
  • warm corn tortillas

Instructions

First, let’s make the marinade:

In a large skillet over medium heat, toast the chiles for around a minute on each side, pressing them with tongs or a spatula until their oils are activated (they will smell amazing!) and their skins soften. Place them in a bowl and cover them with hot tap water for 15 minutes, and then drain them. While the chiles are soaking, place the garlic in the hot, dry skillet and toast until the skins start to darken on all sides and then turn off the heat and transfer to a bowl. When they are cool enough to handle, peel the garlic cloves and add them to a blender. Also, to the blender, add the rehydrated chiles, dried high desert herbs (or oregano), salt, coriander, pepper, canela or cinnamon, apple cider vinegar, oil, agave or honey, and pineapple slices. Blend until smooth. Spread this marinade over the pork slices and refrigerate overnight.

Grilling and assembling the tacos

Heat your coals in the cauldron to a medium-high heat. Grill the pork until it’s cooked through on both sides, by sight or to an internal temperature of 145°F. Let rest, chop into pieces. Also, grill the pineapple until it has some nice char on both sides. Carefully transfer the pineapple to a cutting board, chop it, and add it to the bowl with the pork. Stir in the fire-roasted green chile. Serve warm tortillas, onion, and cilantro on the side.

grilled-pork-pineapple-with-sides

Did you make this recipe?

Tag @highdeserttable on Instagram so we can cheer you on! 🌟

Nutrition values are estimates only. See the disclaimer here.

Easy Bearnaise Sauce

Marianne Sundquist · January 15, 2025 · Leave a Comment

Every recipe has a story. How I would have loved to be a bird in a tree outside of my great grandmother’s house in Queens, perched at the kitchen window with her cooking inside. What recipes does she remember? How did her cooking change because of her life as a single mom? What recipes came from Italy and what recipes came from newspaper clippings? How did her mother make tomato gravy? Who was the first person in my family to make our beloved “meat pie” or add a pinch of nutmeg to ricotta before adding it to lasagna? These are questions I will never have answers to, but this collection of breadcrumbs make a canon that I carry close to my heart. Each time I make one of these dishes, it’s like a photograph coming to life, carrying our history forward into the future.

A Brief History of Culinary History

According to scholars, the oldest written recipe is a method for brewing beer that was written on clay tablets in Ancient Mesopotamia (modern day Iraq) around 1730 BCE. Since then, our understanding (and documentation) of culinary history has continued to grow across the globe. In 1651, a chef from Burgundy, François Pierre de la Varenne, wrote Le Cuisinier François, a book solidifying French cooking as an identity unto itself.

The Evolution of Mother Sauces

Fast forward to 1833 when another French chef, Marie-Antoine Carême, named four “mother sauces” as core components to French cookery: Velouté, Béchamel, Allemande, and Espagnole. Who could have imagined that just thirteen years later, in a little village on the outskirts of Nice, Georges-Auguste Escoffier would be born. At the age of 12, Escoffier was apprenticing at his uncle’s restaurant and by 1903 he had risen in the culinary world so much that when he adjusted the Mother Sauces by demoting Allemande (a version of Velouté) and adding Hollandaise and Tomato sauces, the culinary world listened.

Simplifying Bearnaise for Real Life

The recipe I’m sharing today is an easy approach to Bearnaise, a light and herby tarragon infused cousin of hollandaise sauce. Hollandaise is made by emulsifying egg yolks with lemon juice and clarified butter. Perfect for benedicts, eggs, vegetables, fish and savory crepes. Here, I take some steps that to some might seem blasphemous. I don’t clarify the butter or use a double boiler (although a double boiler is a great way to reheat if you’re like me and don’t have a microwave).

I don’t skip these steps out of disrespect. I make bearnaise like this because if I didn’t figure out a way to make it work for my real life, I don’t know if I would ever make it. There are times in life that you just need to make something a little bit easier so you can actually make it happen. And I think it’s especially important to note that no one ever complains when this luscious and delightful sauce hits the table. Sometimes when I make it, I press all the water out of a few fire roasted green chiles, dice them and fold them into the sauce right before serving, but that’s up to you.

Print

Easy Bearnaise Sauce

Easy Bearnaise Sauce - in a blue bowl
Print Recipe
Pin Recipe

5 Stars 4 Stars 3 Stars 2 Stars 1 Star

No reviews

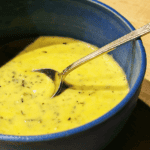
Learn about the fascinating history of French sauces while making a delicious and easy Bearnaise sauce. This simplified recipe skips the fuss, making it perfect for weeknight dinners.

  • Author: Marianne Sundquist
  • Prep Time: 15 mins
  • Cook Time: 15 mins
  • Total Time: 30 minutes
  • Yield: 1 cup
  • Category: Sauce
  • Method: simmer
  • Cuisine: French

Ingredients

Units
  • 1/4 c. white wine vinegar
  • 1 medium shallot, peeled and sliced
  • 2 sprigs of fresh tarragon
  • 2 t. High Desert Herbs or Herbes de provence
  • 2 egg yolks
  • 3 T. water
  • 1 T. olive oil
  • 3 T. butter, room temperature
  • 2 T. minced fresh tarragon
  • Salt, to taste

Instructions

Easy Bearnaise Sauce - ingredients

Gather Your Ingredients

First, gather and measure (if applicable) all of your ingredients, placing them in a place easy for you to reach by the stove. This makes everything easier.

Make the Vinegar Reduction

In a saucepan, add the white wine vinegar, shallot and fresh tarragon sprigs over medium heat. Let this mixture simmer for around 5 minutes, or until the vinegar has reduced to around 1-2 tablespoons. Strain this vinegar reduction, discarding (or snacking on) the shallots and tarragon sprigs. Return the vinegar to the saucepan and let cool for five minutes.

Emulsify the Eggs and Butter

Turn the saucepan on a medium-low heat and add the egg yolks, water and olive oil, whisking continuously. At first, the mixture will have a watery texture. After only a few minutes, the texture will start to thicken. You don’t want the eggs to scramble, but you want the sauce to turn thick and creamy (like a custard). This happens fast so stay vigilant.

As soon as you see the texture shift, remove the pan from the heat and whisk in the room temperature butter, minced tarragon and salt to taste. Serve immediately.


Did you make this recipe?

Tag @highdeserttable on Instagram so we can cheer you on! 🌟

Nutrition values are estimates only. See the disclaimer here.

Mad Jack’s Slow Roasted Pork Shoulder: Oven-Baked BBQ Perfection

Marianne Sundquist · December 21, 2024 · Leave a Comment

Introduction: A Taste of Mad Jack’s at Home

Last spring I had the chance to visit Mad Jack’s Mountaintop BBQ in Cloudcroft for a story I was writing for New Mexico Magazine’s July issue. James Jackson, owner and pitmaster of Mad Jacks, has a loyal and passionate following for his hospitality and kindness just as much as his exceptional barbeque. His wood fired smokers run throughout the night and in the morning brisket, sausages, pork shoulder, chicken and turkey legs are pulled from barrels just in time for them to rest before Jackson opens the door and starts slicing meats to order with his crew.

Slow Roasted Pork Shoulder - Pitmaster James Jackson

For the article Jackson helped me think through how home cooks could approach pork shoulder using their oven instead of a smoker. Now, I’m not going to say that this rivals the incredible flavor and tenderness that comes after slowly cooking meat in a smoker fired with post oak he brings in from Texas. For that, I suggest a road trip down south to Cloudcroft. But a good rub and eight hours in a low oven will get you pretty far.

Slow Roasted Pork Shoulder - Mad Jack's menu board

The Secret’s in the Rub: A New Mexico Twist

This is an adaptation of Jackson’s rub which has a distinct sweet and spicy punch with notes of celery seed lingering throughout. Here, I swap out most of the celery seed for High Desert Herbs (a blend of marjoram, lavender, rosemary, thyme, New Mexico red chile flakes and sage) and swap out cayenne pepper for New Mexico Chile Powder. You might find that you have some rub left over. Just make sure to have very clean and dry hands when handling the rub mixture and you can save it for seasoning all kinds of meat and vegetables.

How to serve this slow roasted pork shoulder?

On the day I made this, I also made a lime, sesame and ginger vinaigrette and made a big salad with Ground Stone Farms greens, cucumbers, cilantro, scallions and warm pork shoulder over the top. My husband Hans had salad on the side because he had a different idea. He piled the pulled pork shoulder into tortillas and got the BBQ sauce out of the fridge. We had different ideas about the best way to eat something that had been making our house smell good all day and both were perfect, so I’ll let you use your best judgement.

Slow Roasted Pork Shoulder - plated with greens
Print

Mad Jack’s Slow Roasted Pork Shoulder: Oven-Baked BBQ Perfection

Slow Roasted Pork Shoulder - out of the oven
Print Recipe
Pin Recipe

5 Stars 4 Stars 3 Stars 2 Stars 1 Star

No reviews

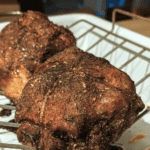
Recreate the flavors of Mad Jack’s Mountaintop BBQ at home with this slow-roasted, oven-baked pork shoulder recipe featuring a unique New Mexico-inspired rub. Perfect for sandwiches, salads, and more!

  • Author: Marianne Sundquist
  • Prep Time: 1 hour
  • Cook Time: 8 hours
  • Total Time: 9 hours
  • Yield: 10-12 servings
  • Category: BBQ, dinner, winter
  • Method: slow roast
  • Cuisine: New Mexican

Ingredients

  • 2 T. packed dark brown sugar
  • 1 T. kosher salt
  • 1 T. New Mexico Red Chile Powder
  • 1 T. High Desert Herbs (or Herbes de Provence)
  • 1 T. coarse black pepper
  • 1 T. dried onion flakes
  • 2 t. garlic powder
  • 2 t. smoked paprika
  • 1 t. celery seed
  • 1, 6 pound boneless pork shoulder, trimmed and tied with butcher twine

Instructions

Prepping the rub

In a small bowl, stir together the dark brown sugar, kosher salt, New Mexico Red Chile Powder, High Desert Herbs, coarse black pepper, dried onion flakes, garlic powder, smoked paprika and celery seed.

Slow Roasted Pork Shoulder - prepped in the oven

Slow Roasting Instructions

Rub some of the rub mixture on all sides of the tied pork shoulder and place the meat in a roasting pan with a rack if possible. Roast for around 8 hours, or until it reaches an internal temperature of 195 F. Leave uncovered until it has a nice “bark” developing and then gently cover it with foil so the outside doesn’t burn.

Resting and Shredding the Pork

When the pork is done cooking, let it rest at room temperature until it’s cool enough to safely pull apart into pieces with your hands. As you’re shredding the pork, sprinkle a little bit of the rub into the shredded meat, tasting as you go. You’ll have some extra rub to use at a later time.

Let cool to room temperature before transferring to the fridge for up to five days.

Did you make this recipe?

Tag @highdeserttable on Instagram so we can cheer you on! 🌟

Nutrition values are estimates only. See the disclaimer here.

Hearty Beef, Squash, and Red Chile Soup

Marianne Sundquist · December 4, 2024 · Leave a Comment

I’m not calling this a breakfast soup even though the photo has a fried egg floating on top, but this soup is so versatile, warming, and nourishing it can easily be enjoyed any time of the day. On the day I made this hearty beef and red chile soup it simmered away on the stove all afternoon and we had it for dinner. But the next morning, things got really exciting. Some leftover soup warmed up with an egg on top seemed like the breakfast that made the most sense on a cold morning. And wow, we were right.

A New Mexican Inspiration

So this story really begins because I picked up a new chile ristra and have been looking for a way to utilize some of the brilliantly red dried chiles hanging in my kitchen like a warmth-inducing chandelier. So in making this soup, New Mexico Red Chile is where I began.

The Power of Pantry Staples

Then of course, I looked around to see what needed to be used up in my kitchen. I noticed some zucchini squash in the fridge that I had purchased but then forgot to use. This is the way it goes and I have to admit, I love when these parameters come into play and combinations I may have never thought of simmer to the surface. And that’s what happened here. If I had a completely blank page in front of me I can imagine myself thinking about making a different soup altogether. Maybe I would have added beans or cauliflower or pumpkin. But in that moment, I had zucchini and I’m grateful I did.

A Squash for All Seasons

You’ll notice that I am using the broader name “Squash” in the title of this recipe. It’s important to mention because you can use any variety of squash here. Especially being that we are smack dab in the middle of winter squash season. Whatever squash you want to use, consider how you want to prepare it before adding it to the soup.

For a summer squash like zucchini, it can just be diced and added to the soup. If you use Butternut, you can trim it, peel it with a vegetable peeler, take the seeds out and then dice it for soup. For Kabocha or Delicata squash varieties, you can simply trim off the ends, slice it in half to remove the seeds, then dice it leaving the edible skin on before adding it to the soup. If you wanted to use a pumpkin, you could cut the pumpkin into quarters or wedges (depending on size), roast the pumpkin in the oven with a drizzle of olive oil, salt, and pepper before peeling it and dicing the roasted pumpkin. If you use cooked squash, you can add it towards the end of the cooking process, about 15 minutes before serving.

This soup can be served on its own, or garnished with cilantro or chives. I would recommend some warm bread or tortillas on the side.

Print

Hearty Beef, Squash, and Red Chile Soup

Beef and Red Chile Soup with fried egg
Print Recipe
Pin Recipe

5 Stars 4 Stars 3 Stars 2 Stars 1 Star

No reviews

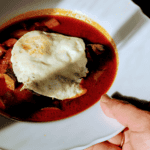
A versatile and warming soup that can be enjoyed any time of day. This hearty beef, squash, and red chile soup is perfect for using up winter squash and red chiles.

  • Author: Marianne Sundquist
  • Prep Time: 1 hour
  • Cook Time: 2 hours
  • Total Time: 3 hours
  • Yield: 8-10 servings
  • Category: Soup, Fall, Winter, Stew
  • Method: Simmer
  • Cuisine: New Mexican

Ingredients

for the chile sauce:

  • 2 dried New Mexico red chiles
  • 3 dried guajillo chiles
  • 2 dried chipotle chiles
  • 1 T. butter
  • 1 small red onion, sliced
  • 4 garlic cloves, thinly sliced
  • 3 c. water
  • 2 T. honey
  • Salt and pepper, to taste


For the meat:

  • 3 lb. beef eye of round steak, trimmed and cut into ½” pieces
  • Salt and pepper
  • High smoke point oil for searing (grapeseed, avocado or vegetable)


For the soup:

  • 2 T. butter
  • 1 large onion, diced
  • 2-4 garlic cloves, thinly sliced
  • 1 T. high desert herbs
  • 2 t. ground coriander
  • 1, 14-oz. can fire-roasted diced tomatoes
  • 4 c. diced zucchini or butternut squash
  • 2 qt. (4 cups) beef broth

Instructions

First, let’s make the chile sauce.

Fill a medium saucepan with water and bring to a boil over high heat. Now place a large, heavy-bottomed soup pot over low heat.

Prepping the Chiles

Remove the stems and seeds from each of the dried chiles and break them into pieces. Transfer the chile pieces to the dry large pot and cook them over low heat for a couple of minutes to activate their flavor, stirring occasionally. Transfer the lightly seared chiles to the pot of hot water. It doesn’t matter if it is boiling yet, just throw them in and let them take a hot bath for ten minutes before straining and reserving the reconstituted chiles.

While they are in the water, add the butter to the soup pot along with the onion. Let the onions cook for around five minutes until they are starting to caramelize. Add the garlic, cook another minute or so more, and transfer this mixture to a blender. Add to the blender the reserved chiles, water, honey, and a pinch of salt and pepper. (Note: whenever measuring honey, with your finger, lightly rub the inside of the measuring spoon with oil before adding the honey to help it come out easier). Blend until completely smooth, taste, adjusting seasoning as needed and reserve.

Turn up the heat

Turn the heat up to medium-high and add 1 T. of the oil for searing to the pot. Generously season the diced beef with salt and pepper, and working in batches so as not to overcrowd the pan, sear the beef on all sides and transfer to a bowl. Repeat this process until all of the beef is seared. Reserve.

Now to the same pot add the butter. Add the onion and cook, stirring frequently until the onions are beginning to caramelize, around five minutes. Add the garlic and cook another minute more. Add the High Desert Herbs and coriander. Stir and let cook for a minute or so.

Simmer until tender

Now add the tomatoes to deglaze and scrape the bottom of the pan, making sure to incorporate all of the caramelized goodness into the chili. Add the chile sauce, seared meat, squash, and beef broth. Bring this to a boil and lower the heat to a simmer. Let this simmer for around two hours, or until the beef is tender. Taste and adjust seasoning as needed.


Did you make this recipe?

Tag @highdeserttable on Instagram so we can cheer you on! 🌟

Nutrition values are estimates only. See the disclaimer here.

Thanksgiving Leftovers: Dutch Oven Turkey Pot Pie

Marianne Sundquist · November 27, 2024 · Leave a Comment

This is hands down my favorite thing to make with leftover turkey and it comes with a story. The year I got married also happened to be the year I got my very first cooking job. Over the next ten years, I worked most holidays and on Thanksgiving mornings we would pop open a split bottle of champagne and have turkey pot pie I had prepared the night before for breakfast before I headed off for work and he headed out to visit family. It was the perfect way to celebrate. To this day it’s one of my favorite memories of those years.

Dutch Oven Magic

To keep things simple I make this in my Le Creuset Dutch Oven. The recipe for pie dough makes twice as much as you will need so you can just freeze half for a single-crust pie or pie dough cookies later. You could also use store-bought pie dough or add other leftover veggies like sweet potatoes or green beans.

Print

Thanksgiving Leftovers: Dutch Oven Turkey Pot Pie

Dutch Oven Turkey Pot Pie - Out of the oven
Print Recipe
Pin Recipe

5 Stars 4 Stars 3 Stars 2 Stars 1 Star

No reviews

This comforting Dutch Oven Turkey Pot Pie is a delicious way to use leftover turkey. Packed with flavor and made with a flaky homemade pie crust, it’s the perfect weeknight meal!

  • Author: Marianne Sundquist
  • Prep Time: 1 hour
  • Cook Time: 1 hour
  • Total Time: 2 hours
  • Yield: 6-8 servings
  • Category: Thanksgiving, Fall, Dinner
  • Method: Bake
  • Cuisine: American

Ingredients

Units
For the pie dough:
  • 1 T. (12 grams) Apple Cider Vinegar
  • 3/4 c. (118-177 g) ice water, depending on need
  • 1 3/4 sticks (196 grams) of unsalted butter, cold
  • 2 1/4 c. (333 grams) All Purpose Flour or Whole Wheat flour
  • 2 1/2 t. (15 g) Kosher salt
  • 2 T. (25 g) sugar
  For the turkey stew:
  • 2 slices of bacon, diced
  • 1 T. Butter
  • 1/2 lb. mushrooms, diced
  • 3 large carrots, peeled and diced
  • 3 celery stalks, diced
  • 1 large yellow onion, diced
  • 1 green apple, diced
  • 2 fire-roasted chiles, seeded and diced
  • 4 garlic cloves, thinly sliced
  • 2-4 t. red chile powder (depending on heat preference and heat of Chile powder)
  • 1 t. Dried rosemary
  • 1 t. dried thyme
  • 2 c. leftover mashed potatoes OR,
  • 1/4 c. all-purpose, whole wheat, corn, or rice flour
  • 5 c. turkey, chicken, or vegetable broth
  • 4 c. shredded cooked turkey meat
  • 2 c. frozen peas
  • 2 c. shredded sharp cheddar cheese
  • Salt & pepper to taste
  For the egg wash:
  • 1 egg
  • 2 T. milk

Instructions

Make the pie dough

Cut butter into small cubes and put in the freezer. In a cup mix the ice water and vinegar and set aside (to keep the water icy cold sometimes I throw in an ice cube if my kitchen is warm). In a large bowl whisk together the flour, salt and sugar. At this point the butter should be super cold but not frozen. Remove butter from the freezer and add to your flour mixture. Using your fingers (or a food processor) squeeze the butter pieces into the flour until the butter is incorporated into the flour and resembles small peas. Add ½ cup of the vinegar and water mixture. Stir with a rubber spatula. At this point, the dough will probably be crumbly. Continue adding and mixing in a tiny bit of vinegar-water at a time just until the dough comes together. Cut into two pieces, shape into round discs, wrap each piece in plastic wrap or parchment paper, and cool one disc in the fridge for at least 1 hour or up to 3 days. Freeze the other disc you won’t need now.

Make the stew

In a large heavy bottomed, oven safe dutch oven or pot over low heat add the bacon. Let the bacon render slowly while you’re preparing the other vegetables. Once the bacon is fully cooked and crispy, reserve bacon in a small bowl with a slotted spoon for later use. We want to leave as much bacon fat in the pot as possible to help cook the vegetables.

Building the Savory Stew Filling

Add the butter and turn the heat to medium-high. Add the mushrooms and stir every few minutes until they are caramelized. Add the carrots, celery, onion, apple, fire-roasted chiles, and garlic. I usually cut up one vegetable at a time and throw it into the pot as I go. Let cook for a few minutes stirring frequently. Stir in the chile powder, rosemary, thyme, and mashed potatoes (or) flour. If you use flour here let the mixture cook a few minutes more. Add the broth and bring the stew to a simmer.

While the stew is coming to a simmer, prepare the pie dough

On a lightly floured surface roll out the dough into a large round, big enough to easily sit inside your pot. If your pot has a lid, use the lid as a guide and trim around it with a knife to make a circle. Cut a few slits in the middle and place the pie dough round on a floured plate and keep in the freezer until ready to use.

Assembling the Pot Pie

Preheat the oven to 350 F. Let the stew cook for around 20 minutes or until the carrots are tender. Taste and season with salt and pepper as needed. Very carefully blend around a quarter of the soup and stir it back into the pot. Stir in the turkey meat and cooked bacon.  Add the frozen peas in a layer on top. Now add the shredded cheese in another layer. Gently place your pie dough round on top.

Dutch Oven Turkey Pot Pie - Adding the dough top

Baking the pie

Make the egg wash by whisking the egg and milk together. Brush egg wash over the top of the pie and crack pepper and sea salt on top. Bake pot pie for 1 hour or until the top of the pie is a deep golden brown. Let cool for ten minutes before scooping into bowls.

Did you make this recipe?

Tag @highdeserttable on Instagram so we can cheer you on! 🌟

Nutrition values are estimates only. See the disclaimer here.

  • Page 1
  • Page 2
  • Page 3
  • Page 4
  • Go to Next Page »

High Desert Table

Copyright © 2025 · High Desert Table

  • Privacy Policy
  • Nutrition Disclaimer