• Skip to primary navigation
  • Skip to main content
High Desert Table

High Desert Table

Your everyday guide to Southwestern cooking

  • Home
  • Recipes
  • About
  • Shop
  • Private Events
  • Contact
  • Show Search
Hide Search

desserts

Red Chile Caramel Corn

Marianne Sundquist · December 8, 2023 · Leave a Comment

This weekend my family went to a Chicago-themed holiday potluck at a friend’s house in Eldorado. We wanted to bring something fun and festive so we decided to make a version of our favorite windy city confection— Chicago Mix Popcorn, a sweet and savory mix of caramel and cheese popcorn. The classic treat reminds me of when my husband and I lived in Chicago and before embarking on any road trip, we always made a stop at Garrett’s Popcorn to pick up a bag on the way out of town.

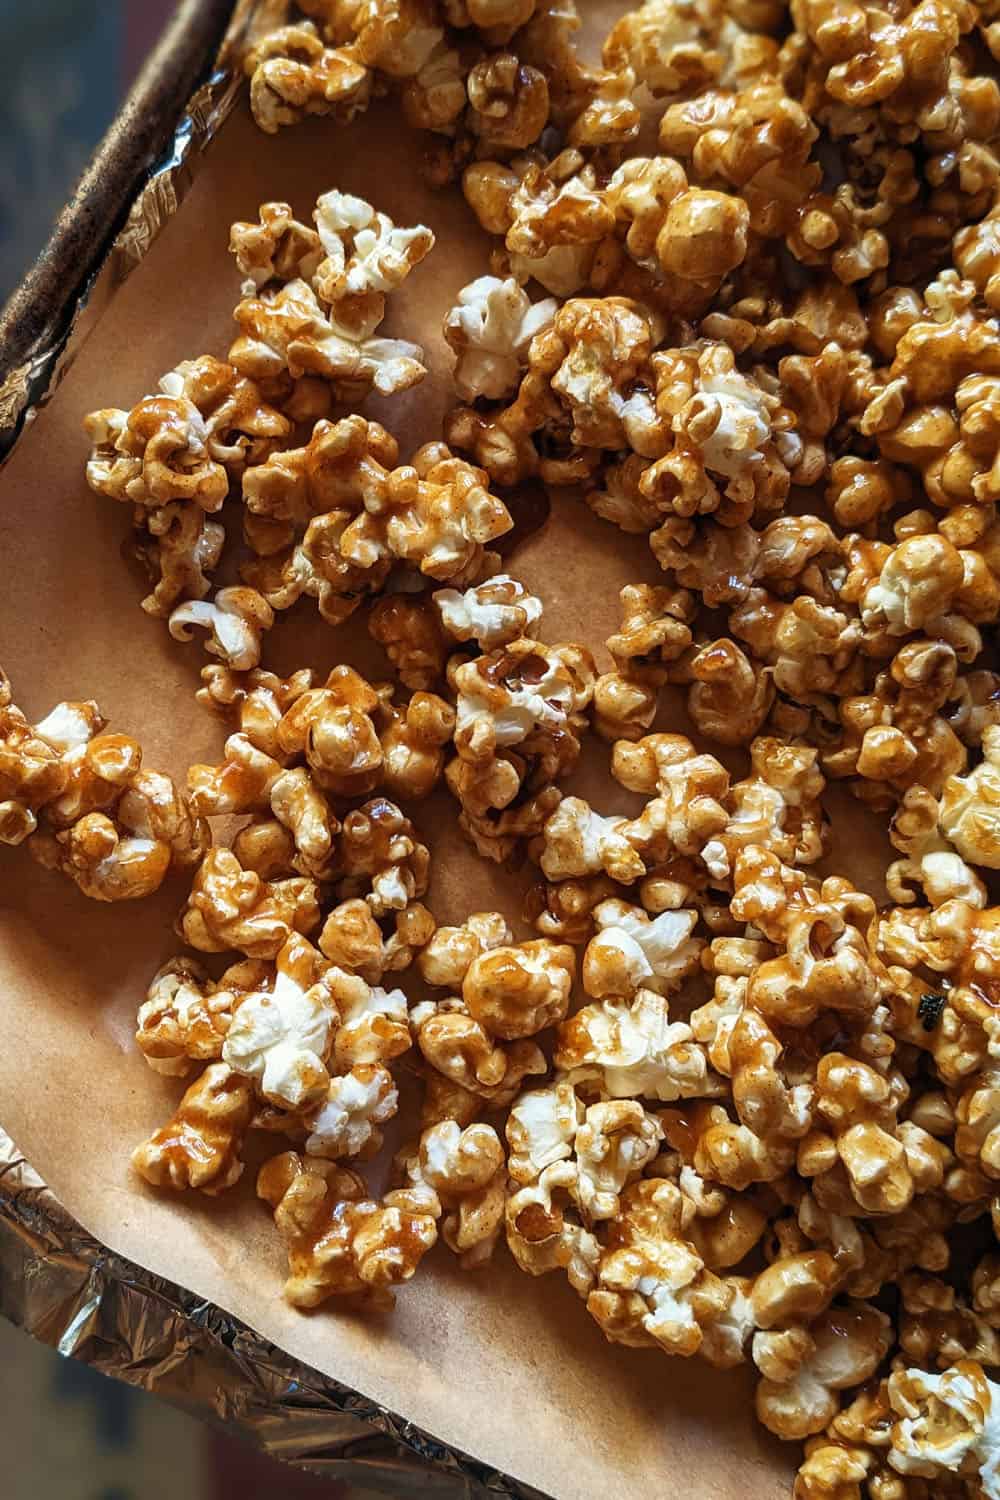
This custom recipe is focused on one-half of the treat, the red chile caramel corn. When you make it, customize it as you wish. Mix it with cheesy popcorn, add nuts, or just enjoy it on its own for a sweet and spicy snack.

As the popcorn was popping on the stove this week, the kids ran downstairs to find out why I was making popcorn, a sure sign that some kind of family movie or game night was on the horizon. Their interest only peaked when I told them I was making caramel corn.

A touch oh heat

As the brown sugar-based caramel sauce simmered away on the stove, I couldn’t resist adding a generous spoonful of red chile powder to my little bowl of baking soda sitting by the stove, the last step of the process before coating the popcorn with the caramel and butter mixture and transferring it to the oven for baking. I’m happy to report that this just might be the best cooking decision I’ve made all week. I know caramel making can be a little intimidating for some of you, but I promise, this recipe is as easy and delightful as it gets.

Making caramel the easy way

Normally when one is making caramel, you begin with sugar and sometimes a very small amount of water. Then, it becomes a waiting game requiring a close eye, and oftentimes a candy thermometer, depending on if the caramel will be made into a sauce, candy, or coating. Here, we keep things simple and no thermometer is needed, just a timer and a bit of extra care since we are dealing with very hot sugar.

Magic ingredient

When making caramel corn, it’s the baking soda that works its magic, creating a caramel sauce that isn’t hard or overly sticky. Rather, the baking soda is added at the very last minute after the caramel has come off the heat and results in a light, melt-in-your-mouth caramel corn.

This popcorn will stay fresh for up to a week in an airtight container at room temperature, making it a perfect option for homemade holiday gifting.

Print

Red Chile Caramel Corn

Red Chile Caramel Corn - with a Christmas tree
Print Recipe
Pin Recipe

5 Stars 4 Stars 3 Stars 2 Stars 1 Star

No reviews

This recipe is an easy and delicious snack that is perfect for any holiday or potluck occasion. The sweet and classic treat makes it a crowd-pleaser, while the red chile powder adds a festive kick. This Red Chile Caramel Corn is easy to make and requires no special skills or equipment.

  • Author: Marianne Sundquist
  • Prep Time: 30 mins
  • Cook Time: 1 hour
  • Total Time: 1 hour 30 minutes
  • Yield: 4 quarts
  • Category: Dessert
  • Method: bake
  • Cuisine: New Mexican

Ingredients

Units
  • 16 c. popped popcorn
  • 2 t. baking soda
  • 2 t. New Mexico red chile powder
  • 1 t. kosher salt
  • 2 t. vanilla extract
  • 2 c. brown sugar
  • 1 c. (2 sticks) unsalted butter
  • 1/2 c. light corn syrup

Instructions

Line two large baking sheets with parchment paper or a silicone baking mat.

Preheat the oven to 250 f.

Divide the popcorn into 2-3 large bowls, making sure you have enough room to add the caramel and stir it with a heatproof rubber spatula.

Dry ingredients

In a small bowl whisk together the baking soda, red chile powder, and salt. Place this bowl and the vanilla extract next to the stove with a measuring spoon so you’re ready when you get to this step.

Making the caramel

In a large saucepan over medium-high heat (the size of the saucepan is important for safety because the baking soda will bubble up when it’s added to the caramel sauce), add the brown sugar, butter, and corn syrup. Watch carefully and once the entire pot has started to rapidly boil set a timer for 3 minutes.

When the 3 minutes have passed, turn off the heat. Whisk in the baking soda mixture and the vanilla.

Time to bake

Carefully divide this mixture among your bowls of popcorn and stir, evenly coating the popcorn as much as possible. Transfer the popcorn to the prepared baking sheets and bake in the oven for 1 hour.

Let the popcorn cool completely before breaking it into pieces and storing it in an airtight container.

Red Chile Caramel Corn - on a sheet tray

Did you make this recipe?

Tag @highdeserttable on Instagram so we can cheer you on! 🌟

Nutrition values are estimates only. See the disclaimer here.

Easy Apple Crisp Crumble: Quick, Delicious, and Perfectly Sweet

Marianne Sundquist · December 4, 2023 · Leave a Comment

There are few desserts as satisfying as an apple crisp. Within minutes of hitting the oven, the scent of baking apples, spice, and toasted oats fills the kitchen in the most delightful way. Over the last week I’ve been in the kitchen cooking all kinds of foods and out of everything I made last week, this easy apple crisp crumble not only emerged as the favorite sweet treat at dessert time, it was also the easiest and fastest thing I made. It comes together in less than 30 minutes and then takes another hour in the oven. I love to build it the day before and pull it from the fridge 30 minutes before baking it the next day.

You’ll notice that this recipe calls for a light sprinkle of High Desert Salt right before it goes in the oven. This is a blend I make and includes flakey sea salt, lavender, red chile, and green chile powders, but feel free to experiment with any combination of these ingredients you have on hand.

Naturally Sweet

The entire recipe uses only one cup of brown sugar and makes a crisp that fills the largest size of all my baking dishes, a 9”x13” rectangle. Because of the natural sweetness of the apples, this is all that’s needed and I think it’s a pretty special dessert for this reason alone. Hot from the oven, we spooned vanilla ice cream on top, and over the next few days, we enjoyed leftovers cold for breakfast with plain greek yogurt.

Easy Apple Crisp Crumble - Fresh Apples on a marble slab
Print

Easy Apple Crisp Crumble: Quick, Delicious, and Perfectly Sweet

Easy Apple Crisp Crumble in a ceramic bowl with ice cream
Print Recipe
Pin Recipe

5 Stars 4 Stars 3 Stars 2 Stars 1 Star

No reviews

Indulge in the delightful aroma of baked apples with this easy apple crisp crumble recipe. A quick and satisfying dessert that takes less than 30 minutes to assemble, featuring a delicious blend of spices and a crunchy topping. Perfect for any occasion, and the natural sweetness of the apples makes it a special treat. Try it with a sprinkle of High Desert Salt for an extra flavor kick!

  • Author: Marianne Sundquist
  • Prep Time: 30 mins
  • Cook Time: 1 hour
  • Total Time: 1 hour 30 minutes
  • Yield: 8-10 servings
  • Category: dessert
  • Method: bake
  • Cuisine: American

Ingredients

Units

For the filling:

  • 8 good-sized firm apples, peeled, cored, and diced
  • 1/2 c. packed brown sugar
  • 1 T. vanilla extract
  • 1/4 c. all-purpose flour
  • 1 T. pumpkin spice blend (or a mix of cinnamon, nutmeg, clove)
  • pinch of salt

For the topping:

  • 1 c. old fashioned oats
  • 1/2 c. all purpose flour
  • 1/2 c. cornmeal
  • 1/2 c. packed brown sugar
  • 1 t. ground cinnamon
  • 1 stick of salted butter, melted

For assembling:

  • 2 T. butter, room temperature
  • Sprinkle of High Desert Salt (optional)

Instructions

Preheat the oven to 350 f.

Easy Apple Crisp Crumble - peeled apples - PIN

First, make the filling

In a large bowl stir together the apples, brown sugar, vanilla, all-purpose flour, pumpkin spice blend, and a pinch of salt.

Easy Apple Crisp Crumble - chopped ingredients in a dish

Next, make the topping

In a medium bowl, stir together the oats, all-purpose flour, cornmeal, packed brown sugar, ground cinnamon, and melted butter.

Easy Apple Crisp Crumble - ready for the oven

Assemble the crisp

Rub butter all over the bottom and sides of a 9”x13” baking dish (or one of a similar size). Pour in the filling and top with the crisp mixture. Sprinkle the top of the crisp with High Desert Salt (if using) and bake for around one hour, or until the top is golden brown and the sides are bubbling. Let cool for ten minutes before serving.

Easy Apple Crisp Crumble in a ceramic bowl with ice cream

Did you make this recipe?

Tag @highdeserttable on Instagram so we can cheer you on! 🌟

Nutrition values are estimates only. See the disclaimer here.

New Mexico-Inspired Thumbprint Cookies with Pecans and Raspberry Jam

Marianne Sundquist · November 10, 2023 · 2 Comments

We are entering the time of year when the smell of cookies baking in the oven just feels right. Yesterday I started making these New Mexico-Inspired Thumbprint Cookies as my husband and kids were getting ready to run some errands around town. The dough came together so quickly that by the time I put it in the fridge to rest, the kids were still getting dressed. Those of you with kids will understand when I say that thirty minutes later the cookie dough was fully rested and ready for rolling into balls, and my kids were looking for their socks and shoes.

All of this is to say that making these cookies is easier than you might expect and takes less time than it takes some people to get dressed. I did notice both my husband and the kids keeping an eye on the kitchen timer, so maybe they were carefully planning the timing the whole time. After all, they all were able to grab a warm cookie on their way out the door.

An Unexpected Love for Thumbprint Cookies

I’ve been thinking about thumbprint cookies for a long time. I never really thought about how much I love these buttery, jam-filled cookies until I had one of Dolina’s Polish Tea Cookies filled with either orange marmalade or raspberry jam. As with many food (and life) discoveries, sometimes it takes one extraordinary moment of noticing to change how you see something forever. I know this sounds dramatic but it’s true. Since I do not have much of a sweet tooth, my mind doesn’t gravitate toward desserts the way it does to cheese, fresh bread, popcorn, or butter. Before tasting this cookie at Dolina, I had never given this style of cookie a second thought. But since then, a new room in my mind went under construction and recently opened, dedicated entirely to this delightful cookie.

I learned that while many people call them Thumbprints, they are also referred to as Polish Tea Cakes, Jam Drops, Butter Balls, Hallongrotta (Swedish for “raspberry caves”), and Niçois Suns, a French version made with almond paste, apricot jam, and pistachios.

The version here touches on the classic approach to a shortbread-esque type of cookie but we handle it a bit differently and include an egg yolk for stability and a very slight textural chew.

The Importance of Precision: Weighing Ingredients for Baking

You’ll notice that I include the weight measurement in grams for both the flour and the pecans. So if you happen to have a scale, I encourage you to use it. If not, don’t worry. Weighing ingredients is the most accurate method of measuring and this is particularly important in baking. If you use a measuring cup for the flour, just be sure to scoop a heaping amount into your measuring spoon and scrape off the excess with a butter knife.

Infusing New Mexico Flavors

I had lots of fun thinking about the flavors of New Mexico and this specific time of year. I used pecans from CLC Pecans grown in Lovington, New Mexico, and filled each cookie with a small spoonful of Heidi’s Raspberry Jam, both of which I purchased at The Santa Fe Farmers Market. I added cinnamon, anise (inspired by the beloved biscochito cookie), and a touch of lavender to the dough. The final result might be my new favorite holiday cookie.

Thumbprint Cookies - with a jar of Heidi's Raspberry Jam

This particular recipe is relatively small. The cookies I made were on the bigger side and the recipe yielded 16 cookies. I could have made them smaller and the yield could have easily jumped to around 20. This is entirely up to you. The size of the cookies you make will directly influence the time it takes to bake. So I would say that 15-25 minutes is the window. Keep an eye on them and trust your instincts. You want to look for golden brown bottom edges and remember—they will firm up as they cool.

Print

New Mexico-Inspired Thumbprint Cookies with Pecans and Raspberry Jam

New Mexico-Inspired Thumbprint Cookies - plated with raspberry jam
Print Recipe
Pin Recipe

5 Stars 4 Stars 3 Stars 2 Stars 1 Star

5 from 1 review

Discover a delightful twist on a classic with these New Mexico-inspired thumbprint cookies. This recipe incorporates pecans and Heidi’s Raspberry Jam for a unique holiday treat. Learn how to achieve the perfect texture and taste, and explore the versatility of this beloved cookie style.

  • Author: Marianne Sundquist
  • Prep Time: 35 mins
  • Cook Time: 25 mins
  • Total Time: 1 hour
  • Yield: 12-20 cookies
  • Category: dessert
  • Method: bake
  • Cuisine: New Mexican

Ingredients

Units

for the cookies:

  • 1 1/4 c. (150 g.) all purpose flour
  • 1 c. (120 g.) pecan pieces
  • 1 t. kosher salt
  • 1 t. ground cinnamon
  • 1 t. anise seed
  • 1/2 t. dried culinary lavender buds (optional)
  • 1/2 c. (1 stick) unsalted butter, softened to room temperature
  • 2 large egg yolks
  • 1 t. vanilla extract or paste
  • 2/3 c. granulated sugar

for the filling:

  • 1/4 c. jam of your choice

Instructions

Line a large baking tray with a silicone baking mat or parchment paper.

Thumbprint Cookies - Ingredients prepped and ready to mix

In a very dry blender, add the flour, pecans, salt, cinnamon, anise seed and lavender. Blend until the flour mixture looks relatively smooth. It’s ok if you see a few pecan pieces throughout.

Mixing the ingredients

In the bowl of a stand mixer with the paddle attachment (or a large bowl with a wooden spoon), beat together the butter, egg yolks, vanilla, and sugar until light and fluffy. You will need to use a rubber spatula to scrape the sides down a couple of times until the mixture comes together. Add the flour mixture and mix until the dough just comes together. If it looks a little crumbly, it’s ok. It will come together more as it rests. Cover and let the dough rest in the fridge for 30 minutes.

Thumbprint Cookies - dough balls on a baking sheet

Making the thumbprints

Preheat the oven to 350 f.  After the dough has rested, use your hands to roll pieces of dough into (evenly sized) balls and place them around 2 inches apart on your prepared baking sheets. Make an indentation around halfway down the dough with your thumb or the back of a wooden spoon. Fill each “cave” with jam.

Thumbprint Cookies - making the thumb prints and adding the jam

Baking the cookies

Bake for 15-25 minutes, until the bottom edges are turning golden brown. Remove from the oven and let sit for a few minutes. Use a spatula to transfer them to a wire cooling rack. Let cool for at least five minutes before taking a bite as the jam will be piping hot.

Did you make this recipe?

Tag @highdeserttable on Instagram so we can cheer you on! 🌟

Nutrition values are estimates only. See the disclaimer here.

High Altitude Pumpkin Spice & Olive Oil Bundt Cake

Marianne Sundquist · October 14, 2023 · Leave a Comment

This weekend I went on a hike with a friend and saw the first cluster of leaves turning gold. I stopped at the store, picked up a can of pumpkin puree, and headed home, knowing that I’d have all of the other ingredients I needed to whip up this hearty dose of pumpkin and spice.

It’s true, the basic components for this recipe are foods you probably already have hanging around. But over the past couple of years, after a few too many sitcom-worthy basking fiascos, I have taken a deep dive into baking at high altitude. 

High elevation technique

Santa Fe sits at just over 7,000 feet at its lowest points. And since baking is affected as low as 3,000 feet in elevation, there is no way of getting around it here. The first thing I learned is that as we travel higher in elevation, air pressure decreases. And air pressure is what makes our understanding of general baking rules, proportions, time, and temperatures what it is. Low air pressure is what causes water to boil at lower temperatures (at 7000 feet, 198.9 F. to be exact) and in baking it does two main things: it causes liquids to evaporate faster and makes baked goods rise faster and easier. I now understand that my exploding cakes were the result of high pressure rising so quickly that the cell walls inflated and burst.

To remedy this I employ a few well-known high elevation techniques: I decrease leavening agents (here the baking powder and baking soda) and sugar a bit, I increase liquid, and just for added cellular structure, I usually add an extra egg. Then I send the cakes into the oven with hope and good wishes and try my very best not to open the oven door to take a peek until it’s time. 

Weighing ingredients

A good pastry chef almost always weighs their ingredients instead of measuring them since this is the most accurate way to bake. I love the idea of this and agree that it’s undoubtedly the best way to ensure consistent bakes. I approach a hybrid version, where I weigh the ingredients that are most likely to vary between weighing and measuring. Here, it’s the flour. It doesn’t take much for flour to settle into a measuring cup and significantly alter the final amount being used. I keep a small digital scale in a drawer and pull it out for this very reason. Other baking ingredients like cane sugar and even packed brown sugar are more measuring cup friendly.  

No bundt, no problem

I’m happy to report that this Pumpkin and olive Oil Cake responded well and finished baking at exactly the one-hour mark. If you don’t have a bundt cake pan, it’s ok! A loaf pan, two regular cake pans, or even a 9×13 baking dish will work. A number of years ago, my mother-in-law gifted me this heavy-duty bundt pan, so I love any excuse to put it to use. 

An autumn glaze

For the glaze, I keep it simple with brown butter and pumpkin spice, but if I’m honest, I wanted to add some red chile powder. I didn’t want my kids’ noses to turn up at “mama’s spicy cake” so I left it out this time. Another addition that would be lovely, is a light sprinkling of pumpkin seeds, pinon nuts, or pecans on top of the glaze right after it’s poured and before it’s had a chance to dry.

I’ll leave these important decisions up to you.

Print

High Altitude Pumpkin Spice & Olive Oil Bundt Cake

Glazed Pumpkin Bundt Cake
Print Recipe
Pin Recipe

5 Stars 4 Stars 3 Stars 2 Stars 1 Star

No reviews

This olive oil bundt cake recipe contains a hearty dose of pumpkin and spice making it the perfect dessert treat for fall with friends. 

  • Author: Marianne Sundquist
  • Prep Time: 1.5 hours
  • Cook Time: 1 hour
  • Total Time: 3 hours
  • Yield: 1 bundt cake
  • Category: dessert
  • Method: bake
  • Cuisine: american

Ingredients

for the cake:

  • 3 c. (360 g.) all-purpose flour
  • 1 t. baking soda
  • 1 1/2 t. baking powder
  • 1 T. pumpkin spice
  • 1 1/2 c. brown sugar
  • 3/4 c. olive oil
  • 3 eggs, room temperature
  • 3/4 c. sour cream
  • 1 (15 oz.) can of pumpkin puree

for preparing the pan:

  • olive, coconut or avocado oil spray
  • 1/4 c. can sugar

for the brown butter glaze:

  • 2 T. salted butter
  • 1/4 c. maple syrup
  • 1 c. powdered sugar

Instructions

Preheat the oven to 350 F.

In a medium bowl, whisk together the flour, baking soda, baking powder, and pumpkin spice. 


In a separate bowl of a stand mixer with a whisk attachment, add the brown sugar, olive oil, and eggs. Whisk over medium speed until the mixture is light and fluffy, around five minutes. 


Turn off the mixer and add the sour cream and pumpkin puree. Whisk again for a couple of minutes. Turn off the mixer again and add the flour mixture. Turn on the mixture for just another minute or so, until everything comes together.


Right before you are ready to bake the cake, prepare the bundt pan: Generously spray the inside of the bundt pan with the oil spray. Now sprinkle the can of sugar all around and knock out any excess in the sink. Pour in the batter, using a spoon or spatula to help guide you around the center of the pan. Bake for one hour, or until a paring knife inserted comes out clean.


Let the cake rest in the pan for 15 minutes before inverting it onto a cake stand or a cooling rack. Let the cake cool completely before pouring on the glaze.


After the cake is cool, make the glaze (so it doesn’t harden):  In a small saucepan over medium heat, melt the butter. Let it start to bubble until the color shifts from golden yellow to golden brown. When folks first make brown butter it can be tempting to stop as soon as you see the color start to change. I encourage you to keep a close eye on the butter, but let it deepen just a shade or two more. We don’t want it to turn black and burn, but your patience will be rewarded if you can hold out for a deeper brown, trust me. Turn off the heat and carefully pour the brown butter into a bowl or pitcher. Whisk in the maple syrup and powdered sugar until smooth. The glaze should be thick but pourable.  

Pumpkin Bundt Cake - pouring the frosting glaze
Pumpkin Bundt Cake – pouring the frosting glaze

Pour the glaze over the top of the cake, slowly turning the cake stand or plate as you go. Wherever you want the glaze to drip down, just slightly pause moving the cake stand before continuing around to glaze the entire cake.

A Slice of Pumpkin Bundt Cake

Did you make this recipe?

Tag @highdeserttable on Instagram so we can cheer you on! 🌟

Nutrition values are estimates only. See the disclaimer here.

Pistachio Panna Cotta

Marianne Sundquist · May 31, 2023 · Leave a Comment

Panna Cotta, a popular Italian dessert with origins from the Piedmont region, literally translates to “cooked cream”. This sweet treat of sweetened cream set with gelatin has been spotted across the globe in various forms and names, dating back to the 13th century when an almost identical version, Moos Hwit, was discovered in a Danish cookbook. 

The beauty of panna cotta lies in its simplicity. It could be easily made with only three ingredients: cream, gelatin, and sugar. But being that New Mexico is one of the three states that grow pistachios in the country, I thought it would be fun to combine my love of both pistachios and panna cotta. 

To begin, we peel the pistachios to make a bright green pistachio paste. This step is truly optional and really only affects the color of the panna cotta. If you don’t mind a more neutral color to the panna cotta, you don’t have to peel them.

In this recipe, I like to use cream and half and half to lighten it up. And it always amazes me how little sugar is needed for this perfectly sweetened treat.  I love how panna cotta has low-key, almost minimal vibes, and yet it’s loaded with a luscious mouth feel and decadent flavor. While I usually love to lean into this and serve it on its own, if you wanted to doll it up a bit, you could always garnish the top with fresh raspberries, blackberries, strawberries, pistachios, caramel sauce, a spoon of whipped cream or a crispy cookie on the side.

Print

Pistachio Panna Cotta

Pistachio Panna Cotta cooled set and ready to enjoy
Print Recipe
Pin Recipe

5 Stars 4 Stars 3 Stars 2 Stars 1 Star

No reviews

Panna Cotta, a popular Italian dessert with origins from the Piedmont region, literally translates to “cooked cream”. But being that New Mexico is one of the three states that grow pistachios in the country, I thought it would be fun to combine my love of both in this pistachio panna cotta.

  • Author: Marianne Sundquist
  • Prep Time: 30 mins
  • Cook Time: 3.5 hours
  • Total Time: 4 hours
  • Yield: 6 servings
  • Category: Dessert
  • Method: Gelatin
  • Cuisine: Italian inspired

Ingredients

Units
  • 1 c. raw pistachios, room temperature
  • 4 T. cold water
  • 1 1/2 t. powdered unflavored gelatin
  • 1 T. olive oil
  • 1 c. heavy cream
  • 1 c. half and half
  • 1/4 c. sugar
  • 2 t. vanilla bean paste or extract

Instructions

Pistachio Panna Cotta - pistachios peeled and resting in a white bowl

Prepping the pistachios

The first thing we want to do is peel the pistachios: If you don’t care about the color being green, you can skip this step. Bring a medium saucepan with around four cups of water to a boil. Put in the pistachios, turn off the heat, and let them soak for a couple of minutes before draining. Transfer the pistachios to the sheet tray lined with a clean dish towel. Rub the pistachios with the towel and then your hands to remove the skin. Make sure they are completely dry.

Blooming the gelatin

In a small bowl add the 4 T. of water and sprinkle in the gelatin powder and reserve.

making the pistachio paste

Making the pistachio paste

To make the pistachio paste, place the pistachios in the bowl of a food processor and pulse them into a crumbly powder. Slowly drizzle in a tablespoon of olive oil and puree until it resembles a smooth paste. Transfer this mixture to a saucepan with the heavy cream, half and half, sugar, and vanilla bean paste. Bring this mixture to a boil, whisking as needed. Turn off the heat. Whisk in the bloomed gelatin until it’s fully dissolved and strain the mixture through a fine mesh strainer. Divide between 6 ramekins or small glass cups. Transfer to the refrigerator until the panna cotta is set, around 3-4 hours.

panna cotta cups ready to set in  the fridge

Did you make this recipe?

Tag @highdeserttable on Instagram so we can cheer you on! 🌟

Nutrition values are estimates only. See the disclaimer here.

  • « Go to Previous Page
  • Page 1
  • Page 2
  • Page 3
  • Go to Next Page »

High Desert Table

Copyright © 2025 · High Desert Table

  • Privacy Policy
  • Nutrition Disclaimer