• Skip to primary navigation
  • Skip to main content
High Desert Table

High Desert Table

Your everyday guide to Southwestern cooking

  • Home
  • Recipes
  • About
  • Shop
  • Private Events
  • Contact
  • Show Search
Hide Search

red chile

Hearty Beef, Squash, and Red Chile Soup

Marianne Sundquist · December 4, 2024 · Leave a Comment

I’m not calling this a breakfast soup even though the photo has a fried egg floating on top, but this soup is so versatile, warming, and nourishing it can easily be enjoyed any time of the day. On the day I made this hearty beef and red chile soup it simmered away on the stove all afternoon and we had it for dinner. But the next morning, things got really exciting. Some leftover soup warmed up with an egg on top seemed like the breakfast that made the most sense on a cold morning. And wow, we were right.

A New Mexican Inspiration

So this story really begins because I picked up a new chile ristra and have been looking for a way to utilize some of the brilliantly red dried chiles hanging in my kitchen like a warmth-inducing chandelier. So in making this soup, New Mexico Red Chile is where I began.

The Power of Pantry Staples

Then of course, I looked around to see what needed to be used up in my kitchen. I noticed some zucchini squash in the fridge that I had purchased but then forgot to use. This is the way it goes and I have to admit, I love when these parameters come into play and combinations I may have never thought of simmer to the surface. And that’s what happened here. If I had a completely blank page in front of me I can imagine myself thinking about making a different soup altogether. Maybe I would have added beans or cauliflower or pumpkin. But in that moment, I had zucchini and I’m grateful I did.

A Squash for All Seasons

You’ll notice that I am using the broader name “Squash” in the title of this recipe. It’s important to mention because you can use any variety of squash here. Especially being that we are smack dab in the middle of winter squash season. Whatever squash you want to use, consider how you want to prepare it before adding it to the soup.

For a summer squash like zucchini, it can just be diced and added to the soup. If you use Butternut, you can trim it, peel it with a vegetable peeler, take the seeds out and then dice it for soup. For Kabocha or Delicata squash varieties, you can simply trim off the ends, slice it in half to remove the seeds, then dice it leaving the edible skin on before adding it to the soup. If you wanted to use a pumpkin, you could cut the pumpkin into quarters or wedges (depending on size), roast the pumpkin in the oven with a drizzle of olive oil, salt, and pepper before peeling it and dicing the roasted pumpkin. If you use cooked squash, you can add it towards the end of the cooking process, about 15 minutes before serving.

This soup can be served on its own, or garnished with cilantro or chives. I would recommend some warm bread or tortillas on the side.

Print

Hearty Beef, Squash, and Red Chile Soup

Beef and Red Chile Soup with fried egg
Print Recipe
Pin Recipe

5 Stars 4 Stars 3 Stars 2 Stars 1 Star

No reviews

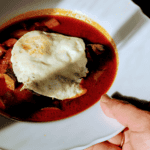
A versatile and warming soup that can be enjoyed any time of day. This hearty beef, squash, and red chile soup is perfect for using up winter squash and red chiles.

  • Author: Marianne Sundquist
  • Prep Time: 1 hour
  • Cook Time: 2 hours
  • Total Time: 3 hours
  • Yield: 8-10 servings
  • Category: Soup, Fall, Winter, Stew
  • Method: Simmer
  • Cuisine: New Mexican

Ingredients

for the chile sauce:

  • 2 dried New Mexico red chiles
  • 3 dried guajillo chiles
  • 2 dried chipotle chiles
  • 1 T. butter
  • 1 small red onion, sliced
  • 4 garlic cloves, thinly sliced
  • 3 c. water
  • 2 T. honey
  • Salt and pepper, to taste


For the meat:

  • 3 lb. beef eye of round steak, trimmed and cut into ½” pieces
  • Salt and pepper
  • High smoke point oil for searing (grapeseed, avocado or vegetable)


For the soup:

  • 2 T. butter
  • 1 large onion, diced
  • 2–4 garlic cloves, thinly sliced
  • 1 T. high desert herbs
  • 2 t. ground coriander
  • 1, 14-oz. can fire-roasted diced tomatoes
  • 4 c. diced zucchini or butternut squash
  • 2 qt. (4 cups) beef broth

Instructions

First, let’s make the chile sauce.

Fill a medium saucepan with water and bring to a boil over high heat. Now place a large, heavy-bottomed soup pot over low heat.

Prepping the Chiles

Remove the stems and seeds from each of the dried chiles and break them into pieces. Transfer the chile pieces to the dry large pot and cook them over low heat for a couple of minutes to activate their flavor, stirring occasionally. Transfer the lightly seared chiles to the pot of hot water. It doesn’t matter if it is boiling yet, just throw them in and let them take a hot bath for ten minutes before straining and reserving the reconstituted chiles.

While they are in the water, add the butter to the soup pot along with the onion. Let the onions cook for around five minutes until they are starting to caramelize. Add the garlic, cook another minute or so more, and transfer this mixture to a blender. Add to the blender the reserved chiles, water, honey, and a pinch of salt and pepper. (Note: whenever measuring honey, with your finger, lightly rub the inside of the measuring spoon with oil before adding the honey to help it come out easier). Blend until completely smooth, taste, adjusting seasoning as needed and reserve.

Turn up the heat

Turn the heat up to medium-high and add 1 T. of the oil for searing to the pot. Generously season the diced beef with salt and pepper, and working in batches so as not to overcrowd the pan, sear the beef on all sides and transfer to a bowl. Repeat this process until all of the beef is seared. Reserve.

Now to the same pot add the butter. Add the onion and cook, stirring frequently until the onions are beginning to caramelize, around five minutes. Add the garlic and cook another minute more. Add the High Desert Herbs and coriander. Stir and let cook for a minute or so.

Simmer until tender

Now add the tomatoes to deglaze and scrape the bottom of the pan, making sure to incorporate all of the caramelized goodness into the chili. Add the chile sauce, seared meat, squash, and beef broth. Bring this to a boil and lower the heat to a simmer. Let this simmer for around two hours, or until the beef is tender. Taste and adjust seasoning as needed.


Did you make this recipe?

Tag @highdeserttable on Instagram so we can cheer you on! 🌟

Nutrition values are estimates only. See the disclaimer here.

Red Chile Caramel Corn

Marianne Sundquist · December 8, 2023 · Leave a Comment

This weekend my family went to a Chicago-themed holiday potluck at a friend’s house in Eldorado. We wanted to bring something fun and festive so we decided to make a version of our favorite windy city confection— Chicago Mix Popcorn, a sweet and savory mix of caramel and cheese popcorn. The classic treat reminds me of when my husband and I lived in Chicago and before embarking on any road trip, we always made a stop at Garrett’s Popcorn to pick up a bag on the way out of town.

This custom recipe is focused on one-half of the treat, the red chile caramel corn. When you make it, customize it as you wish. Mix it with cheesy popcorn, add nuts, or just enjoy it on its own for a sweet and spicy snack.

As the popcorn was popping on the stove this week, the kids ran downstairs to find out why I was making popcorn, a sure sign that some kind of family movie or game night was on the horizon. Their interest only peaked when I told them I was making caramel corn.

A touch oh heat

As the brown sugar-based caramel sauce simmered away on the stove, I couldn’t resist adding a generous spoonful of red chile powder to my little bowl of baking soda sitting by the stove, the last step of the process before coating the popcorn with the caramel and butter mixture and transferring it to the oven for baking. I’m happy to report that this just might be the best cooking decision I’ve made all week. I know caramel making can be a little intimidating for some of you, but I promise, this recipe is as easy and delightful as it gets.

Making caramel the easy way

Normally when one is making caramel, you begin with sugar and sometimes a very small amount of water. Then, it becomes a waiting game requiring a close eye, and oftentimes a candy thermometer, depending on if the caramel will be made into a sauce, candy, or coating. Here, we keep things simple and no thermometer is needed, just a timer and a bit of extra care since we are dealing with very hot sugar.

Magic ingredient

When making caramel corn, it’s the baking soda that works its magic, creating a caramel sauce that isn’t hard or overly sticky. Rather, the baking soda is added at the very last minute after the caramel has come off the heat and results in a light, melt-in-your-mouth caramel corn.

This popcorn will stay fresh for up to a week in an airtight container at room temperature, making it a perfect option for homemade holiday gifting.

Print

Red Chile Caramel Corn

Red Chile Caramel Corn - with a Christmas tree
Print Recipe
Pin Recipe

5 Stars 4 Stars 3 Stars 2 Stars 1 Star

No reviews

This recipe is an easy and delicious snack that is perfect for any holiday or potluck occasion. The sweet and classic treat makes it a crowd-pleaser, while the red chile powder adds a festive kick. This Red Chile Caramel Corn is easy to make and requires no special skills or equipment.

  • Author: Marianne Sundquist
  • Prep Time: 30 mins
  • Cook Time: 1 hour
  • Total Time: 1 hour 30 minutes
  • Yield: 4 quarts
  • Category: Dessert
  • Method: bake
  • Cuisine: New Mexican

Ingredients

Units
  • 16 c. popped popcorn
  • 2 t. baking soda
  • 2 t. New Mexico red chile powder
  • 1 t. kosher salt
  • 2 t. vanilla extract
  • 2 c. brown sugar
  • 1 c. (2 sticks) unsalted butter
  • 1/2 c. light corn syrup

Instructions

Line two large baking sheets with parchment paper or a silicone baking mat.

Preheat the oven to 250 f.

Divide the popcorn into 2-3 large bowls, making sure you have enough room to add the caramel and stir it with a heatproof rubber spatula.

Dry ingredients

In a small bowl whisk together the baking soda, red chile powder, and salt. Place this bowl and the vanilla extract next to the stove with a measuring spoon so you’re ready when you get to this step.

Making the caramel

In a large saucepan over medium-high heat (the size of the saucepan is important for safety because the baking soda will bubble up when it’s added to the caramel sauce), add the brown sugar, butter, and corn syrup. Watch carefully and once the entire pot has started to rapidly boil set a timer for 3 minutes.

When the 3 minutes have passed, turn off the heat. Whisk in the baking soda mixture and the vanilla.

Time to bake

Carefully divide this mixture among your bowls of popcorn and stir, evenly coating the popcorn as much as possible. Transfer the popcorn to the prepared baking sheets and bake in the oven for 1 hour.

Let the popcorn cool completely before breaking it into pieces and storing it in an airtight container.

Red Chile Caramel Corn - on a sheet tray

Did you make this recipe?

Tag @highdeserttable on Instagram so we can cheer you on! 🌟

Nutrition values are estimates only. See the disclaimer here.

Red Chile Mezcal BBQ Pulled Pork

Marianne Sundquist · June 2, 2023 · Leave a Comment

For years my go-to way of preparing pulled pork revolved around the idea of submerging caramelized meat in the oven with broth and aromatics (like onion, garlic, cilantro stems, and a jalapeno) over low heat for many hours, sometimes even overnight in the crock pot. I have always loved braising because eventually all of the toughness disappears, not only creating strands of tender meat but just as much because of the luscious broth that’s left behind that can be used for reheating meat, soup, stew or to freeze for a rainy day. 

Why roast it?

This recipe approaches pork shoulder in another effective way—through roasting. And even though we forfeit a few quarts of liquid gold that come from braising, we end up with melt-in-your-mouth shreds of tender meat and crispy pork skin speckled throughout, perfect for drizzling, dunking or tossing in Red Chile High Desert BBQ Sauce, a chile based sauce spiked with a generous pour of mezcal and softened with a hunk of butter. 

The butt is the shoulder

This recipe calls for Pork Shoulder (also called Picnic Shoulder or Picnic Roast), but Pork Butt (also called Boston Butt) is technically part of the front shoulder and some might even argue is a better choice so let’s talk about it: Pork Butt is not from the rear of the pig at all, but a primal cut right behind the pig head. Late in the 19th century the topsy-turvy name was coined and stuck. The shoulder on the other hand, sits right below the butt and travels down the front leg toward the hoof. Pork Butt has more fat marbling throughout the meat, which renders during cooking adding more moisture and flavor. Pork shoulder has less fat throughout the meat, but often a thicker piece of fat on top, which crisps up beautifully during the final minutes of cooking. So either way you can’t lose. 

Prep the day before

I like to make pulled pork and BBQ sauce the day before a backyard barbecue, so when I wake up the next morning all I have to do is sip on coffee and think about how all the big lifting for the day is done. The grill is also wide open, with plenty of room for grilling buttered buns, vegetables, and fruit. Aside from making delicious sandwiches, this combo of roasted pork and bbq sauce can be put to use in many ways. You could fill tortillas for tacos, sprinkle on salads, serve with rice or quinoa, eggs, etc. The Bbq Sauce stands on its own, pairing well with shrimp, white fish, veggies, chicken, or drizzled on burgers and brats.

Print

Red Chile Mezcal BBQ Pulled Pork

HDT BBQ Pulled Pork roasted sauced and ready to eat
Print Recipe
Pin Recipe

5 Stars 4 Stars 3 Stars 2 Stars 1 Star

No reviews

This bbq pulled pork turns your classic american backyard barbecue into a Southwest-themed party by kicking up the flavors with red chile and mezcal. This slow-cooked meat is perfect on toasted buns, tortillas, crispy taco shells, or on your favorite southwest salad.

  • Author: Marianne Sundquist
  • Prep Time: 1 hour
  • Cook Time: 4 hours
  • Total Time: 5 hours
  • Yield: 10-12 servings
  • Category: BBQ
  • Method: Roast
  • Cuisine: American

Ingredients

Units

for the pork:

  • 3 t. whole coriander seed
  • 1 t. black peppercorns
  • 1 t. dried juniper berries
  • 2 T. packed brown sugar
  • 1 T. red chile powder, whatever heat you prefer
  • 1 T. high desert herbs or herbes de provence
  • 2 t. kosher salt
  • 2 t. garlic powder
  • 1 t. dried culinary lavender
  • 4 lb. boneless pork shoulder

for the high desert bbq sauce:

  • 4 T. butter
  • 1 c. diced onion
  • 4 garlic cloves, sliced
  • 1/2 c. mezcal
  • 2 c. (1 pt.) mild Red chile puree
  • 2 t. Dijon mustard
  • 1/4 c. apple cider vinegar
  • 1/4 c. brown sugar
  • 2 t. worcestershire sauce
  • 1/2 t. black pepper
  • 1 1/2 t. kosher salt

Instructions

Making the spice rub

The night before, make the spice rub: In a small pan over medium heat, toast the coriander, peppercorns, and juniper berries until they are lightly toasted and you start to smell their fragrance wafts out from the pan. Transfer this to a very dry blender, along with the brown sugar, red chile powder, herbs, salt, garlic powder, and lavender. Blend until pulverized into a fine powder. Lightly score any thick areas of fat with a sharp knife. Using all the spice rub, massage the pork all over with the spice rub and refrigerate overnight in an ovenproof baking dish.

ingredients prepped on a plate including peppercorn, red chile powder, and more

Making the BBQ sauce

To make the bbq sauce: In a saucepan over medium heat melt the butter. Add the onion and garlic and let simmer until the onions turn translucent, around 10-15 minutes. Add the mezcal and let simmer for another 15 minutes. Add the chile puree, apple cider vinegar, dijon, brown sugar, Worcestershire, black pepper, and salt. Let this mixture simmer for another 15 minutes, stirring occasionally. Carefully transfer the sauce to a blender and puree until smooth.

Roasting the pork shoulder

The next day when you’re ready to roast the pork shoulder, pull the pork from the refrigerator and let it sit at room temperature for a half hour. Preheat the oven to 275 F. Roast pork in the oven, uncovered for around 3-4 hours, or until the internal temperature reads 190 F. on a thermometer. Turn the heat up to 500 F. and roast for an additional 10-15 minutes, until the skin is a deep golden brown and crispy. Remove the pork from the oven and let it rest for 30 minutes.

HDT BBQ Pulled Pork roasted sauced and ready to eat

Pull apart the meat and crispy skin into strips and serve warm with bbq sauce on the side.

Did you make this recipe?

Tag @highdeserttable on Instagram so we can cheer you on! 🌟

Nutrition values are estimates only. See the disclaimer here.

Calabacitas Benedict

Marianne Sundquist · May 22, 2023 · Leave a Comment

Calabacitas “little squash”, is a dish with many names, and variations and steeped in New Mexico history originating from Native American Pueblos dating back to the 16th century. As with most foods unique to this area, the finished dish is only the starting point for the many opportunities to learn about the foods, people, and history that make up the heart and soul of the Southwest landscape. Each new ingredient and method I learn here change me, even in a small way. Added together, I can’t help but notice that living and cooking here has changed and grounded me in ways I could have ever imagined where the only thing I know for sure, is that I hope I will be learning here with an open heart for the rest of my life. Cooking becomes less about what I do in the kitchen and more about what others have experienced, preserved, and the gift of gathering around the kitchen table to share a dish like this. 

Sacred Ingredients

In her James Beard Award-winning book, Foods of the Southwest Indian Nation, Lois Ellen Frank (Kiowa on her mother’s side and Sephardic on her father’s side) writes about the sacred elements to tribes across the country and the ingenuity of an ecosystem that is created by planting three crops that benefit and thrive when they are planted together in companion planting. This book also happens to include the largest acknowledgments section of any book I have ever seen. I don’t think this is by accident, and if I’ve learned anything at all since my time here learning from chefs like Lois and Walter Whitewater from Red Mesa Cuisine, it’s that the native approach to cooking embodies a spirit of attention and care for all living things including land and food, with a deep appreciation for teachers in all forms.  

Of the three sisters, Lois writes that they “are believed to have been domesticated in Mesoamerica sometime between 7000 and 3000 B.C.” Then, as travel increased along the El Camino Real de Tierra Adentro, the 1591-mile-long road between Mexico City and San Juan Pueblo, New Mexico, it is believed corn and chile was added to cooked summer squash making the combination we know and love today. In Lois’s book the recipe, also called calabacitas, is called Mesa Squash Fry and includes red bell pepper and sunflower seeds. In the Pueblo Indian Cookbook, compiled and edited by Phyllis Hughes a similar version is called Skillet Squash and includes the addition of shredded longhorn cheese (cheddar or american style cheese in the shape of a half moon), while Fabiola C. Gilbert in her book Historic Cookery published in 1931 refers to Calabacitas con Chile Verde which includes a small amount of milk and grated Native or American cheese. I have seen more variations than I can count with additions like tomatoes, chicken broth, cream, queso fresco, jalapeno, and differences in texture from extra brothy to this version which is more on the caramelized vegetable side.

Making the Calabacitas

Calabacitas is wonderful in a bowl on its own, but it also happens to make my favorite benedict of all time. This is a vegetarian recipe, but you could always add a slice of ham or bacon on top of the bread if you wish. Or, if you didn’t want to use biscuits or english muffins, you could always swap those out for roasted fingerling potatoes, sweet potatoes, roasted asparagus or a bed of sauteed hearty greens like kale, chard or collards. 

The classic way of preparing hollandaise sauce is by using a double boiler and saying lots of prayers while whisking. This blender version can be made with a standard blender or an immersion blender and is so easy you might be inclined to add this to your regular brunch rotation.

Print

Calabacitas Benedict

HDT Calabacitas Benedict plated
Print Recipe
Pin Recipe

5 Stars 4 Stars 3 Stars 2 Stars 1 Star

No reviews

Calabacitas is wonderful in a bowl on its own, but it also happens to make my favorite southwestern style benedict of all time. This is a vegetarian recipe, but you could always add a slice of ham or bacon on top of the bread if you wish.

  • Author: Marianne Sundquist
  • Prep Time: 30 mins
  • Cook Time: 30 mins
  • Total Time: 1 hour
  • Yield: 6 servings
  • Category: Breakfast
  • Method: fire-roasted
  • Cuisine: New Mexican

Ingredients

Units

for the calabacitas:

  • 2 T. olive oil
  • 1 red onion, diced
  • 3–4 cloves of garlic, finely chopped
  • 2 fire roasted poblano peppers, peeled, seeded and diced
  • 2 medium zucchini, diced
  • 2 medium yellow squash
  • 2 c. fire roasted corn kernels
  • 1 T. fresh oregano, rough chopped (or 2 t. dry)
  • salt and pepper, to taste

for the hollandaise:

  • 2 1/2 sticks unsalted butter
  • 2 large egg yolks
  • 2 T. freshly squeezed lemon juice
  • 1/2 t. New Mexico Red Chile Powder or to taste
  • Salt and pepper, to taste
  • warm water, as needed for thinning

for serving:

  • 6–12 eggs, prepared however you like them best
  • 6 english muffins or biscuits, sliced in half, toasted and buttered
  • 1/4 c. minced chives, for garnish


Instructions

To make the calabacitas, heat the olive oil in a large, heavy-bottomed pan over medium-high heat. Add the onion and cook until they are beginning to caramelize. Add the garlic and cook for another couple of minutes. Now add the fire-roasted poblanos, zucchini, yellow squash, corn and oregano. Let this cook, stirring occasionally until the vegetables are tender, all of the water has evaporated from the zucchini and yellow squash and everything in the pan is starting to caramelize. Season with salt and pepper until it tastes wonderful to you. Keep warm.

Less than 30 minutes before serving the benedict is the time to make the hollandaise. Fill your blender with very warm water. In a small saucepan over medium heat bring the butter to a simmer and turn off the heat. Pour out the water from the blender, saving it for another use like watering plants once it comes to room temperature and dry the blender with a clean cloth. Transfer the butter to a heat-proof pitcher or measuring cup with a pouring spout to have ready to go. Add the egg yolks, lemon juice, New Mexico chile powder and a pinch of salt and pepper to the blender. Blend this on a medium speed and while it’s blending, carefully remove the fill cap from the blender lid and very slowly pour in the hot butter. Watch the mixture as you pour, you should see it thicken as it emulsifies. Once all the butter has been added, season with salt and pepper as needed. If the hollandaise is too thick, you can thin it out by blending in more lemon juice if you feel it’s needed or one tablespoon of warm water at a time. Transfer the sauce to a heat proof container and keep covered and warm until ready to serve.

To assemble the benedict:  Place English muffins or biscuits in a large bowl, top generously with a spoon of calabacitas, an egg and a drizzle of hollandaise sauce. Garnish with chives and serve immediately.

Did you make this recipe?

Tag @highdeserttable on Instagram so we can cheer you on! 🌟

Nutrition values are estimates only. See the disclaimer here.

High Desert Table

Copyright © 2025 · High Desert Table

  • Privacy Policy
  • Nutrition Disclaimer