• Skip to primary navigation
  • Skip to main content
High Desert Table

High Desert Table

Your everyday guide to Southwestern cooking

  • Home
  • Recipes
  • About
  • Shop
  • Private Events
  • Contact
  • Show Search
Hide Search

green chile

Poblano Potato Puree

Marianne Sundquist · November 22, 2024 · Leave a Comment

I think I should begin with the acknowledgement that just as there are many ways to peel a potato, there are also many ways to make mashed potatoes. Sometimes I love to make mashed potatoes with a potato masher, the skins on and just a bit of olive oil, herbs and lemon zest. And there are other times (once a year in fact) when I make these potatoes at home and love every bit of this French style take on pomme puree.

Technically, the way I learned from my French chef instructors at school over 20 years ago was a ratio of 2:1:1. Meaning 2 part potatoes, 1 part milk (or cream) and 1 part butter. This recipe is already my most decadent take on potatoes and I’m not even going that far. But if you want to go for it, simply increase the butter and half & half to 2 cups each.

This recipe for poblano potato puree results in smooth, luscious potatoes, no lumps in sight. Let’s talk about ingredients! If you leave out the salt and pepper, there are only five ingredients, so each one matters.

Choosing the Right Potatoes for the Best Puree

When choosing potatoes, try to choose potatoes that are similar in size. This will help ensure that they cook evenly. If your potatoes vary in size, no worries! Just keep an eye on them throughout the cooking process, pulling potatoes as they reach the point of being fully cooked. And I have learned the hard way, make sure the potatoes are fully cooked, otherwise it will be difficult to pass them through the food mill.

The reason these potatoes are so luscious and smooth is because we spend a lot of effort removing as much water as possible. This is why we boil them whole as opposed to quartering them. This is also why we spend time stirring them in a hot pan after they’ve gone through the food mill to cook off any water remaining in the potatoes. Because of this, using a high quality butter (with a higher butterfat and lower water content) is a good idea.

Selecting the Perfect Green Chile for Your Dish

When it comes to green chiles, the choice is about what you love and how much heat you prefer. My love for poblanos is never ending. Their flavor and amount of heat easily takes the prize. But more importantly, what chiles do you have? What do you like and how hot do you want it? You could even use pints of frozen green chile just be sure to defrost, drain and press out as much water as possible before adding it to the cream and butter. How much to add? Trust your judgment and taste as you are warming up the cream mixture if needed to help you along.

The other thing that’s important to mention is the many different ways you can actually make these potatoes. If you don’t have a food mill, it’s ok! You can use a potato masher for the whole process. It might not be as smooth but it will taste just as good. Another option is to use a stand mixer with the whisk attachment. This is easiest to do with hot potatoes. Place the fully cooked and peeled potatoes in your stand mixer and slowly add the cream mixture until it all comes together.

Print

Poblano Potato Puree

HDT Poblano Potato Puree Plated
Print Recipe
Pin Recipe

5 Stars 4 Stars 3 Stars 2 Stars 1 Star

No reviews

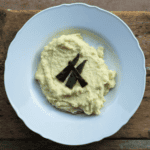
Discover the perfect blend of creamy French-style pomme puree and spicy green chile in this Green Chile Potato Puree recipe. Learn how to achieve smooth, luscious mashed potatoes with a flavorful twist of poblanos and garlic.

  • Author: Marianne Sundquist
  • Prep Time: 30 mins
  • Cook Time: 1 hour
  • Total Time: 1.5 hours
  • Yield: 6 servings
  • Category: Thanksgiving
  • Method: simmer
  • Cuisine: New Mexican

Ingredients

Units
  • 3 lb. yukon gold potatoes, similar in size and washed well
  • 1 1/2 c. (3 sticks) unsalted butter
  • 1 1/2 c. cream, half & half or whole milk
  • 4 fire roasted poblanos, seeded, stemmed
  • 3 large garlic cloves, sliced
  • Salt and pepper, to taste

Instructions

How to Cook and Prepare the Potatoes

In a saucepan, cover the potatoes with cold water and season generously with salt. Bring to a simmer and cook until tender when pierced with a paring knife, about 40 minutes (the length of cooking time entirely depends on the size of your potatoes). Drain well. Let the potatoes cool just enough so they are safe to touch, then slip off and discard the skins and quarter them.

Making the Poblano Cream Mixture

While the potatoes are cooking, place the butter, half & half, poblanos and garlic in a saucepan. Once the butter is melted and the mixture is hot, turn off the heat and carefully blend until smooth. Reserve.

Processing the Potatoes through the Food Mill

Once the potatoes are peeled and quartered, working in batches, process them through the food mill arranged on top of a medium saucepan. Once the potatoes are all milled, place the pot over medium heat. With a heat proof rubber spatula, stir the potatoes for a few minutes, allowing any remaining water to cook off but being careful not to burn them. Turn the heat to low.

Bringing it All Together: Mixing and Tasting

Slowly pour in a bit of your poblano cream at a time, whisking into the potatoes until they fully absorb the liquid before pouring in some more. Continue this until all of the cream has been added.

Optional Steps for the Smoothest Potato Puree

This next step is optional, but at this point you could pass the potatoes through a fine mesh strainer or mesh sieve (this will result in the smoothest of smooth potatoes). Taste the potatoes and season them with salt and pepper as needed.

Storing and Reheating

Store in the fridge for up to 4 days and in the freezer for up to 1 month. To reheat, defrost the potatoes overnight in the fridge and then transfer them to a baking dish with a couple tablespoons of butter and a splash of cream. bake at 350 F. for 30 minutes before serving.

HDT Poblano Potato Puree Quart Containers

Did you make this recipe?

Tag @highdeserttable on Instagram so we can cheer you on! 🌟

Nutrition values are estimates only. See the disclaimer here.

Green Chile Stacked Enchiladas

Marianne Sundquist · January 24, 2024 · Leave a Comment

It’s a humbling and majestic thing to live in New Mexico as an Italian chef from the Midwest. It’s like landing on a different culinary planet. A planet where flavors transcend, reach deeply into the land and sky, and then reappear in a simmering pot of green chile sauce.

Enchanted lavender

A good example of this is lavender. I mostly had experienced lavender in restaurant kitchens as an unexpected flavor profile meant to wow guests, or by getting a whiff from a lotion or candle in a city shop. For almost twenty years I considered it to be my least favorite smell and taste. Then four years ago I moved to New Mexico. There were two different varieties of lavender in my yard and they smelled nothing like I expected. The high floral notes were grounded with traces of grass and wood, soft musk, and worn leather. The flowers were not alone like I had often seen them. They were part of a family, connected to long green stalks and twisting roots. They were growing next to chives and mint. Honeysuckle grew a few feet away. Sometimes there were other scents too, like roasting chiles and pinion fires wafting around and through wooden fence slats from neighboring yards. In the summer with all these high desert scents bumping and bouncing off each other, for the first time, lavender didn’t just make sense and smell good. I was enchanted. It became one of my favorite flavors of all time.

The Southwest is a melting pot

Because of this interconnected Southwest ecosystem where history, ingredients, landscape, and people meet, learning about New Mexican food feels like an extraordinary gift. With Christmas around the corner, I wanted to share a very special recipe from a very special Chef. Over the past number of months, I have had the privilege of learning about Native New Mexican cuisine from Dr. Lois Ellen Frank and Walter Whitewater through virtual culinary tours hosted by Heritage Inspirations. Lois has spent over 25 years documenting the foods and lifeways of Native American tribes from the Southwest and regions throughout the Americas. In 2007, she started a Native American Cuisine catering company named Red Mesa. I’m so grateful she was willing to share her recipes for Green Chile sauce, Tortillas, and Stacked Enchiladas with us here.

Since the pandemic Red Mesa has gone virtual and is offering hands-on cook-along cooking classes, demonstration-style cooking classes, and holiday family classes, along with a beautiful collection of local food products, cookbooks, and posters available on the website.

“When you cook together as a family, it unifies your bond and calls in the wisdom of the ancestors.”

Lois Ellen Frank
 Lois Ellen Frank and Walter Whitewater
Print

Green Chile Stacked Enchiladas

Green Chile Stacked Enchiladas - Plated with sauce
Print Recipe
Pin Recipe

5 Stars 4 Stars 3 Stars 2 Stars 1 Star

No reviews

Spice up your dinner routine with this easy-to-follow and mouthwatering green chile stacked enchiladas recipe. This authentic recipe features roasted New Mexico or Anaheim Green Chiles, flavorful corn tortillas, succulent rotisserie chicken, and a generous layer of melted Jack Cheese.

  • Author: Marianne Sundquist
  • Prep Time: 1 hour
  • Cook Time: 30 mins
  • Total Time: 1.5 hours
  • Yield: 10-12 servings
  • Category: Dinner
  • Method: Bake
  • Cuisine: New Mexican

Ingredients

Units

For the Green Chile Sauce: 

  • 6 cups New Mexico or Anaheim Green Chiles, Roasted, Peeled, & Chopped
  • 1 28 oz can chopped tomatoes
  • 1 Tablespoons Sunflower Oil
  • 1 Medium White Onion, diced (approximately 2 cups)
  • 1 Tablespoon chopped garlic (approximately 6 to 8 cloves)
  • 2-teaspoons kosher salt
  • 1/4 teaspoon freshly ground black pepper
  • 2 cups water


For the Corn Tortillas: 

  • 3 cups Corn Masa Flour for Tortillas (this can be found in your supermarket in the Latin food section)
  • 1 1/2 teaspoons kosher salt (or to taste)
  • 1 1/2 cups warm water


For the Enchiladas: 

  • 1 Rotisserie Chicken, (meat picked from the bones)
  • 4 3/4 cups Jack Cheese, grated

Instructions

Make the Green Chile Sauce

Using the open flame method, roast the green chiles until completely charred and then place in a glass or metal bowl covered with plastic wrap to allow the chiles to sweat and cool down. Once the chiles have cooled, peel, seed, and chop them.

In a medium size saucepan, heat the sunflower oil until hot but not smoking. Sauté the onion over medium to high heat until it begins to brown. About 3 minutes. Add the garlic and sauté for another minute. Add the tomatoes and cook for another 5 minutes stirring to prevent burning. Add the chopped green chile and sauté for another 3 minutes. Add the water and bring to a boil. Reduce the heat and simmer for approximately 15 minutes.

Add the salt and pepper to taste. Remove from heat.

In a blender place half the sauce and blend on high for several minutes until completely smooth. Return the blended mixture to the saucepan with the unblended sauce. Makes approximately 2 ½ quarts sauce for the enchiladas with some sauce on the side.


For the Corn Tortillas

In a medium-sized mixing bowl, combine the corn flour, salt, and water and mix together until you have formed a dough. You can do this with a spoon, but I always use my hands. After the ingredients are completely mixed, use your hands to form balls just smaller than a golf ball and set aside. Preheat your seasoned cast iron skillet so that it is very hot.

In a tortilla press, place one ball in the center of the tortilla press and press together to make one corn tortilla. I use a plastic bag that I cut in half leaving a seam on one side so that I can place the corn masa ball inside the plastic so that it doesn’t stick to the tortilla press. Remove the tortilla from the plastic place it on the cast iron skillet and cook the first side of the tortilla for 30 to 45 seconds, then turn it over and cook for approximately 30 to 40 seconds and cook until it puffs and that is the sign that the tortilla is done.

Place the cooked tortilla in a kitchen towel inside a basket or bowl and prepare the next tortilla following the same steps. Stack the tortillas on top of each other to keep them warm inside the towel. Makes approximately 21 tortillas.

Homemade Tortillas in a bowl

Bake

Preheat your oven to 350 degrees. In a casserole pan or half-hotel pan, layer some green chile sauce to cover the bottom of the pan. Place tortillas on top of sauce (approximately 7 tortillas). Spoon more of the green chile sauce on top of the corn tortillas. Evenly place 1/3 the amount of shredded cooked chicken on top of the green chile sauce and then top with 1 ½ cups of the shredded jack cheese.

Begin another layer. First the corn tortillas (approximately 7 tortillas). Spoon some green chile sauce on top of the tortillas. Evenly place the second 1/3 of the shredded cooked chicken on top of the sauce. Top with another 1 ½ cups of the shredded jack cheese.

Begin the final layer. Place the corn tortillas on top to start the next layer (approximately 7 tortillas). Spoon some green chile sauce on top of the tortillas. Evenly place the final 1/3 of the shredded cooked chicken on top of the sauce. Top with the final amount 1 ¾ cups of shredded jack cheese. Place in the pre-heated oven and bake until the cheese browns and you see bubbles on the side of the pan approximately 30 minutes. Serve immediately.

Notes

The bones can be made into chicken stock. Here is a recipe for homemade rotisserie chicken stock.

Did you make this recipe?

Tag @highdeserttable on Instagram so we can cheer you on! 🌟

Nutrition values are estimates only. See the disclaimer here.

This Rotisserie Chicken Stock - in a bowl

Rotisserie Chicken Stock

Create a rich and flavorful chicken stock by simmering a leftover Rotisserie chicken with aromatic vegetables, such as onions, carrots, and celery. This Rotisserie Chicken Stock is a savory and versatile base for soups, stews, and sauces.

Get the Recipe

Hatch Green Chile Picnic Chicken Salad

Marianne Sundquist · May 26, 2023 · Leave a Comment

When warm weather arrives, my family can’t wait to get outside. We take more walks, go adventuring around town and look for any and all excuses to light up the grill. This Picnic Chicken Salad is made for days like these. It’s easy to make ahead, easy to make into sandwiches, and versatile enough to bring along on a hike or stash in your picnic basket for tailgating at the opera.

Make it happen

This recipe brings back a lot of memories because it reminded me this week of a lobster salad I used to make way back when I was working as a chef de partie at Avenues in the Peninsula Hotel in Chicago under the helm of Chef Graham Elliot. The kitchen was small and only had room for four of us aside from Chef. Even though we were serving anywhere from three to 20+ course spontaneous tasting menus, somehow night after night we got it done with enough juice left in the tank to wake up and do it again the next day. I think having a handful of so-simple-how-can-it-taste-this-amazing kind of recipes up our sleeves was how we pulled it off with such a small team. That, and the phrase that became a kind of daily mantra “make it happen” which when said to each other was annoying and motivational in equal measure. And somehow at the end of the night, even when we were faced with a seemingly impossible prep list or a stack of tickets from the dining room, by some miracle we actually had made it happen. I would like to publicly apologize to my husband and kids who sometimes hear me accidentally say “make it happen” to them. What can I say? It’s a habit that has worked for me for a long time, so now as a mom maybe it can work its magic at home too, or so I can dream.

Creme Fraiche is the way

You’ll notice that I steer clear of mayo or even sour cream and use creme fraiche instead. Creme Fraiche is the French, fattier and creamier cousin to sour cream. Thinned with a little lemon we get a decadent, bright, and creamy dressing that doesn’t get weighed down with the oily mouthfeel found in mayo. Don’t get me wrong, I love a good garlic mayo on too many things to count, but here I wanted to keep it light and flavor-forward in every possible way.

The meat

You can make this salad as it is here with pulled roasted chicken, or you can use steamed or roasted chicken breasts, roasted or smoked salmon, shrimp, or cooked lobster meat. If you want to leave out meat altogether, just substitute roasted baby or new potatoes, and viola! One of my favorite potato salads of all time. 

Common misconceptions

There is a common misconception that when picnic salads go bad, it is because of the creamy dressing. This is false. A lot of times, a dressing will actually protect the salad a bit because they usually contain some preservatives like sugar or acid, but the bigger dangers are dirty hands or utensils when preparing it and all cut vegetables and fruits because they contain more surface area for bacteria to grow. When you head out into the field with any kind of prepared food, keep it on ice in a cooler or be sure to consume it within 2 hours, or 1 hour if it’s extra hot out. Happy trails!

Picnic chicken salad ingredients fresh from the market
Print

Hatch Green Chile Picnic Chicken Salad

Print Recipe
Pin Recipe

5 Stars 4 Stars 3 Stars 2 Stars 1 Star

No reviews

This Picnic Chicken Salad is made for warm-weather picnics or backyard barbeques. It’s easy to make ahead, easy to make into sandwiches, and versatile enough to bring along on a hike or stash in your picnic basket for tailgating.

  • Author: Marianne Sundquist
  • Prep Time: 15 mins
  • Cook Time: 0 mins
  • Total Time: 15 minutes
  • Yield: 2 quarts
  • Category: Summer
  • Method: chop
  • Cuisine: American

Ingredients

Units
  • 2 fire-roasted hatch green chiles, peeled, seeded, and diced
  • 8 oz. creme fraiche
  • 1 Lemon, juiced and zested (around 2 T. Juice)
  • 1 large apple, finely diced
  • 1/2 c. finely diced red onion
  • 1/4 c. Minced chives
  • 1 c. Celery and leaves
  • 4 c. pulled roasted Chicken,
  • Salt and pepper to taste

Instructions

In a blender, blend the green chiles, creme fraiche, lemon juice, and zest until smooth. Transfer this mixture to a large bowl and add the apple, red onion, chives, celery leaves, and roasted chicken. Season to taste with salt and pepper.

Picninc chicken salad ingredients chopped, prepped, and ready to go

Did you make this recipe?

Tag @highdeserttable on Instagram so we can cheer you on! 🌟

Nutrition values are estimates only. See the disclaimer here.

High Desert Green Chile Cheeseburger

Marianne Sundquist · May 13, 2023 · Leave a Comment

There is so much about cooking and eating in the Southwest that is special, including green chile cheeseburgers which top the list for me, especially during the grilling season. I think about burgers made in other places and all the care and effort that goes into coming up with the most creative combination of toppings, or signature burger patties, but at the end of the day it feels like we have an unfair advantage—we have fire roasted green chile. The best burgers I have ever had are in New Mexico and while they vary to some degree, they all have green chile in common. Over time, I have discovered that my favorite burgers tend to be the simplest. I love making this burger and eating it just as is, sometimes with a bun, sometimes wrapped in big pieces of lettuce, but always with melted cheese and a spoonful of poblano jam on top. And I can’t believe I’m saying this, but with this combination, I don’t even add my usual burger go-to’s of mayo, ketchup, and raw slices of onion. 

The cheese

I didn’t want to choose the cheese for you because this is such a personal choice. The day I made these, we melted blue cheese on top of the burgers because this is one of our favorite cheeses, but goat cheese, cheddar, and American would be great too. 

The patty

The most important thing for a good burger is a flavorful burger patty. Here, we accomplish this by adding two kinds of meat, half ground chuck and half-ground sirloin. The chuck brings the texture while the ground sirloin brings the flavor. Combined together with good seasoning and frozen grated butter for additional flavor and moisture, results in my favorite burger patty of all time. You’ll notice that we add a generous (1 tablespoon) of dried herbs to the burger. I have an affinity for the herb blend I make called High Desert Herbs, a combination of marjoram, sage, lavender, rosemary, chile, and thyme (available at stokli.com) but it’s also similar to Herbes de Provence and can be substituted with any or all of the dried herbs listed above.   

The jam

The jam can easily be made a few days in advance and can be adjusted with different chiles. If you want a spicier jam, instead of poblano, you might want to try a hatch, anaheim or even poblano chile. Or, you can create your own signature jam by combining more than one chile together. 

HDT Green Chile Cheeseburger - Poblano Jam
Print

High Desert Green Chile Cheeseburger

HDT Green Chile Cheeseburger - plated
Print Recipe
Pin Recipe

5 Stars 4 Stars 3 Stars 2 Stars 1 Star

No reviews

This New Mexico-inspired green chile cheeseburger combines the heat of green or poblano chiles with the creamy richness of your favorite cheese, creating a mouthwatering fusion that will leave your taste buds craving more.

  • Author: Marianne Sundquist
  • Prep Time: 30 mins
  • Cook Time: 30 mins
  • Total Time: 1 hour
  • Yield: 8 burgers
  • Category: burgers
  • Method: grilling
  • Cuisine: New Mexican Inspired

Ingredients

Units

for the poblano jam:

  • 2 T. olive oil
  • 1 large shallot, sliced
  • 4 garlic cloves, sliced
  • 4 fire-roasted poblano chiles, peeled, seeded & diced
  • 1/4 c. sherry vinegar
  • 1/4 c. brown sugar, packed
  • Salt and pepper to taste

for the burgers:

  • 1/2 c. (1 stick) unsalted butter
  • 1 lb. ground beef chuck
  • 1 lb. ground beef sirloin
  • 1 T. High Desert Herbs or Herbes de Provence
  • 2 t. kosher or flakey sea salt
  • 1/2 t. Black pepper

for everything else:

  • 8 buns
  • your favorite cheese and toppings

Instructions

Making the jam

To make the poblano jam, heat the oil over medium heat in a saucepan. Add the shallots and cook for around ten minutes, until they caramelize. Add the garlic and cook for another few minutes, stirring frequently to prevent burning. Add the diced chiles, vinegar, sugar, and a pinch of salt and pepper. Let this mixture come to a boil, then lower the heat and let it simmer for around 10 minutes, or until the liquid has reduced by around half in the pan. You can leave this as is or transfer the mixture to a blender and pulse a few times to make a slightly smoother consistency. Check seasoning and add more salt and pepper as needed. Transfer the jam to a heat-proof jar and serve warm with the burgers or refrigerate if making in advance.

Making the burgers

To make the burgers, first, grate the butter into a bowl with a box grater and freeze the butter for around ten minutes. In a large mixing bowl, combine both types of ground beef, herbs, salt, pepper, and frozen butter until the mixture is well combined. Form into 8 patties and keep refrigerated. When you’re ready to grill, preheat the grill and cook the burgers to your desired temperature. When they’re almost done, top with cheese, close the grill, and cook the burger for another couple minutes, until the cheese is melted. This is a great time to place the buns cut side down on the grill to slightly toast them. To serve, place burgers on the buns and top with poblano jam. Enjoy with your favorite condiments and other toppings.

Did you make this recipe?

Tag @highdeserttable on Instagram so we can cheer you on! 🌟

Nutrition values are estimates only. See the disclaimer here.

Spring Chicken Posole Verde

Marianne Sundquist · May 12, 2023 · Leave a Comment

When I spooned up a bowl of this authentic chicken pozole for my husband last week, the first thing he said was “this tastes like New Mexico”. I cannot think of a better compliment than this. This is a simple soup that takes some time to make, but I promise it’s worth it. There are many kinds of posole, so to celebrate the full arrival of Spring, I decided to make one loaded with greens. 

When I arrived home after picking up a bag of Posole at the Santa Fe Farmers Market, I noticed a little piece of paper inside the ziplock bag with a recipe for “Raul’s Posole”. The recipe was for a pork and red chile version where you put pork and posole into a pot with water, and let it cook for a couple of hours before adding red chile, salt, pepper, garlic, and tomatoes before garnishing with chopped onions and oregano. The next time I make a pot of posole I will definitely try Raul’s recipe. The generosity of recipe sharing is how I’m learning to cook here and each time is a gift. 

When it comes to posole, I’ve probably learned the most while hanging out in the kitchen with Chefs Lois Ellen Frank and Walter Whitewater. They taught me that while there are many ways of cooking posole, soaking the corn overnight in the fridge is a great way to jump-start the process for cooking the next day. And their favorite way of cooking posole is overnight in a crock pot covered with water. The next day, you will have fluffy and tender posole for however, you plan on using it. So feel free to experiment with cooking posole either of these ways. And as always, you can always shorten the cooking time for this recipe with cans of hominy if you find that helpful.

You’ll notice that in this recipe I give estimates for the number of garlic and tomatillos. The main reason for this is that tomatillos and garlic cloves come in a variety of sizes. If you’re using garlic cloves that are close to the center of a head of garlic, the cloves will be smaller. So just use the number that feels good to you.

When I make this recipe, I like to make the broth, pick the chicken meat and soak the posole the day before. This way, when I actually make the soup the next day, everything feels fast and easy. If you’re crunched for time you can buy chicken broth at the store and/or simmer chicken breasts or thighs in the broth until they are cooked through before pulling the meat into bite-sized pieces. And while you’re at it, if you don’t care about the broth being a bright green, you can skip the blending and simply add minced parsley and cilantro to the warm soup right before serving. 

So while you can make a pot of posole about a hundred different ways, make it work for you. I’d be willing to bet it will still taste like New Mexico in the best of ways.

Print

Spring Chicken Posole Verde

High Desert Table - Easy Chicken Pozole - plated with jalapenos
Print Recipe
Pin Recipe

5 Stars 4 Stars 3 Stars 2 Stars 1 Star

No reviews

When I spooned up a bowl of this Spring Posole for my husband last week, the first thing he said was “this tastes like New Mexico”. I cannot think of a better compliment than this.

  • Author: Marianne Sundquist
  • Prep Time: 2 hours
  • Cook Time: 1 hour
  • Total Time: 3 hours
  • Yield: around 12 servings
  • Category: Soup
  • Method: Slow Cook
  • Cuisine: New Mexico Inspired

Ingredients

Units

for the hominy (posole):

  • 1 1/2 c. dried hominy (posole) or 2 cans of cooked hominy, rinsed and drained

for the chicken & broth:

  • 1 rotisserie chicken
  • 12 c. cold water
  • 2 t. Salt

for the soup:

  • 1 T. olive oil
  • 1 large onion, diced
  • 3–5 garlic cloves, finely chopped
  • 5–7 tomatillos, trimmed and diced
  • 2 c. (or 1, 16 oz. tub) mild green chile, diced
  • 2 fire roasted poblano chiles, peeled, seeded, diced
  • 1 small bunch of spring onions, green parts sliced and white parts sliced and reserved
  • 1 c. parsley leaves and stems, sliced
  • 1 c. cilantro leaves and stems, sliced
  • salt and pepper to taste

for garnish:


  • Jalapeno slices, reserved green onions and/or avocado


Instructions

If you are using canned posole (hominy) skip this step: The day before you cook your dried posole, soak them in the fridge, covered with water by at least three inches. The next day, pour the water and posole into a large pot and add more water to cover. Cook them over medium-high heat until they are tender, around two hours, and drain.

HDT - Spring Posole - hominy prepped

To make the chicken broth

Break the chicken into pieces and place in a large pot. Add the water, salt and bring to a boil. If you are preparing the vegetables for the soup at this time, throw in the ends, skins, and trimmings, but if you’re making this ahead of time, don’t worry about it. Lower the heat to a simmer for around an hour. Pull out the chicken pieces with tongs and strain the broth through a fine mesh strainer. Reserve the broth and pull the chicken meat from the bones once it’s cool enough to handle and reserve.

To make the soup

Place the chicken broth in a large pot and bring to a simmer. Bring a separate, large, heavy-bottomed pot to medium heat. Add the oil and after a minute, add the onions. Let them cook until they are just starting to caramelize. Add the garlic and cook another minute more. Add the tomatillos, mild green chile, fire-roasted poblanos, white parts of the spring onions, the cooked posole, and reserved chicken.

Place the parsley and cilantro in a blender, along with 6 cups of the hot chicken broth. Carefully blend until the broth is a bright green. Pour this and the remaining chicken broth into the pot with the posole mixture. Bring this to a simmer, taste, and adjust seasoning as needed.

Ladle into bowls and garnish with jalapeno, the green parts of spring onions and/or avocado. Enjoy!


Did you make this recipe?

Tag @highdeserttable on Instagram so we can cheer you on! 🌟

Nutrition values are estimates only. See the disclaimer here.

High Desert Table

Copyright © 2025 · High Desert Table

  • Privacy Policy
  • Nutrition Disclaimer