• Skip to primary navigation
  • Skip to main content
High Desert Table

High Desert Table

Your everyday guide to Southwestern cooking

  • Home
  • Recipes
  • About
  • Shop
  • Private Events
  • Contact
  • Show Search
Hide Search

family recipes

Homemade Danish Apple Kringle

Marianne Sundquist · January 3, 2025 · Leave a Comment

This week’s recipe is a special one because I get to introduce you to the Pastry Bandit, aka my husband Hans, who comes from a Swedish family in Minnesota and has been enjoying kringles since he was a child. Being that flour makes him sneeze, he wears a bandana whenever baking and inevitably we all gather to see what creations this masked character is mixing, rolling, and shaping. The kringle he grew up eating the most is the one his mom still makes to this day, filled with an almond filling. Here, because we had exactly six granny smith apples in the fridge, we decided to try a fruit filling this year instead. It was a great decision!

What is a Kringle?

Kringles are known for their flakey, buttery pastry and almond or fruit fillings, often glazed and sprinkled with nuts or sugar. This classic Danish dough is incredibly easy to make (only four ingredients) and is a dream to work with, especially after resting in the fridge overnight. In this recipe, we skip the glaze but if you want to add a boost of sweetness, simply whisk together one cup of powdered sugar with two tablespoons of milk and you are ready to drizzle away until your heart’s content.

If you want to get creative with the fruit filling, go for it! You could add blueberries, dried fruits like cherries or currants, or chopped nuts. We love to make the dough and the filling the day before we plan on rolling it out and baking. This is perfect for breakfast, dessert, or a mid-day snack break and is wonderful with tea and coffee.

Print

Homemade Danish Apple Kringle

Danish Apple Kringle - out of the oven on a cutting board
Print Recipe
Pin Recipe

5 Stars 4 Stars 3 Stars 2 Stars 1 Star

No reviews

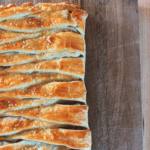
Learn how to make a delicious and easy homemade Danish Apple Kringle with this simple recipe. This classic Danish pastry is flaky, buttery, and perfect for any occasion.

  • Author: Marianne Sundquist
  • Prep Time: 1 hour
  • Cook Time: 40 mins
  • Total Time: 1 hour 40 minutes
  • Yield: 12 servings
  • Category: dessert, breakfast
  • Method: bake
  • Cuisine: danish

Ingredients

Units

for the dough:

  • 2 c. all-purpose flour
  • pinch of salt
  • 1 c. cold butter, diced
  • 1 c. sour cream

for the filling:

  • 6 medium-sized firm apples, peeled, cored, and diced into 1/2” pieces
  • 1/2 c. packed brown sugar
  • 1 T. cornstarch
  • 2 t. pumpkin spice or cinnamon
  • 2 t. vanilla extract
  • pinch of salt

for building:

  • 1 egg, for egg wash
  • 2 T. decorating sugar or sugar in the raw

Instructions

The day before, make the dough: In the bowl of a stand mixer with the paddle attachment, add the flour, salt, butter, and sour cream. Mix this on medium speed until the dough comes together and comes away from the side of the bowl. It will feel just slightly sticky but easily form into a ball. Wrap the dough in plastic wrap and refrigerate for at least overnight.

Making the Apple Filling

To make the filling, add the apples, brown sugar, cornstarch, pumpkin spice, vanilla, and salt to a large saute pan. Let this mixture simmer over medium heat until the apples release their juice and the mixture slightly thickens, resembling apple pie filling, around 30 minutes. Let this cool completely.

Assembling the Kringle

To build and bake the kringle, preheat the oven to 375 F. and line a large baking sheet with a silicone baking mat or parchment paper.  On a lightly floured, clean, and dry surface, roll out the dough to a rectangle, roughly 24” wide and 14” high. Carefully transfer this rectangle of dough to your baking sheet.

Danish Apple Kringle - rolling and prepping the dough

Make sure to leave a 12-inch wide rectangle of rolled-out dough in the middle, and cut 1-inch wide strips along both sides of the rectangle. Spread the apple filling in the center rectangle of the pastry.

Danish Apple Kringle - cutting the strips

Danish Apple Kringle - folding the strips

Then, alternating sides, fold each strip of cut dough over the apple filling until all of the apple is covered and all the strips are folded over.

Danish Apple Kringle - before baking

Baking the kringle

In a small bowl, whisk the egg and brush it over the pastry. Sprinkle the top with decorating sugar and bake for around 35-40 minutes, or until the pastry is golden brown.

Danish Apple Kringle - egg wash and decorative sugar

Transfer to a cutting board and let cool for ten minutes before slicing and serving.

Danish Apple Kringle - sliced and plated


Did you make this recipe?

Tag @highdeserttable on Instagram so we can cheer you on! 🌟

Nutrition values are estimates only. See the disclaimer here.

High Altitude Chocolate Chip Cookies

Marianne Sundquist · December 31, 2024 · Leave a Comment

Over the years I have made many cookies. In the pastry realm of recipes, I’ve always considered cookies to be one of the easiest and most straight forward. And in Santa Fe we are lucky enough to have pastry chefs who know their way around the kitchen when it comes to cookies. This week we picked up a cookie box from Momo + Co. for the holiday week and with each new cookie I taste out of the box, I am fairly sure it’s the best I have ever had. Not to mention the macarons at Chaine in Burro Alley which would give any Parisian macaron a run for its money. But there is also something about making a simple cookie at home. It’s one of my favorite things to do with my kids. I love how much fun they have measuring (and spilling) and waiting for the cookies to emerge from the oven.

The Quest for the Perfect High-Altitude Cookie

Around eight years ago when my family moved to New Mexico my cookies started coming out of the oven and were a little bit off. Sometimes they were too puffy and other times too dry. I was puzzled because I had always assumed that high altitude baking was primarily for cakes. So I set out to figure out how to make a chocolate chip cookie that was crispy on the outside but chewy on the inside. I also wanted the cookie to stay chewy over the next couple of days when stored at room temperature in an airtight container. After many attempts in the Santa Fe altitude, I’m happy to report that my family has declared this the best cookie I have ever made. This is a big win for me and I hope it will be a big win for you too.

Adapting a Classic Recipe

I found an old chocolate chip cookie recipe that had worked well for me years ago. I wish I could remember where it came from to give a proper thank you to its origins, probably a baking blog or back of a bag of chocolate chips. Then I adjusted it with some basic high-altitude techniques: I increased the temperature, decreased the cooking time, slightly decreased the leavening agents and sugars and increased the liquid (here I added an extra egg). Then for a bit of salty richness, I do what Snoop Dog does, which is add creamy peanut butter to his chocolate chip cookie dough. And to finish it off, right before the cookies go into the oven I sprinkle some flakey sea salt over the top. And since I always keep Stokli’s High Desert Salt by the stove, I use this which adds a hint of New Mexico red and green chiles and lavender too.

If you don’t have a hand mixer, don’t worry! You can use a handheld electric mixer, or make this the way everyone used to, with a wooden spoon and some elbow grease. It might take a little longer, but it will get the job done, resulting in the best chocolate chip cookies I’ve ever made from sea level to the mountains.

Print

High Altitude Chocolate Chip Cookies

High Altitude Chocolate Chip Cookies - in a bowl
Print Recipe
Pin Recipe

5 Stars 4 Stars 3 Stars 2 Stars 1 Star

No reviews

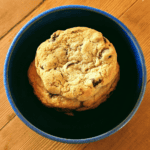
Learn how to make the best high altitude chocolate chip cookies with this easy recipe. Perfect for chewy, crispy cookies every time!

  • Author: Marianne Sundquist
  • Prep Time: 30 mins
  • Cook Time: 30 mins
  • Total Time: 1 hour
  • Yield: 24-48 cookies
  • Category: dessert, high-altitude
  • Method: Bake
  • Cuisine: american

Ingredients

Units
  • 2 c. (240 g.) all-purpose flour
  • 1/4 t. baking soda
  • 1/2 t. baking powder
  • 1/2 t. kosher salt
  • 3/4 c. (12 T. / 170 g.) unsalted butter, cold
  • 2 T. creamy peanut butter
  • 1/2 c. (100 g.) granulated sugar
  • 1/2 c. (100 g.) packed brown sugar
  • 2 large eggs
  • 2 t. vanilla paste or extract
  • 1 1/2 c. dark chocolate chips
  • flakey sea salt for sprinkling on top

Instructions

Preheat the oven to 400 F. Line 2 large baking sheets with a silicone baking mat or parchment paper.

In a medium bowl, whisk together the all-purpose flour, baking soda, baking powder and salt. Set aside.

Making the Cookie Dough

In the bowl of a stand mixer fitted with the paddle attachment, add the butter, peanut butter, granulated sugar and brown sugar. Mix on medium speed until the butter mixture is thoroughly combined and there are no lumps.

Now add the eggs and vanilla and mix again until fully incorporated. Turn off the mixer and add the flour mixture. Turn the mixer on low at first, so you don’t have a cloud of flour fly into your face. Once the flour begins to turn into a dough, you can turn the mixer speed to medium to fully mix everything together. Along the way you may need to stop the mixer to scrape the sides of the bowl with a rubber spatula so nothing is stuck on the sides.

Once the cookie dough has come together, add the chocolate chips and mix just until combined. Scoop the dough with a spoon or a cookie scoop into whatever size cookies you want to make, leaving around 2-inches of space between each one. Sprinkle a small amount of flakey sea salt on top of each cookie.

High Altitude Chocolate Chip Cookies - dough on a sheet tray

Baking and Cooling

If you are making a standard size cookie (around 2 tablespoons of dough), bake the cookies for 8-10 minutes, until the edges begin to turn golden brown. Let rest on the cookie sheet for 5 minutes before transferring them to a wire rack or plate to finish cooling.

Did you make this recipe?

Tag @highdeserttable on Instagram so we can cheer you on! 🌟

Nutrition values are estimates only. See the disclaimer here.

High Desert Table

Copyright © 2025 · High Desert Table

  • Privacy Policy
  • Nutrition Disclaimer