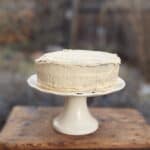
High-altitude baking can be a challenge. If I had a video camera in my kitchen since moving to Santa Fe, there have been a few times when the footage could be used to make a sitcom or reality show. I mean, this is some real popcorn-worthy material—a cake overflowing out of the pan, the little bubbling bits catching fire on a sheet tray in the oven, and the hilarity that ensues as everyone in the house reacts. The kids, the husband, the baker (aka me), and even Saturn the dog comes to life from his nap spot on the couch as cake pans are quickly brought outside in a plume of smoke and tossed on cold rocks to cool down. Even though my bakes usually result in whiffs and sighs of delightful success, now when I set out to bake a cake, there’s a new joke in our house. My well-meaning family members wish me luck, my brow furrows as I pour the batter into the pan, and I whisper a little prayer with no idea of what will happen in the 30 minutes to follow. I think some of this has been a bit of bad luck but another part of it was me in denial about the reality of what high altitude does to baking. This year, I have set out to not only bake better cakes but more importantly learn about why making adjustments to leavening agents, liquid, temperature and time makes a meaningful difference. This cake is the result of my exploration and discovery. The days of my cake-making dramas are (hopefully) over.
High-altitude baking
Santa Fe sits at just over 7,000 feet at its lowest points. And since baking is affected as low as 3,000 feet in elevation, there is no way of getting around it here. The first thing I learned when setting out to conquer my cake-making fiascos, is that as we travel higher in elevation, air pressure decreases. And air pressure is what makes our understanding of general baking rules, proportions, time, and temperatures what it is. Low air pressure is what causes water to boil at lower temperatures (at 7000 feet, 198.9 F. to be exact) and in baking it does two main things: it causes liquids to evaporate faster and makes baked goods rise faster and easier. I now understand that my exploding cakes were the result of high pressure rising so quickly that the cell walls inflated and burst. Oh, how I feel understood and seen by air pressure science!
This recipe takes these small but mighty elevation details into account and I played with many variables until I landed on a luscious cake full of bounce and rich chocolate flavor. I experimented with the amount of liquid, egg, sugar, and baking powder and also the temperature and time of the bake.
Super simple frosting
For this cake, I include a recipe for a simple cream cheese frosting which was a great choice since eventually, we turned the top of the cake into a panda face for River’s tenth birthday. But I think a whipped cream cream cheese frosting would be just as delicious and a bit lighter. You can make this cake into two or three layers, whichever you prefer. And feel free to get creative with what you spread inside the layers. This recipe keeps it simple and just uses frosting, but it’s also a great way to add another layer of flavor to the cake. You could use any flavor jam (raspberry is a favorite), even apple or pumpkin butter.
If you make a cake or cupcakes, just keep in mind that baking times will be less for cupcakes. Keep an eye on it as it bakes and keep a small knife, skewer, or toothpick ready for testing. After all of the care that goes into making a cake or cupcakes, the last thing you want to happen is for it to overbake and get dry and crumbly. We are all in this together, so happy baking!
PrintHigh Altitude Chocolate Cake with Cream Cheese Frosting
Baking at higher elevations can be an unpredictable challenge. This luscious chocolate cake is perfect for your high-elevation baking adventures.
- Prep Time: 60 mins
- Cook Time: 40 mins
- Total Time: 1 hour 40 minutes
- Yield: 1, 9” 2 or 3-layer cake or 24 cupcakes
- Category: Dessert
- Method: Baking
- Cuisine: Southwest
Ingredients
for the cake:
- butter, for coating the pans
- parchment paper, for lining the bottom of the pans
- 2 c. (250 g.) all-purpose flour, plus more for pans
- 1 ¾ c. (350 g.) granulated sugar
- 3/4 c. (75 g.) dutch processed cocoa powder
- 2 t. baking soda
- 3/4 t. baking powder
- 1 t. kosher salt
- 1 1/4 c. buttermilk
- 1/2 c. vegetable oil
- 3 large eggs, at room temperature
- 2 t. vanilla extract
- 1 c. freshly brewed hot coffee
for the frosting:
- 3 c. powdered sugar, sifted
- 2, sticks unsalted butter, room temperature
- 2, 8 oz. packs of cream cheese, at room temperature
- 2 t. vanilla extract
Instructions
First, preheat the oven to 375 F. Generously rub butter all over the inside of your two or three cake pans. Now place around a tablespoon of flour into one of the pans. Moving around in the circle, tap the pan so the flour coats the bottom and sides of the pans evenly. Now tap all of the excess flour into the next pan and repeat this process. If you are using a third pan, repeat this again, otherwise, tap out any extra flour into the sink. Now line each cake pan with parchment paper on the bottom. To do this, cut a piece of parchment paper at least the size of the cake pan and fold it in half. Now fold it in half again. Now fold the triangle again and hold it over the cake pan so the corner reaches the center. Cut the outer edge of the paper so it matches the curve of the circular pan, unfold the parchment and it should fit in the bottom perfectly. If you are making cupcakes, line your cupcake pan with paper liners.
To make the batter, in a large, dry bowl whisk together the flour, sugar, cocoa powder, baking soda, baking powder and salt. In a separate medium bowl whisk together the buttermilk, vegetable oil, eggs, vanilla, and hot coffee. Add the wet ingredients into the dry ingredients and whisk together until the batter is incorporated. Pour the batter evenly between your pans or into your cupcake liners. Bake for 20-25 minutes (for a cake) and 15-20 minutes (for cupcakes), or until a small knife or skewer inserted into the center comes out clean.
Let the cakes cool for 15 minutes before carefully inverting them onto a large plate lined with parchment paper. The way I like to do this is to place a piece of parchment paper on top of the cake. Place a large plate over the parchment paper and while holding everything tightly together, carefully flip it over. Remove the cake pan and parchment paper stuck to the bottom of the cake. Let the cake cool completely before layering and frosting.
Once the cakes are cool, lay one cake on a platter or pedestal and generously frost the top. Repeat this with the remaining layers and then frost the entire outside of the cake. Enjoy!