• Skip to primary navigation
  • Skip to main content
High Desert Table

High Desert Table

Your everyday guide to Southwestern cooking

  • Home
  • Recipes
  • About
  • Shop
  • Private Events
  • Contact
  • Show Search
Hide Search

lunch

Everyday Vinaigrette

Marianne Sundquist · June 23, 2023 · Leave a Comment

I love to keep a vinaigrette in the fridge for the week. It makes a lunchtime salad easy, it’s easy to grab for dipping raw vegetables in for a snack, sometimes I find myself drizzling some inside a sandwich or in a chicken, tuna, pasta, or grain salad, or on top of all types of grilled vegetables. The bottom line? A simple vinaigrette is more savvy and useful than it might appear.

Everyday Vinaigrette - fresh ingredients in a bowl

I know I’ve talked about it before, but this is a nook-and-cranny kind of dressing. I have to admit they are my favorite kind. Sure, they can be tossed with all kinds of greens but this kind of dressing functions at its best when it’s topically applied, meaning to spoon on top creating an uneven coating. 

Why in the world does anyone want an uneven coating of dressing you might be asking? It all comes down to the element of delight and surprise. Imagine you are eating a salad and with the first bite you taste some greens, some golden beets, and a bit of goat cheese and in general everything is lightly dressed in a bright, lemony vinaigrette. That salad sounds pretty good and as I write this, I’m starting to feel a bit hungry for lunch. Now, imagine you are eating another salad and with the first bite you taste some greens, some golden beets, a bit of goat cheese and then BAM, a burst of lemon, olive oil, honey, shallot, and some savory element you can’t describe (here it’s the garlic that’s mellowed in the olive oil and acid) has found a spot to hide inside a fold of greens. This is the delightful experience of a nook and cranny dressing. It’s the finely chopped shallot and garlic that gives the dressing the ability to concentrate flavors and hide. I sometimes use other ingredients to function in this way, like crushed grapes or diced apples. You’ll probably notice that the olive oil hardens in the fridge. Just remove the jar about 15 minutes before using or run the sealed jar under hot water for a minute.

This is the dressing I make most often and never measure the ingredients. The lemon juice is interchangeable with many kinds of vinegar like red wine vinegar, white wine vinegar, champagne vinegar, and rice wine vinegar. I encourage you to try this by either following the recipe or not. I have complete faith that your eyes and your mouth will guide you.

Everyday Vinaigrette chopped ingredients
Print

Everyday Vinaigrette

Everyday Lemon Vinaigrette ready to serve
Print Recipe
Pin Recipe

5 Stars 4 Stars 3 Stars 2 Stars 1 Star

No reviews

This everyday lemon vinaigrette makes a lunchtime salad simple, it’s easy to grab for dipping raw vegetables in for a snack, sometimes I find myself drizzling some inside a sandwich or in a chicken, tuna, pasta, or grain salad, or on top of all types of grilled vegetables. The bottom line? An everyday vinaigrette is more savvy and useful than it might appear.

  • Author: Marianne Sundquist
  • Prep Time: 15 mins
  • Cook Time: 0 mins
  • Total Time: 15 mins
  • Yield: 1 cup
  • Category: Salads
  • Method: chop
  • Cuisine: French

Ingredients

Units
  • 1–2 shallots, depending on size, finely chopped
  • 2 garlic cloves, finely chopped
  • 1/4 c. freshly squeeze lemon juice
  • 1/3 c. extra virgin olive oil
  • 1 T. honey
  • 1 T. dijon mustard

Instructions


Chop what needs chopping, squeeze what needs squeezing, and whisk all ingredients together and store in the refrigerator for up to a week. So simple, so easy. You’re a pro!

Did you make this recipe?

Tag @highdeserttable on Instagram so we can cheer you on! 🌟

Nutrition values are estimates only. See the disclaimer here.

Red Chile Mezcal BBQ Pulled Pork

Marianne Sundquist · June 2, 2023 · Leave a Comment

For years my go-to way of preparing pulled pork revolved around the idea of submerging caramelized meat in the oven with broth and aromatics (like onion, garlic, cilantro stems, and a jalapeno) over low heat for many hours, sometimes even overnight in the crock pot. I have always loved braising because eventually all of the toughness disappears, not only creating strands of tender meat but just as much because of the luscious broth that’s left behind that can be used for reheating meat, soup, stew or to freeze for a rainy day. 

Why roast it?

This recipe approaches pork shoulder in another effective way—through roasting. And even though we forfeit a few quarts of liquid gold that come from braising, we end up with melt-in-your-mouth shreds of tender meat and crispy pork skin speckled throughout, perfect for drizzling, dunking or tossing in Red Chile High Desert BBQ Sauce, a chile based sauce spiked with a generous pour of mezcal and softened with a hunk of butter. 

The butt is the shoulder

This recipe calls for Pork Shoulder (also called Picnic Shoulder or Picnic Roast), but Pork Butt (also called Boston Butt) is technically part of the front shoulder and some might even argue is a better choice so let’s talk about it: Pork Butt is not from the rear of the pig at all, but a primal cut right behind the pig head. Late in the 19th century the topsy-turvy name was coined and stuck. The shoulder on the other hand, sits right below the butt and travels down the front leg toward the hoof. Pork Butt has more fat marbling throughout the meat, which renders during cooking adding more moisture and flavor. Pork shoulder has less fat throughout the meat, but often a thicker piece of fat on top, which crisps up beautifully during the final minutes of cooking. So either way you can’t lose. 

Prep the day before

I like to make pulled pork and BBQ sauce the day before a backyard barbecue, so when I wake up the next morning all I have to do is sip on coffee and think about how all the big lifting for the day is done. The grill is also wide open, with plenty of room for grilling buttered buns, vegetables, and fruit. Aside from making delicious sandwiches, this combo of roasted pork and bbq sauce can be put to use in many ways. You could fill tortillas for tacos, sprinkle on salads, serve with rice or quinoa, eggs, etc. The Bbq Sauce stands on its own, pairing well with shrimp, white fish, veggies, chicken, or drizzled on burgers and brats.

Print

Red Chile Mezcal BBQ Pulled Pork

HDT BBQ Pulled Pork roasted sauced and ready to eat
Print Recipe
Pin Recipe

5 Stars 4 Stars 3 Stars 2 Stars 1 Star

No reviews

This bbq pulled pork turns your classic american backyard barbecue into a Southwest-themed party by kicking up the flavors with red chile and mezcal. This slow-cooked meat is perfect on toasted buns, tortillas, crispy taco shells, or on your favorite southwest salad.

  • Author: Marianne Sundquist
  • Prep Time: 1 hour
  • Cook Time: 4 hours
  • Total Time: 5 hours
  • Yield: 10-12 servings
  • Category: BBQ
  • Method: Roast
  • Cuisine: American

Ingredients

Units

for the pork:

  • 3 t. whole coriander seed
  • 1 t. black peppercorns
  • 1 t. dried juniper berries
  • 2 T. packed brown sugar
  • 1 T. red chile powder, whatever heat you prefer
  • 1 T. high desert herbs or herbes de provence
  • 2 t. kosher salt
  • 2 t. garlic powder
  • 1 t. dried culinary lavender
  • 4 lb. boneless pork shoulder

for the high desert bbq sauce:

  • 4 T. butter
  • 1 c. diced onion
  • 4 garlic cloves, sliced
  • 1/2 c. mezcal
  • 2 c. (1 pt.) mild Red chile puree
  • 2 t. Dijon mustard
  • 1/4 c. apple cider vinegar
  • 1/4 c. brown sugar
  • 2 t. worcestershire sauce
  • 1/2 t. black pepper
  • 1 1/2 t. kosher salt

Instructions

Making the spice rub

The night before, make the spice rub: In a small pan over medium heat, toast the coriander, peppercorns, and juniper berries until they are lightly toasted and you start to smell their fragrance wafts out from the pan. Transfer this to a very dry blender, along with the brown sugar, red chile powder, herbs, salt, garlic powder, and lavender. Blend until pulverized into a fine powder. Lightly score any thick areas of fat with a sharp knife. Using all the spice rub, massage the pork all over with the spice rub and refrigerate overnight in an ovenproof baking dish.

ingredients prepped on a plate including peppercorn, red chile powder, and more

Making the BBQ sauce

To make the bbq sauce: In a saucepan over medium heat melt the butter. Add the onion and garlic and let simmer until the onions turn translucent, around 10-15 minutes. Add the mezcal and let simmer for another 15 minutes. Add the chile puree, apple cider vinegar, dijon, brown sugar, Worcestershire, black pepper, and salt. Let this mixture simmer for another 15 minutes, stirring occasionally. Carefully transfer the sauce to a blender and puree until smooth.

Roasting the pork shoulder

The next day when you’re ready to roast the pork shoulder, pull the pork from the refrigerator and let it sit at room temperature for a half hour. Preheat the oven to 275 F. Roast pork in the oven, uncovered for around 3-4 hours, or until the internal temperature reads 190 F. on a thermometer. Turn the heat up to 500 F. and roast for an additional 10-15 minutes, until the skin is a deep golden brown and crispy. Remove the pork from the oven and let it rest for 30 minutes.

HDT BBQ Pulled Pork roasted sauced and ready to eat

Pull apart the meat and crispy skin into strips and serve warm with bbq sauce on the side.

Did you make this recipe?

Tag @highdeserttable on Instagram so we can cheer you on! 🌟

Nutrition values are estimates only. See the disclaimer here.

High Desert Green Chile Cheeseburger

Marianne Sundquist · May 13, 2023 · Leave a Comment

There is so much about cooking and eating in the Southwest that is special, including green chile cheeseburgers which top the list for me, especially during the grilling season. I think about burgers made in other places and all the care and effort that goes into coming up with the most creative combination of toppings, or signature burger patties, but at the end of the day it feels like we have an unfair advantage—we have fire roasted green chile. The best burgers I have ever had are in New Mexico and while they vary to some degree, they all have green chile in common. Over time, I have discovered that my favorite burgers tend to be the simplest. I love making this burger and eating it just as is, sometimes with a bun, sometimes wrapped in big pieces of lettuce, but always with melted cheese and a spoonful of poblano jam on top. And I can’t believe I’m saying this, but with this combination, I don’t even add my usual burger go-to’s of mayo, ketchup, and raw slices of onion. 

The cheese

I didn’t want to choose the cheese for you because this is such a personal choice. The day I made these, we melted blue cheese on top of the burgers because this is one of our favorite cheeses, but goat cheese, cheddar, and American would be great too. 

The patty

The most important thing for a good burger is a flavorful burger patty. Here, we accomplish this by adding two kinds of meat, half ground chuck and half-ground sirloin. The chuck brings the texture while the ground sirloin brings the flavor. Combined together with good seasoning and frozen grated butter for additional flavor and moisture, results in my favorite burger patty of all time. You’ll notice that we add a generous (1 tablespoon) of dried herbs to the burger. I have an affinity for the herb blend I make called High Desert Herbs, a combination of marjoram, sage, lavender, rosemary, chile, and thyme (available at stokli.com) but it’s also similar to Herbes de Provence and can be substituted with any or all of the dried herbs listed above.   

The jam

The jam can easily be made a few days in advance and can be adjusted with different chiles. If you want a spicier jam, instead of poblano, you might want to try a hatch, anaheim or even poblano chile. Or, you can create your own signature jam by combining more than one chile together. 

HDT Green Chile Cheeseburger - Poblano Jam
Print

High Desert Green Chile Cheeseburger

HDT Green Chile Cheeseburger - plated
Print Recipe
Pin Recipe

5 Stars 4 Stars 3 Stars 2 Stars 1 Star

No reviews

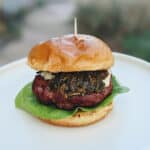
This New Mexico-inspired green chile cheeseburger combines the heat of green or poblano chiles with the creamy richness of your favorite cheese, creating a mouthwatering fusion that will leave your taste buds craving more.

  • Author: Marianne Sundquist
  • Prep Time: 30 mins
  • Cook Time: 30 mins
  • Total Time: 1 hour
  • Yield: 8 burgers
  • Category: burgers
  • Method: grilling
  • Cuisine: New Mexican Inspired

Ingredients

Units

for the poblano jam:

  • 2 T. olive oil
  • 1 large shallot, sliced
  • 4 garlic cloves, sliced
  • 4 fire-roasted poblano chiles, peeled, seeded & diced
  • 1/4 c. sherry vinegar
  • 1/4 c. brown sugar, packed
  • Salt and pepper to taste

for the burgers:

  • 1/2 c. (1 stick) unsalted butter
  • 1 lb. ground beef chuck
  • 1 lb. ground beef sirloin
  • 1 T. High Desert Herbs or Herbes de Provence
  • 2 t. kosher or flakey sea salt
  • 1/2 t. Black pepper

for everything else:

  • 8 buns
  • your favorite cheese and toppings

Instructions

Making the jam

To make the poblano jam, heat the oil over medium heat in a saucepan. Add the shallots and cook for around ten minutes, until they caramelize. Add the garlic and cook for another few minutes, stirring frequently to prevent burning. Add the diced chiles, vinegar, sugar, and a pinch of salt and pepper. Let this mixture come to a boil, then lower the heat and let it simmer for around 10 minutes, or until the liquid has reduced by around half in the pan. You can leave this as is or transfer the mixture to a blender and pulse a few times to make a slightly smoother consistency. Check seasoning and add more salt and pepper as needed. Transfer the jam to a heat-proof jar and serve warm with the burgers or refrigerate if making in advance.

Making the burgers

To make the burgers, first, grate the butter into a bowl with a box grater and freeze the butter for around ten minutes. In a large mixing bowl, combine both types of ground beef, herbs, salt, pepper, and frozen butter until the mixture is well combined. Form into 8 patties and keep refrigerated. When you’re ready to grill, preheat the grill and cook the burgers to your desired temperature. When they’re almost done, top with cheese, close the grill, and cook the burger for another couple minutes, until the cheese is melted. This is a great time to place the buns cut side down on the grill to slightly toast them. To serve, place burgers on the buns and top with poblano jam. Enjoy with your favorite condiments and other toppings.

Did you make this recipe?

Tag @highdeserttable on Instagram so we can cheer you on! 🌟

Nutrition values are estimates only. See the disclaimer here.

High Desert Table

Copyright © 2025 · High Desert Table

  • Privacy Policy
  • Nutrition Disclaimer