• Skip to primary navigation
  • Skip to main content
High Desert Table

High Desert Table

Your everyday guide to Southwestern cooking

  • Home
  • Recipes
  • About
  • Shop
  • Private Events
  • Contact
  • Show Search
Hide Search

breakfast

Homemade Danish Apple Kringle

Marianne Sundquist · January 3, 2025 · Leave a Comment

This week’s recipe is a special one because I get to introduce you to the Pastry Bandit, aka my husband Hans, who comes from a Swedish family in Minnesota and has been enjoying kringles since he was a child. Being that flour makes him sneeze, he wears a bandana whenever baking and inevitably we all gather to see what creations this masked character is mixing, rolling, and shaping. The kringle he grew up eating the most is the one his mom still makes to this day, filled with an almond filling. Here, because we had exactly six granny smith apples in the fridge, we decided to try a fruit filling this year instead. It was a great decision!

What is a Kringle?

Kringles are known for their flakey, buttery pastry and almond or fruit fillings, often glazed and sprinkled with nuts or sugar. This classic Danish dough is incredibly easy to make (only four ingredients) and is a dream to work with, especially after resting in the fridge overnight. In this recipe, we skip the glaze but if you want to add a boost of sweetness, simply whisk together one cup of powdered sugar with two tablespoons of milk and you are ready to drizzle away until your heart’s content.

If you want to get creative with the fruit filling, go for it! You could add blueberries, dried fruits like cherries or currants, or chopped nuts. We love to make the dough and the filling the day before we plan on rolling it out and baking. This is perfect for breakfast, dessert, or a mid-day snack break and is wonderful with tea and coffee.

Print

Homemade Danish Apple Kringle

Danish Apple Kringle - out of the oven on a cutting board
Print Recipe
Pin Recipe

5 Stars 4 Stars 3 Stars 2 Stars 1 Star

No reviews

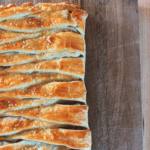
Learn how to make a delicious and easy homemade Danish Apple Kringle with this simple recipe. This classic Danish pastry is flaky, buttery, and perfect for any occasion.

  • Author: Marianne Sundquist
  • Prep Time: 1 hour
  • Cook Time: 40 mins
  • Total Time: 1 hour 40 minutes
  • Yield: 12 servings
  • Category: dessert, breakfast
  • Method: bake
  • Cuisine: danish

Ingredients

Units

for the dough:

  • 2 c. all-purpose flour
  • pinch of salt
  • 1 c. cold butter, diced
  • 1 c. sour cream

for the filling:

  • 6 medium-sized firm apples, peeled, cored, and diced into 1/2” pieces
  • 1/2 c. packed brown sugar
  • 1 T. cornstarch
  • 2 t. pumpkin spice or cinnamon
  • 2 t. vanilla extract
  • pinch of salt

for building:

  • 1 egg, for egg wash
  • 2 T. decorating sugar or sugar in the raw

Instructions

The day before, make the dough: In the bowl of a stand mixer with the paddle attachment, add the flour, salt, butter, and sour cream. Mix this on medium speed until the dough comes together and comes away from the side of the bowl. It will feel just slightly sticky but easily form into a ball. Wrap the dough in plastic wrap and refrigerate for at least overnight.

Making the Apple Filling

To make the filling, add the apples, brown sugar, cornstarch, pumpkin spice, vanilla, and salt to a large saute pan. Let this mixture simmer over medium heat until the apples release their juice and the mixture slightly thickens, resembling apple pie filling, around 30 minutes. Let this cool completely.

Assembling the Kringle

To build and bake the kringle, preheat the oven to 375 F. and line a large baking sheet with a silicone baking mat or parchment paper.  On a lightly floured, clean, and dry surface, roll out the dough to a rectangle, roughly 24” wide and 14” high. Carefully transfer this rectangle of dough to your baking sheet.

Danish Apple Kringle - rolling and prepping the dough

Make sure to leave a 12-inch wide rectangle of rolled-out dough in the middle, and cut 1-inch wide strips along both sides of the rectangle. Spread the apple filling in the center rectangle of the pastry.

Danish Apple Kringle - cutting the strips

Danish Apple Kringle - folding the strips

Then, alternating sides, fold each strip of cut dough over the apple filling until all of the apple is covered and all the strips are folded over.

Danish Apple Kringle - before baking

Baking the kringle

In a small bowl, whisk the egg and brush it over the pastry. Sprinkle the top with decorating sugar and bake for around 35-40 minutes, or until the pastry is golden brown.

Danish Apple Kringle - egg wash and decorative sugar

Transfer to a cutting board and let cool for ten minutes before slicing and serving.

Danish Apple Kringle - sliced and plated


Did you make this recipe?

Tag @highdeserttable on Instagram so we can cheer you on! 🌟

Nutrition values are estimates only. See the disclaimer here.

Easy Apple Crisp Crumble: Quick, Delicious, and Perfectly Sweet

Marianne Sundquist · December 4, 2023 · Leave a Comment

There are few desserts as satisfying as an apple crisp. Within minutes of hitting the oven, the scent of baking apples, spice, and toasted oats fills the kitchen in the most delightful way. Over the last week I’ve been in the kitchen cooking all kinds of foods and out of everything I made last week, this easy apple crisp crumble not only emerged as the favorite sweet treat at dessert time, it was also the easiest and fastest thing I made. It comes together in less than 30 minutes and then takes another hour in the oven. I love to build it the day before and pull it from the fridge 30 minutes before baking it the next day.

You’ll notice that this recipe calls for a light sprinkle of High Desert Salt right before it goes in the oven. This is a blend I make and includes flakey sea salt, lavender, red chile, and green chile powders, but feel free to experiment with any combination of these ingredients you have on hand.

Naturally Sweet

The entire recipe uses only one cup of brown sugar and makes a crisp that fills the largest size of all my baking dishes, a 9”x13” rectangle. Because of the natural sweetness of the apples, this is all that’s needed and I think it’s a pretty special dessert for this reason alone. Hot from the oven, we spooned vanilla ice cream on top, and over the next few days, we enjoyed leftovers cold for breakfast with plain greek yogurt.

Easy Apple Crisp Crumble - Fresh Apples on a marble slab
Print

Easy Apple Crisp Crumble: Quick, Delicious, and Perfectly Sweet

Easy Apple Crisp Crumble in a ceramic bowl with ice cream
Print Recipe
Pin Recipe

5 Stars 4 Stars 3 Stars 2 Stars 1 Star

No reviews

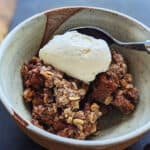
Indulge in the delightful aroma of baked apples with this easy apple crisp crumble recipe. A quick and satisfying dessert that takes less than 30 minutes to assemble, featuring a delicious blend of spices and a crunchy topping. Perfect for any occasion, and the natural sweetness of the apples makes it a special treat. Try it with a sprinkle of High Desert Salt for an extra flavor kick!

  • Author: Marianne Sundquist
  • Prep Time: 30 mins
  • Cook Time: 1 hour
  • Total Time: 1 hour 30 minutes
  • Yield: 8-10 servings
  • Category: dessert
  • Method: bake
  • Cuisine: American

Ingredients

Units

For the filling:

  • 8 good-sized firm apples, peeled, cored, and diced
  • 1/2 c. packed brown sugar
  • 1 T. vanilla extract
  • 1/4 c. all-purpose flour
  • 1 T. pumpkin spice blend (or a mix of cinnamon, nutmeg, clove)
  • pinch of salt

For the topping:

  • 1 c. old fashioned oats
  • 1/2 c. all purpose flour
  • 1/2 c. cornmeal
  • 1/2 c. packed brown sugar
  • 1 t. ground cinnamon
  • 1 stick of salted butter, melted

For assembling:

  • 2 T. butter, room temperature
  • Sprinkle of High Desert Salt (optional)

Instructions

Preheat the oven to 350 f.

Easy Apple Crisp Crumble - peeled apples - PIN

First, make the filling

In a large bowl stir together the apples, brown sugar, vanilla, all-purpose flour, pumpkin spice blend, and a pinch of salt.

Easy Apple Crisp Crumble - chopped ingredients in a dish

Next, make the topping

In a medium bowl, stir together the oats, all-purpose flour, cornmeal, packed brown sugar, ground cinnamon, and melted butter.

Easy Apple Crisp Crumble - ready for the oven

Assemble the crisp

Rub butter all over the bottom and sides of a 9”x13” baking dish (or one of a similar size). Pour in the filling and top with the crisp mixture. Sprinkle the top of the crisp with High Desert Salt (if using) and bake for around one hour, or until the top is golden brown and the sides are bubbling. Let cool for ten minutes before serving.

Easy Apple Crisp Crumble in a ceramic bowl with ice cream

Did you make this recipe?

Tag @highdeserttable on Instagram so we can cheer you on! 🌟

Nutrition values are estimates only. See the disclaimer here.

Mushroom, Poblano & Goat Cheese Frittata

Marianne Sundquist · June 11, 2023 · Leave a Comment

If you’re ever tasked with making breakfast, brunch, or lunch for a crowd, this frittata (an Italian unfolded omelet) recipe might be right up your alley. I’m not sure it gets easier than this. No eggs cooked to order. The vegetables can be easily cooked the day before, and all that’s required is a quick whisk of the eggs (not too much so there is not a deflation of air during baking), a sprinkling of vegetables and cheese before throwing it in the oven for less than a half hour and voila! 

But that’s not all. Frittatas can be served any time of the day, as a hot main course or cool added to the middle of a sandwich or sliced and served as an appetizer alongside a variety of antipasto as the women in my family would say. In fact, you can make the entire frittata in advance and reheat it the next day by placing it covered in foil, in a 350 F. oven for 15 minutes or until it’s heated all the way through. If reheating individual slices (like when you have leftovers), I like to place a splash of water in the bottom of a small baking dish before adding slices and then covering them. This creates a bit of steam during reheating and prevents the edges from drying out. Another (and opposite) popular method of reheating slices is to fry them in a skillet on the stove, embracing and encouraging the sides to crisp up.

This simple flavor combination of mushroom, red onion, poblano, goat cheese, and basil is just one combination. Whenever making a frittata I usually ask myself a couple of questions: What do I have that I need to use up that is at risk for going to waste? And, what is amazing right now because of the season we are in? In the late fall, winter, and early spring, I will rummage in the freezer looking for frozen chiles and sweet corn I’ve squirreled away. I can promise you that if I had any corn left I would have added it here. But I found poblanos in the freezer and goat cheese in the fridge, so this is where I began. Please consult the most important person when considering what veggies and things to add to your frittata (You!). What do you love? What’s in your fridge? What can you access at the grocery store or farmers market? 

The most important thing to remember is that in any baked egg dish, water causes problems. Because of this, it’s important that vegetables and meat are cooked before adding them to your egg mixture.

If you’re serving this as a main course, it pairs well with a simple green salad and fresh fruit, or you can make it a party and serve this with a decadent baked French toast (like the one I shared last week) or an assortment of pastries.

Print

Mushroom, Poblano & Goat Cheese Frittata

HDT - Sq - Goat Cheese Frittata - in a rustic bowl ready for brunch
Print Recipe
Pin Recipe

5 Stars 4 Stars 3 Stars 2 Stars 1 Star

No reviews

If you’re ever tasked with making breakfast, brunch, or lunch for a crowd, this frittata recipe might be right up your alley. I’m not sure it gets easier than this. No eggs cooked to order. The vegetables can be easily cooked the day before, and all that’s required is a quick whisk of the eggs, and a sprinkling of vegetables and cheese before throwing it in the oven for less than a half hour and voila!

  • Author: Marianne Sundquist
  • Prep Time: 30 mins
  • Cook Time: 30 mins
  • Total Time: 1 hour
  • Yield: 6-8 servings
  • Category: Breakfast
  • Method: bake
  • Cuisine: Italian

Ingredients

Units

For the vegetables:

  • 3 T. butter
  • 1 lb. fresh cremini mushrooms (aka baby bellas), cleaned with a dry kitchen towel and sliced
  • 1 medium red onion, sliced
  • Salt and pepper, to taste
  • 2 fire-roasted poblanos, peeled, seeded and diced

For the frittata:

  • 2 T. butter
  • 12 large eggs
  • 1/4 c. heavy cream
  • 1 t. Kosher or large flaked sea salt
  • 1 c. fresh goat cheese
  • torn basil leaves, for garnish


Instructions

The mushrooms

In a large saute pan over medium-high heat, add the butter. Once it’s melted, add the mushrooms and onions with a generous pinch of salt and pepper. Let them cook until the water inside them releases and evaporates, at which point both mushrooms and onions will begin to caramelize. Let them cook until they are a deep, golden brown, and turn off the heat. Transfer to a small bowl and add the diced poblanos. Reserve until you are ready to bake the frittata.

Baking the frittata

To cook the frittata, preheat the oven to 375 F. In a large bowl or pitcher, whisk together the eggs, cream, and salt. Place butter in a 10 to 12-inch cast iron skillet or a baking dish that’s approximately the same size. Place the skillet in the oven for around 5 minutes, or until the butter is completely melted. Carefully remove the skillet from the oven and swirl (or brush) the butter around so the bottom and sides are coated. Pour in the egg mixture in the skillet, and sprinkle in the cooked vegetables and fresh goat cheese. Bake for around 25 minutes, or until the frittata doesn’t wobble in the middle. You don’t want to overbake it, but you don’t want undercooked eggs on the inside either. You can also insert a small knife in the center. If it comes out clean you are good to go.


To serve, garnish with torn basil leaves and enjoy.

Did you make this recipe?

Tag @highdeserttable on Instagram so we can cheer you on! 🌟

Nutrition values are estimates only. See the disclaimer here.

Mushroom, poblano, and goatcCheese Frittata in a rustic bowl ready for brunch

Calabacitas Benedict

Marianne Sundquist · May 22, 2023 · Leave a Comment

Calabacitas “little squash”, is a dish with many names, and variations and steeped in New Mexico history originating from Native American Pueblos dating back to the 16th century. As with most foods unique to this area, the finished dish is only the starting point for the many opportunities to learn about the foods, people, and history that make up the heart and soul of the Southwest landscape. Each new ingredient and method I learn here change me, even in a small way. Added together, I can’t help but notice that living and cooking here has changed and grounded me in ways I could have ever imagined where the only thing I know for sure, is that I hope I will be learning here with an open heart for the rest of my life. Cooking becomes less about what I do in the kitchen and more about what others have experienced, preserved, and the gift of gathering around the kitchen table to share a dish like this. 

Sacred Ingredients

In her James Beard Award-winning book, Foods of the Southwest Indian Nation, Lois Ellen Frank (Kiowa on her mother’s side and Sephardic on her father’s side) writes about the sacred elements to tribes across the country and the ingenuity of an ecosystem that is created by planting three crops that benefit and thrive when they are planted together in companion planting. This book also happens to include the largest acknowledgments section of any book I have ever seen. I don’t think this is by accident, and if I’ve learned anything at all since my time here learning from chefs like Lois and Walter Whitewater from Red Mesa Cuisine, it’s that the native approach to cooking embodies a spirit of attention and care for all living things including land and food, with a deep appreciation for teachers in all forms.  

Of the three sisters, Lois writes that they “are believed to have been domesticated in Mesoamerica sometime between 7000 and 3000 B.C.” Then, as travel increased along the El Camino Real de Tierra Adentro, the 1591-mile-long road between Mexico City and San Juan Pueblo, New Mexico, it is believed corn and chile was added to cooked summer squash making the combination we know and love today. In Lois’s book the recipe, also called calabacitas, is called Mesa Squash Fry and includes red bell pepper and sunflower seeds. In the Pueblo Indian Cookbook, compiled and edited by Phyllis Hughes a similar version is called Skillet Squash and includes the addition of shredded longhorn cheese (cheddar or american style cheese in the shape of a half moon), while Fabiola C. Gilbert in her book Historic Cookery published in 1931 refers to Calabacitas con Chile Verde which includes a small amount of milk and grated Native or American cheese. I have seen more variations than I can count with additions like tomatoes, chicken broth, cream, queso fresco, jalapeno, and differences in texture from extra brothy to this version which is more on the caramelized vegetable side.

Making the Calabacitas

Calabacitas is wonderful in a bowl on its own, but it also happens to make my favorite benedict of all time. This is a vegetarian recipe, but you could always add a slice of ham or bacon on top of the bread if you wish. Or, if you didn’t want to use biscuits or english muffins, you could always swap those out for roasted fingerling potatoes, sweet potatoes, roasted asparagus or a bed of sauteed hearty greens like kale, chard or collards. 

The classic way of preparing hollandaise sauce is by using a double boiler and saying lots of prayers while whisking. This blender version can be made with a standard blender or an immersion blender and is so easy you might be inclined to add this to your regular brunch rotation.

Print

Calabacitas Benedict

HDT Calabacitas Benedict plated
Print Recipe
Pin Recipe

5 Stars 4 Stars 3 Stars 2 Stars 1 Star

No reviews

Calabacitas is wonderful in a bowl on its own, but it also happens to make my favorite southwestern style benedict of all time. This is a vegetarian recipe, but you could always add a slice of ham or bacon on top of the bread if you wish.

  • Author: Marianne Sundquist
  • Prep Time: 30 mins
  • Cook Time: 30 mins
  • Total Time: 1 hour
  • Yield: 6 servings
  • Category: Breakfast
  • Method: fire-roasted
  • Cuisine: New Mexican

Ingredients

Units

for the calabacitas:

  • 2 T. olive oil
  • 1 red onion, diced
  • 3–4 cloves of garlic, finely chopped
  • 2 fire roasted poblano peppers, peeled, seeded and diced
  • 2 medium zucchini, diced
  • 2 medium yellow squash
  • 2 c. fire roasted corn kernels
  • 1 T. fresh oregano, rough chopped (or 2 t. dry)
  • salt and pepper, to taste

for the hollandaise:

  • 2 1/2 sticks unsalted butter
  • 2 large egg yolks
  • 2 T. freshly squeezed lemon juice
  • 1/2 t. New Mexico Red Chile Powder or to taste
  • Salt and pepper, to taste
  • warm water, as needed for thinning

for serving:

  • 6–12 eggs, prepared however you like them best
  • 6 english muffins or biscuits, sliced in half, toasted and buttered
  • 1/4 c. minced chives, for garnish


Instructions

To make the calabacitas, heat the olive oil in a large, heavy-bottomed pan over medium-high heat. Add the onion and cook until they are beginning to caramelize. Add the garlic and cook for another couple of minutes. Now add the fire-roasted poblanos, zucchini, yellow squash, corn and oregano. Let this cook, stirring occasionally until the vegetables are tender, all of the water has evaporated from the zucchini and yellow squash and everything in the pan is starting to caramelize. Season with salt and pepper until it tastes wonderful to you. Keep warm.

Less than 30 minutes before serving the benedict is the time to make the hollandaise. Fill your blender with very warm water. In a small saucepan over medium heat bring the butter to a simmer and turn off the heat. Pour out the water from the blender, saving it for another use like watering plants once it comes to room temperature and dry the blender with a clean cloth. Transfer the butter to a heat-proof pitcher or measuring cup with a pouring spout to have ready to go. Add the egg yolks, lemon juice, New Mexico chile powder and a pinch of salt and pepper to the blender. Blend this on a medium speed and while it’s blending, carefully remove the fill cap from the blender lid and very slowly pour in the hot butter. Watch the mixture as you pour, you should see it thicken as it emulsifies. Once all the butter has been added, season with salt and pepper as needed. If the hollandaise is too thick, you can thin it out by blending in more lemon juice if you feel it’s needed or one tablespoon of warm water at a time. Transfer the sauce to a heat proof container and keep covered and warm until ready to serve.

To assemble the benedict:  Place English muffins or biscuits in a large bowl, top generously with a spoon of calabacitas, an egg and a drizzle of hollandaise sauce. Garnish with chives and serve immediately.

Did you make this recipe?

Tag @highdeserttable on Instagram so we can cheer you on! 🌟

Nutrition values are estimates only. See the disclaimer here.

Biscochito French Toast 

Marianne Sundquist · April 17, 2023 · 1 Comment

Table of Contents

  • The crumble topping
  • Why corn?
  • The gift of living and cooking in New Mexico
  • Brunch for a crowd

This Biscochito French Toast  recipe is entirely inspired by the state cookie of New Mexico, the biscochito (or bizcochito), and more specifically its spice combination of cinnamon, sugar, and ground anise seeds. I don’t often make individual slices of french toast, but I’m a huge fan of baked french toast, where extra egg mixture is poured over layers of bread resulting in a custardy-bread-pudding-like consistency. Before it goes into the oven, it’s topped with a pecan crumble and when it emerges from the oven a caramel-hued golden brown, it’s topped with red chile mascarpone. The italian cream cheese begins melting instantly and for the finishing touch, the french toast is drizzled with a warm concoction of melted butter whisked with maple syrup. I usually serve some kind of salad with this decadent dessert for breakfast and feel good about all of it.

The crumble topping

Most crumble toppings will include a flour of some kind to bind the nuts, sugar, and butter together. In the recipe, I give three options because they all work providing varying degrees of texture, and most importantly I want you to feel freedom to use what you can find or have on hand.  This could be all-purpose flour, nut flours, or in this case, cornmeal. 

Why corn?

For a moment, let’s talk about corn. I chose to use it because it is a food that’s cultivated and cared for in abundance here, more than anywhere else I have lived. I try to buy posole, chicos, and corn meal from local, small farms whenever possible. Working as a chef mostly in large cities, I used to think I knew so much about food. I don’t make that mistake anymore. Corn is just one of the foods that helped me realize I will be a student here for the rest of my life, no matter how many methods and techniques I learn along the way.

The gift of living and cooking in New Mexico

I remember as a young cook, working in restaurants where ingredients were sourced from far-off places. Once they arrived, we would make them into creams, purees, powders, foams, and gelees. In our pressed white jackets, there was often a collective pride about our innovative inventions, as if we were painters and each dish was our own work of art. I cringe a little now and also remember these days with great fondness. We worked so hard, with so much creative, passionate energy. Then recently I found a notebook filled with old sketches of dishes that I had either pitched to chefs I worked for or later made myself when I was writing my own restaurant menus. From my kitchen table, sipping on piñon coffee and hearing the wind chimes sing in the yard, I couldn’t help but notice that most of the ideas felt a bit flat. This is the gift of living and cooking in New Mexico. There is nothing flat about a blue corn enchilada topped with red chile, or better yet both red and green. I’m thinking of a few chefs here who take a contemporary approach to these ingredients, deconstructing them, and fitting them back together with an artist’s eye and heart. Still, the contextual richness remains. These foods reach deep into our sandy and silted soil, carrying with them a living history steeped in story, responsibility, family, and landscape.  

A finely ground cornmeal will have a flour-esque consistency and act as a soft binder with the pecan mixture, while a medium-ground cornmeal will add a little more crunch to the topping. You could also use masa harina (dough flour), where field corn is nixtamalized (cooked and soaked in an alkaline lime solution also called “cal”  which is calcium hydroxide, or sifted wood ash) before being dehydrated and pulverized into a powder. This process, invented by indigenous Mesoamericans more than 3,500 years is a culinary marvel—it makes niacin, also known as B-3, bioavailable, a vitamin that turns food into energy. Amino acids come to life, myotoxins and fungi are destroyed and what was once considered a risk to eat in large quantities, is now a nutrient filled food source. If you choose to use masa harina in your crumble topping, you can expect more depth of flavor as opposed to the brighter and lighter corn flavor or cornmeal. 

Brunch for a crowd

This is the perfect dish when you’re cooking breakfast or brunch for a crowd. I like to build it the night before, wrap it and keep it in the fridge. The next morning, while the oven is preheating, I remove the baking dish from the fridge so it can warm up a bit. This protects our baking dish from a drastic shift in temperature (cold to hot) which could cause damage to the baking dish.

Biscochito French Toast top view with fresh fruit
Print

Biscochito French Toast 

Biscochito French Toast another top view
Print Recipe
Pin Recipe

5 Stars 4 Stars 3 Stars 2 Stars 1 Star

5 from 1 review

This Biscochito French Toast recipe is entirely inspired by the state cookie of New Mexico, the biscochito (or bizcochito), and more specifically its spice combination of cinnamon, sugar, and ground anise seeds. This is the perfect dish when you’re cooking breakfast or brunch for a crowd.

  • Author: Marianne Sundquist
  • Prep Time: 15 mins
  • Cook Time: 45 mins
  • Total Time: 1 hour
  • Yield: 8-10 servings
  • Category: Breakfast
  • Method: baking
  • Cuisine: New Mexican

Ingredients

Units

for the crumble topping:

  • 1/2 c. pecans
  • 2 T. cornmeal (fine or medium grind), corn flour or masa harina
  • 1/2 c. packed brown sugar
  • 2 t. ground cinnamon
  • 3 T. butter, melted


for the french toast:

  • 2 T. butter, softened
  • 8 large eggs
  • 2 c. whole milk
  • 2 T. maple syrup
  • 1 T. vanilla bean paste or extract
  • pinch of salt
  • 1 t. ground anise seeds
  • 1 loaf challah bread, cut into 1-inch slices


for the mascarpone:

  • 8 oz. mascarpone cheese
  • 1/4 c. powdered sugar
  • 1–2 t. New Mexico red chile powder, depending on the heat
  • 2 t. Vanilla bean paste or extract


for serving:

  • Maple syrup with a few nubs of butter melted in a saucepan

Instructions

Preheat the oven to 375 F. Rub softened butter all over the bottom and sides of a large cast iron pan or 9×13 baking dish. First, make the crumble topping: In a small bowl, stir together the pecans, corn flour, brown sugar, cinnamon, and melted butter. Sprinkle half of the crumble topping across the bottom of your prepared pan. Reserve the rest.

Biscochito French Toast Prep
Prepping the crumble into the buttered pan

Now, prepare the egg mixture: In a bowl, whisk together the eggs, milk, maple syrup, vanilla, salt, and anise. Soak each slice of bread in the mixture and let it soak for around 15 seconds on each side. Transfer the slices to your buttered pan as you go and layer as you see fit depending on the size and shape of your pan. If there’s any remaining egg, pour it over the bread. Sprinkle the remaining crumble topping over the bread pieces and transfer this to the oven to bake for 45 minutes.

While the French toast is baking, make the mascarpone: whisk together the mascarpone, powdered sugar, red chile powder, and vanilla.

When the french toast comes out of the oven, either dollop the mascarpone over the top and serve family style, or you can cut pieces of the French toast and dollop each piece with the mascarpone. Drizzle with warm buttery maple syrup and enjoy!

Biscochito French Toast pouring maple syrup
Drizzle warm maple syrup over the dish before serving

Did you make this recipe?

Tag @highdeserttable on Instagram so we can cheer you on! 🌟

Nutrition values are estimates only. See the disclaimer here.

  • Page 1
  • Page 2
  • Go to Next Page »

High Desert Table

Copyright © 2025 · High Desert Table

  • Privacy Policy
  • Nutrition Disclaimer