• Skip to primary navigation
  • Skip to main content
High Desert Table

High Desert Table

Your everyday guide to Southwestern cooking

  • Home
  • Recipes
  • About
  • Shop
  • Private Events
  • Contact
  • Show Search
Hide Search

Blog

Classic High Desert Eggnog

Marianne Sundquist · December 26, 2023 · Leave a Comment

There are so many options when it comes to this classic High Desert Eggnog. You can use the spices that sound good to you. You can leave out the alcohol. You can use the egg whites for an omelet, or you could whip them to peaks and fold them into the cold eggnog for an extra frothy lift.

For a mixologist’s twist on this recipe, check out our High Desert Eggnog Flip

Print

Classic High Desert Eggnog

High Desert Eggnog - in a coupe glass with pine branches
Print Recipe
Pin Recipe

5 Stars 4 Stars 3 Stars 2 Stars 1 Star

No reviews

There are so many options when it comes to this classic High Desert Eggnog. You can use the spices that sound good to you. You can leave out the alcohol. You can use the egg whites for an omelet, or you could whip them to peaks and fold them into the cold eggnog for an extra frothy lift.

  • Author: Marianne Sundquist
  • Prep Time: 1.5 hours
  • Total Time: 1.5 hours
  • Yield: 10 half cup servings
  • Category: beverage
  • Method: mix
  • Cuisine: New Mexican

Ingredients

Units
  • 2. whole milk
  • 1 c. heavy whipping cream
  • 2 t. ground nutmeg
  • 1 t. New Mexico Red Chile powder (optional)
  • 1 t. ground culinary lavender
  • 1/2 t. ground cinnamon
  • 1/2 t. ground anise
  • 1/4 t. sea salt
  • 6 large egg yolks
  • 1/2 c. sugar
  • 1/2 c. mezcal (optional)
  • 1/2 c. cognac (optional)
  • 1 T. vanilla extract

Instructions

Add milk, cream, nutmeg, chile powder, lavender, cinnamon, anise and sea salt in a saucepan over medium heat. We want to heat this milk mixture until it’s just beginning to simmer.

In a separate large bowl, whisk together the sugar and yolks until the mixture is light and fluffy, around three minutes.

Prepare for the next step: place a heat-proof spatula, ladle, and thermometer next to the stove.

Once the milk and cream is hot, use a ladle to transfer about fifty percent of the milk to the egg mixture to temper, whisking the whole time. Now pour the tempered egg mixture directly into the milk pot over medium heat. Using your spatula, begin moving it in a figure-eight motion, making sure nothing sticks to the bottom.

Cook the mixture on medium heat until it reaches 160 f, about five minutes. You’ll notice that the mixture nicely coats the back of your spatula right as it approaches 160 f.

Remove from heat. Whisk in the alcohol and vanilla extract.

Pour into a serving bowl or glass jar. Let cool down to room temperature before transferring it to the fridge for at least a few hours or overnight. Enjoy within a week.

Did you make this recipe?

Tag @highdeserttable on Instagram so we can cheer you on! 🌟

Nutrition values are estimates only. See the disclaimer here.

Discover Santa Fe’s Sweet Haven: Chainé’s Piñon Chocolate Chip Cookies

Marianne Sundquist · December 20, 2023 · Leave a Comment

A few blocks west of the plaza, nestled between Palace Avenue and San Francisco Street you’ll find Burro Alley, paved with cobblestones and the resonance of old Santa Fe. At one point the alley served as a place for burros to park and unload firewood. Now it’s a quiet, pedestrian-friendly, just off-the-beaten-path home for a handful of local businesses.

One of my favorite shops in town, Modern Folk Ware owned by potter Jennie Johnsrud, recently moved next door to Chainé, a dessert shop owned by Chainé Pena with creative, made-from-scratch, small-batch French macarons and cookies. Both shops have loyal and passionate followings so it feels almost too good to be true that now they are right next door to each other.

Chaine - Speciality Cookies Shop in Santa Fe
photo credit Chaine Pena

On the day I walked in with my kids to celebrate their last day of school for the year, Pena, a 6th generation Santa Fean, had just pulled a batch of biscochitos from the oven. Her mom was helping her in the open kitchen, while my boys carefully eyed an array of generously portioned cookies and row after row of colorful macarons. They eventually both made the same choice — a bright red “Santa” macaron, filled with a chocolate cookie & mint cream.

So when Pena offered to share her famous Pinon & Chocolate Chip Cookie recipe with all of us here, it felt like such a gift. Pena started baking as a hobby before she took a macaron baking class in France where she fell in love with this technically intricate cookie. When she began posting her creations on social media and people started asking if they could place orders, it’s then she knew she was on the right path. Pena says,

Chaine Pena with macaron - Santa Fe
photo credit Isaiah Hererra

Unexpected flavors

“I love that cookies are a straightforward treat that most people love. What really makes me excited about my cookie offerings is playing with texture and flavor to create something a little different like our lemon meringue cookie or creme brulee. It’s fun to pack an unexpected dessert flavor into a few inches of a cookie.”

Thankfully for us, she is giving us one of her most beloved recipes for the always classic chocolate chip cookie spiked with a hefty dose of piñon nuts.

Chainé is open 11am-3pm Wednesday through Saturday at 38 Burro Alley. Macarons and Cookies can also be preordered on the Chainé website or via email at chainescookies@gmail.com.

Chaine Macarons with flowers
photo credit Chaine Pena
Print

Discover Santa Fe’s Sweet Haven: Chainé’s Piñon Chocolate Chip Cookies

Pinon Chocolate Chip Cookies - hand holding a stack of cookies
Print Recipe
Pin Recipe

5 Stars 4 Stars 3 Stars 2 Stars 1 Star

No reviews

Explore the charming Burro Alley in Santa Fe, where Modern Folk Ware and Chainé create a sweet haven for locals. Dive into the story of Chainé Pena’s passion for desserts and her famous Piñon Chocolate Chip Cookies. Learn the art of baking these treats at home with Chainé’s exclusive recipe.

  • Author: Marianne Sundquist
  • Prep Time: 1.25 hours
  • Cook Time: 15 minutes
  • Total Time: 1.5 hours
  • Yield: Around 30 cookies
  • Category: Dessert
  • Method: bake

Ingredients

Units
  • 1 c. unsalted butter, room temperature, and the best quality you can get your hands on
  • 3/4 c. light brown sugar, loosely packed
  • 1/2 c. granulated sugar
  • 2 large eggs
  • 2 t. vanilla paste or extract
  • 2 1/2 c. all-purpose flour, her favorite is Bob’s Red Mill
  • 1 t. baking powder
  • 1 t. baking soda
  • 1/2 t. sea salt, she uses pink
  • 2 t. cornstarch
  • 2 c. semi-sweet chocolate chips, her favorite is Ghirardelli 5mm baking chips
  • 2 c. piñon nuts, unsalted & shelled

Instructions

In a stand mixer with a paddle attachment (or with a wooden spoon by hand), cream together the butter, brown sugar, and granulated sugar until it’s fluffy and fully incorporated.

Stir in the eggs and vanilla. Scrape the sides of the bowl one to two times between mixing to ensure all the butter and sugar remnants combine with the eggs.

In a separate bowl, using a sifter or a fine mesh strainer, sift the flour, baking powder, baking soda, sea salt, and cornstarch. Add ¾ of the dry mixture to the wet. Mix just until it slightly comes together. Add the chocolate chips and the nuts to the remaining flour mixture and give them a toss. (this step helps the chocolate and nuts disperse evenly throughout the dough).

Using a cookie scooper, a large tablespoon, a ¼ c. measuring cup, or a scale (about 2 oz) portion out rounds of dough. Refrigerate pre-portioned cookie dough for 45 min to one hour.

Time to bake! Preheat your oven to 375. On a parchment-lined cookie sheet place your cookies and give them plenty of room to grow. Bake for about 11 – 13 minutes until the edges and top are just browned. Allow cookies to cool for at least 10 minutes. Store in an airtight container.


Did you make this recipe?

Tag @highdeserttable on Instagram so we can cheer you on! 🌟

Nutrition values are estimates only. See the disclaimer here.

Chaine - Speciality Cookies Shop Santa Fe - Macarons
photo credit Chaine Pena

Red Chile Caramel Corn

Marianne Sundquist · December 8, 2023 · Leave a Comment

This weekend my family went to a Chicago-themed holiday potluck at a friend’s house in Eldorado. We wanted to bring something fun and festive so we decided to make a version of our favorite windy city confection— Chicago Mix Popcorn, a sweet and savory mix of caramel and cheese popcorn. The classic treat reminds me of when my husband and I lived in Chicago and before embarking on any road trip, we always made a stop at Garrett’s Popcorn to pick up a bag on the way out of town.

This custom recipe is focused on one-half of the treat, the red chile caramel corn. When you make it, customize it as you wish. Mix it with cheesy popcorn, add nuts, or just enjoy it on its own for a sweet and spicy snack.

As the popcorn was popping on the stove this week, the kids ran downstairs to find out why I was making popcorn, a sure sign that some kind of family movie or game night was on the horizon. Their interest only peaked when I told them I was making caramel corn.

A touch oh heat

As the brown sugar-based caramel sauce simmered away on the stove, I couldn’t resist adding a generous spoonful of red chile powder to my little bowl of baking soda sitting by the stove, the last step of the process before coating the popcorn with the caramel and butter mixture and transferring it to the oven for baking. I’m happy to report that this just might be the best cooking decision I’ve made all week. I know caramel making can be a little intimidating for some of you, but I promise, this recipe is as easy and delightful as it gets.

Making caramel the easy way

Normally when one is making caramel, you begin with sugar and sometimes a very small amount of water. Then, it becomes a waiting game requiring a close eye, and oftentimes a candy thermometer, depending on if the caramel will be made into a sauce, candy, or coating. Here, we keep things simple and no thermometer is needed, just a timer and a bit of extra care since we are dealing with very hot sugar.

Magic ingredient

When making caramel corn, it’s the baking soda that works its magic, creating a caramel sauce that isn’t hard or overly sticky. Rather, the baking soda is added at the very last minute after the caramel has come off the heat and results in a light, melt-in-your-mouth caramel corn.

This popcorn will stay fresh for up to a week in an airtight container at room temperature, making it a perfect option for homemade holiday gifting.

Print

Red Chile Caramel Corn

Red Chile Caramel Corn - with a Christmas tree
Print Recipe
Pin Recipe

5 Stars 4 Stars 3 Stars 2 Stars 1 Star

No reviews

This recipe is an easy and delicious snack that is perfect for any holiday or potluck occasion. The sweet and classic treat makes it a crowd-pleaser, while the red chile powder adds a festive kick. This Red Chile Caramel Corn is easy to make and requires no special skills or equipment.

  • Author: Marianne Sundquist
  • Prep Time: 30 mins
  • Cook Time: 1 hour
  • Total Time: 1 hour 30 minutes
  • Yield: 4 quarts
  • Category: Dessert
  • Method: bake
  • Cuisine: New Mexican

Ingredients

Units
  • 16 c. popped popcorn
  • 2 t. baking soda
  • 2 t. New Mexico red chile powder
  • 1 t. kosher salt
  • 2 t. vanilla extract
  • 2 c. brown sugar
  • 1 c. (2 sticks) unsalted butter
  • 1/2 c. light corn syrup

Instructions

Line two large baking sheets with parchment paper or a silicone baking mat.

Preheat the oven to 250 f.

Divide the popcorn into 2-3 large bowls, making sure you have enough room to add the caramel and stir it with a heatproof rubber spatula.

Dry ingredients

In a small bowl whisk together the baking soda, red chile powder, and salt. Place this bowl and the vanilla extract next to the stove with a measuring spoon so you’re ready when you get to this step.

Making the caramel

In a large saucepan over medium-high heat (the size of the saucepan is important for safety because the baking soda will bubble up when it’s added to the caramel sauce), add the brown sugar, butter, and corn syrup. Watch carefully and once the entire pot has started to rapidly boil set a timer for 3 minutes.

When the 3 minutes have passed, turn off the heat. Whisk in the baking soda mixture and the vanilla.

Time to bake

Carefully divide this mixture among your bowls of popcorn and stir, evenly coating the popcorn as much as possible. Transfer the popcorn to the prepared baking sheets and bake in the oven for 1 hour.

Let the popcorn cool completely before breaking it into pieces and storing it in an airtight container.

Red Chile Caramel Corn - on a sheet tray

Did you make this recipe?

Tag @highdeserttable on Instagram so we can cheer you on! 🌟

Nutrition values are estimates only. See the disclaimer here.

Easy Apple Crisp Crumble: Quick, Delicious, and Perfectly Sweet

Marianne Sundquist · December 4, 2023 · Leave a Comment

There are few desserts as satisfying as an apple crisp. Within minutes of hitting the oven, the scent of baking apples, spice, and toasted oats fills the kitchen in the most delightful way. Over the last week I’ve been in the kitchen cooking all kinds of foods and out of everything I made last week, this easy apple crisp crumble not only emerged as the favorite sweet treat at dessert time, it was also the easiest and fastest thing I made. It comes together in less than 30 minutes and then takes another hour in the oven. I love to build it the day before and pull it from the fridge 30 minutes before baking it the next day.

You’ll notice that this recipe calls for a light sprinkle of High Desert Salt right before it goes in the oven. This is a blend I make and includes flakey sea salt, lavender, red chile, and green chile powders, but feel free to experiment with any combination of these ingredients you have on hand.

Naturally Sweet

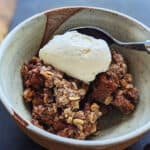
The entire recipe uses only one cup of brown sugar and makes a crisp that fills the largest size of all my baking dishes, a 9”x13” rectangle. Because of the natural sweetness of the apples, this is all that’s needed and I think it’s a pretty special dessert for this reason alone. Hot from the oven, we spooned vanilla ice cream on top, and over the next few days, we enjoyed leftovers cold for breakfast with plain greek yogurt.

Easy Apple Crisp Crumble - Fresh Apples on a marble slab
Print

Easy Apple Crisp Crumble: Quick, Delicious, and Perfectly Sweet

Easy Apple Crisp Crumble in a ceramic bowl with ice cream
Print Recipe
Pin Recipe

5 Stars 4 Stars 3 Stars 2 Stars 1 Star

No reviews

Indulge in the delightful aroma of baked apples with this easy apple crisp crumble recipe. A quick and satisfying dessert that takes less than 30 minutes to assemble, featuring a delicious blend of spices and a crunchy topping. Perfect for any occasion, and the natural sweetness of the apples makes it a special treat. Try it with a sprinkle of High Desert Salt for an extra flavor kick!

  • Author: Marianne Sundquist
  • Prep Time: 30 mins
  • Cook Time: 1 hour
  • Total Time: 1 hour 30 minutes
  • Yield: 8-10 servings
  • Category: dessert
  • Method: bake
  • Cuisine: American

Ingredients

Units

For the filling:

  • 8 good-sized firm apples, peeled, cored, and diced
  • 1/2 c. packed brown sugar
  • 1 T. vanilla extract
  • 1/4 c. all-purpose flour
  • 1 T. pumpkin spice blend (or a mix of cinnamon, nutmeg, clove)
  • pinch of salt

For the topping:

  • 1 c. old fashioned oats
  • 1/2 c. all purpose flour
  • 1/2 c. cornmeal
  • 1/2 c. packed brown sugar
  • 1 t. ground cinnamon
  • 1 stick of salted butter, melted

For assembling:

  • 2 T. butter, room temperature
  • Sprinkle of High Desert Salt (optional)

Instructions

Preheat the oven to 350 f.

Easy Apple Crisp Crumble - peeled apples - PIN

First, make the filling

In a large bowl stir together the apples, brown sugar, vanilla, all-purpose flour, pumpkin spice blend, and a pinch of salt.

Easy Apple Crisp Crumble - chopped ingredients in a dish

Next, make the topping

In a medium bowl, stir together the oats, all-purpose flour, cornmeal, packed brown sugar, ground cinnamon, and melted butter.

Easy Apple Crisp Crumble - ready for the oven

Assemble the crisp

Rub butter all over the bottom and sides of a 9”x13” baking dish (or one of a similar size). Pour in the filling and top with the crisp mixture. Sprinkle the top of the crisp with High Desert Salt (if using) and bake for around one hour, or until the top is golden brown and the sides are bubbling. Let cool for ten minutes before serving.

Easy Apple Crisp Crumble in a ceramic bowl with ice cream

Did you make this recipe?

Tag @highdeserttable on Instagram so we can cheer you on! 🌟

Nutrition values are estimates only. See the disclaimer here.

Heartwarming Turkey Noodle Soup

Marianne Sundquist · November 29, 2023 · Leave a Comment

Recently one of my dearest friends has been sick. I’ve spent more time at the hospital in the last few weeks than ever before and at various points wrestled with feelings of helplessness when all I want is for her to be healed and feeling well. And with all that’s going on in the world, I know I’m not alone.

When times like this rise up, I find myself pulled to the kitchen like a magnet to the side of the refrigerator. What can I do when it seems like there is nothing I can do? I recently read about a teacher, who when asked this question simply answered “I teach”. And I’ve been thinking a lot about this, about how whatever it is we do, can be an act of activism, love, and hope in itself.

So it makes sense that my fifteen-year-old caribbean blue dutch oven has been simmering with stocks and soups for weeks and my freezer is full of simple soups for when my friend comes home. I have been finding clarity and comfort in small things— my boy’s faces when they get in the car after school, my dog sleeping on the couch, laughing with a friend, and the gift of writing recipes for you. What can I do? I can put my hands to work and cook. At the grocery store last week, I saw egg noodles on sale and voila, the idea for this soup was born. This Turkey Noodle Soup is simple, full of gentle yet satisfying flavor, and deeply nourishing.

Flexible Ingredients

You can use leftover turkey meat, but you can also easily swap out the turkey for chicken. To keep things simple, the recipe calls for turkey or chicken broth which can be purchased or made at home. If you are roasting a turkey, please consider saving the bones, which will make a wonderful broth that you can use for this soup: break up the cooked turkey carcass into smaller pieces and in a large pot cover them with cold water. Add a splash of apple cider vinegar, a generous pinch of salt and any vegetable or herb scraps you have available. Bring this to a simmer and let simmer for an hour (or more) before straining.

Also, keep in mind the things you have that can be put to good use in this soup. You can make this without noodles. You can add hearty greens, green beans, potatoes, beans, calabacitas if you have it and if it sounds good to you.

Print

Heartwarming Turkey Noodle Soup

Turkey Noodle Soup - in a ceramic bowl with spoon
Print Recipe
Pin Recipe

5 Stars 4 Stars 3 Stars 2 Stars 1 Star

No reviews

Discover the therapeutic power of cooking in challenging times with this heartwarming Turkey Noodle Soup. Customizable and leftover-friendly, this recipe is full of gentle, yet deeply satisfying flavor.

  • Author: Marianne Sundquist
  • Prep Time: 1
  • Cook Time: 1
  • Total Time: 2 minutes
  • Yield: 8 servings
  • Category: soup
  • Method: simmer
  • Cuisine: American

Ingredients

Units

For the soup:

  • 4 T. butter
  • 1 large yellow onion, diced
  • 5 large celery stalks, diced
  • 4 large carrots, peeled & sliced
  • 4 cloves garlic, minced
  • 1/4 c. fresh herbs (any combination of rosemary, sage, thyme), minced
  • 1 T. azafran
  • 4 c. cooked turkey meat, torn into bite-sized pieces
  • 8 c. turkey or chicken broth
  • 3 c. dried egg noodles
  • Salt and pepper, to taste

For garnish:

  • Sliced spring onions (optional)

Instructions

Turkey Noodle Soup fresh Ingredients in a bowl

Sweating the Veggies

In a large soup pot over medium heat add the butter. Once it melts, add the onion, celery, and carrot and let these vegetables sweat in the pot, stirring frequently so they don’t burn.

Cook and Simmer

After around ten minutes or so, add the garlic, herbs and azafran. Cook for another few minutes. Add the turkey meat and broth. Turn up the heat and bring the soup to a boil, then reduce the heat to a simmer.

Adding the Noodles

After around 20 minutes, the vegetables should be just about tender. Add the dried noodles and cook for 20 more minutes. Add salt and pepper as needed. Garnish with sliced spring onions if you want to add a bit of bright green vegetable crunch.

Did you make this recipe?

Tag @highdeserttable on Instagram so we can cheer you on! 🌟

Nutrition values are estimates only. See the disclaimer here.

  • « Go to Previous Page
  • Page 1
  • Page 2
  • Page 3
  • Page 4
  • Page 5
  • Page 6
  • Interim pages omitted …
  • Page 10
  • Go to Next Page »

High Desert Table

Copyright © 2025 · High Desert Table

  • Privacy Policy
  • Nutrition Disclaimer