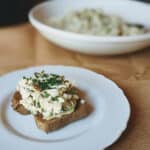
• Skip to primary navigation
  • Skip to main content
High Desert Table

High Desert Table

Your everyday guide to Southwestern cooking

  • Home
  • Recipes
  • About
  • Shop
  • Private Events
  • Contact
  • Show Search
Hide Search

Marianne Sundquist

Calabacitas Benedict

Marianne Sundquist · May 22, 2023 · Leave a Comment

Calabacitas “little squash”, is a dish with many names, and variations and steeped in New Mexico history originating from Native American Pueblos dating back to the 16th century. As with most foods unique to this area, the finished dish is only the starting point for the many opportunities to learn about the foods, people, and history that make up the heart and soul of the Southwest landscape. Each new ingredient and method I learn here change me, even in a small way. Added together, I can’t help but notice that living and cooking here has changed and grounded me in ways I could have ever imagined where the only thing I know for sure, is that I hope I will be learning here with an open heart for the rest of my life. Cooking becomes less about what I do in the kitchen and more about what others have experienced, preserved, and the gift of gathering around the kitchen table to share a dish like this. 

Sacred Ingredients

In her James Beard Award-winning book, Foods of the Southwest Indian Nation, Lois Ellen Frank (Kiowa on her mother’s side and Sephardic on her father’s side) writes about the sacred elements to tribes across the country and the ingenuity of an ecosystem that is created by planting three crops that benefit and thrive when they are planted together in companion planting. This book also happens to include the largest acknowledgments section of any book I have ever seen. I don’t think this is by accident, and if I’ve learned anything at all since my time here learning from chefs like Lois and Walter Whitewater from Red Mesa Cuisine, it’s that the native approach to cooking embodies a spirit of attention and care for all living things including land and food, with a deep appreciation for teachers in all forms.  

Of the three sisters, Lois writes that they “are believed to have been domesticated in Mesoamerica sometime between 7000 and 3000 B.C.” Then, as travel increased along the El Camino Real de Tierra Adentro, the 1591-mile-long road between Mexico City and San Juan Pueblo, New Mexico, it is believed corn and chile was added to cooked summer squash making the combination we know and love today. In Lois’s book the recipe, also called calabacitas, is called Mesa Squash Fry and includes red bell pepper and sunflower seeds. In the Pueblo Indian Cookbook, compiled and edited by Phyllis Hughes a similar version is called Skillet Squash and includes the addition of shredded longhorn cheese (cheddar or american style cheese in the shape of a half moon), while Fabiola C. Gilbert in her book Historic Cookery published in 1931 refers to Calabacitas con Chile Verde which includes a small amount of milk and grated Native or American cheese. I have seen more variations than I can count with additions like tomatoes, chicken broth, cream, queso fresco, jalapeno, and differences in texture from extra brothy to this version which is more on the caramelized vegetable side.

Making the Calabacitas

Calabacitas is wonderful in a bowl on its own, but it also happens to make my favorite benedict of all time. This is a vegetarian recipe, but you could always add a slice of ham or bacon on top of the bread if you wish. Or, if you didn’t want to use biscuits or english muffins, you could always swap those out for roasted fingerling potatoes, sweet potatoes, roasted asparagus or a bed of sauteed hearty greens like kale, chard or collards. 

The classic way of preparing hollandaise sauce is by using a double boiler and saying lots of prayers while whisking. This blender version can be made with a standard blender or an immersion blender and is so easy you might be inclined to add this to your regular brunch rotation.

Print

Calabacitas Benedict

HDT Calabacitas Benedict plated
Print Recipe
Pin Recipe

5 Stars 4 Stars 3 Stars 2 Stars 1 Star

No reviews

Calabacitas is wonderful in a bowl on its own, but it also happens to make my favorite southwestern style benedict of all time. This is a vegetarian recipe, but you could always add a slice of ham or bacon on top of the bread if you wish.

  • Author: Marianne Sundquist
  • Prep Time: 30 mins
  • Cook Time: 30 mins
  • Total Time: 1 hour
  • Yield: 6 servings
  • Category: Breakfast
  • Method: fire-roasted
  • Cuisine: New Mexican

Ingredients

Units

for the calabacitas:

  • 2 T. olive oil
  • 1 red onion, diced
  • 3–4 cloves of garlic, finely chopped
  • 2 fire roasted poblano peppers, peeled, seeded and diced
  • 2 medium zucchini, diced
  • 2 medium yellow squash
  • 2 c. fire roasted corn kernels
  • 1 T. fresh oregano, rough chopped (or 2 t. dry)
  • salt and pepper, to taste

for the hollandaise:

  • 2 1/2 sticks unsalted butter
  • 2 large egg yolks
  • 2 T. freshly squeezed lemon juice
  • 1/2 t. New Mexico Red Chile Powder or to taste
  • Salt and pepper, to taste
  • warm water, as needed for thinning

for serving:

  • 6–12 eggs, prepared however you like them best
  • 6 english muffins or biscuits, sliced in half, toasted and buttered
  • 1/4 c. minced chives, for garnish


Instructions

To make the calabacitas, heat the olive oil in a large, heavy-bottomed pan over medium-high heat. Add the onion and cook until they are beginning to caramelize. Add the garlic and cook for another couple of minutes. Now add the fire-roasted poblanos, zucchini, yellow squash, corn and oregano. Let this cook, stirring occasionally until the vegetables are tender, all of the water has evaporated from the zucchini and yellow squash and everything in the pan is starting to caramelize. Season with salt and pepper until it tastes wonderful to you. Keep warm.

Less than 30 minutes before serving the benedict is the time to make the hollandaise. Fill your blender with very warm water. In a small saucepan over medium heat bring the butter to a simmer and turn off the heat. Pour out the water from the blender, saving it for another use like watering plants once it comes to room temperature and dry the blender with a clean cloth. Transfer the butter to a heat-proof pitcher or measuring cup with a pouring spout to have ready to go. Add the egg yolks, lemon juice, New Mexico chile powder and a pinch of salt and pepper to the blender. Blend this on a medium speed and while it’s blending, carefully remove the fill cap from the blender lid and very slowly pour in the hot butter. Watch the mixture as you pour, you should see it thicken as it emulsifies. Once all the butter has been added, season with salt and pepper as needed. If the hollandaise is too thick, you can thin it out by blending in more lemon juice if you feel it’s needed or one tablespoon of warm water at a time. Transfer the sauce to a heat proof container and keep covered and warm until ready to serve.

To assemble the benedict:  Place English muffins or biscuits in a large bowl, top generously with a spoon of calabacitas, an egg and a drizzle of hollandaise sauce. Garnish with chives and serve immediately.

Did you make this recipe?

Tag @highdeserttable on Instagram so we can cheer you on! 🌟

Nutrition values are estimates only. See the disclaimer here.

New Mexican Sipping Chocolate

Marianne Sundquist · May 20, 2023 · Leave a Comment

I can’t help but think about the person who first stumbled upon a cacao tree and cracked open one of the large pods, revealing bundles of luscious white fruit inside. Past the white silky pulp (baba) of a cacao bean resides the beginnings of the chocolate we know and love today. Similar in some ways to the coffee bean, the potential of cacao is unlocked by fermentation, roasting, winnowing, and grinding. A laborious endeavor is putting it mildly, as there is nothing easy about processing cacao by any standards, which is why there has been much-needed attention given to Slave-free and Fair Trade Chocolate in recent years. And while coffee grows along the “bean belt” 20-30 degrees north and south of the equator, cacao trees thrive in an even more restricted 10-degree zone, on either side of the equator. 

It’s long been known that chocolate played an important role in Mayan culture, where the first iterations of “hot chocolate” were born. Aztecs believed that the feathered serpent god Quetzalcoatl gifted cacao to humanity and are known to have roasted and ground cacao beans before adding water, chiles, and cornmeal.

The History of Chocolate

The history of chocolate is exciting on its own, with new pieces of the puzzle being uncovered, even in recent years. In 2018, University of British Columbia archaeologist Michael Blake discovered evidence that cocoa was held in vessels around 5300 years ago in Santa Ana-La Florida, an ancient village in what’s known today as Ecuador. And the mysteries surrounding this “food of the gods” have landed close to home for us here in New Mexico as well. At one time, it was believed that the Spanish brought cacao to the area in the 15th century, but University of New Mexico archeology professor Dr. Patricia Crown and her team of researchers traced evidence of chocolate consumption to 750 A.D. in the area that is now Arizona and 900 A.D. in Chaco Culture National Historical Park in western New Mexico. 

These days, hot chocolate and drinking chocolate methods vary widely depending on what part of the world you are in. So here, because we are lucky enough to live in a place where New Mexico chiles abound, I could not resist incorporating them into a decadent drinking chocolate that we reserve in our house for both the coldest and most special days of the year. I wanted to keep this version simple and straightforward with chiles and cinnamon, but dried sage, lavender, rose, and a variety of other herbs and spices would be lovely to experiment with too.

Sipping hot chocolate in two ceramic cups
Print

Traditional New Mexican Sipping Chocolate

Sipping hot chocolate in two ceramic cups
Print Recipe
Pin Recipe

5 Stars 4 Stars 3 Stars 2 Stars 1 Star

No reviews

Indulge in a cup of our Southwestern Sipping Hot Chocolate, inspired by the rich history of this ancient beverage. Chocolate, derived from the cacao bean, holds a storied past, cherished by ancient civilizations like the Mayans and Aztecs who believed it possessed mystical and energizing properties. We pay homage to this tradition by infusing our hot chocolate with a simple combination of chiles and cinnamon with a touch of southwestern flavors.

  • Author: Marianne Sundquist
  • Prep Time: 5 mins
  • Cook Time: 10 mins
  • Total Time: 15 minutes
  • Yield: 8 servings
  • Category: Dessert
  • Method: Simmer
  • Cuisine: New Mexican

Ingredients

Units
  • 1–2 dried new Mexican chiles, stemmed and seeded, and broken into pieces
  • 2 c. milk
  • 1 c. heavy cream
  • 2 t. vanilla extract or vanilla bean paste
  • pinch of salt
  • 1 t. ground cinnamon
  • 1 c. bittersweet chocolate chopped pieces
  • maple syrup or honey to taste, optional

Instructions

In a dry medium-large saucepan over medium heat, stir the chile pieces for around a minute to soften them and activate the oils inside. Now pour in the milk, heavy cream, vanilla, salt, and cinnamon. Bring this mixture to a very low simmer (where you barely see a bubble) and let it steep like this for five minutes. Strain the milk mixture through a fine mesh strainer and add it back to the pot. Add the chocolate to the pot and whisk over low heat until the chocolate is completely melted. Serve immediately.

Notes

Chocolate has been a Southwestern Tradition for Centuries

Everything you need to know about Mexican hot chocolate

Dr. Patricia Crown presents chocolate in Chaco

World’s oldest chocolate was made 5300 years ago South American rainforest

The History of drinking chocolate

Did you make this recipe?

Tag @highdeserttable on Instagram so we can cheer you on! 🌟

Nutrition values are estimates only. See the disclaimer here.

High Desert Green Chile Cheeseburger

Marianne Sundquist · May 13, 2023 · Leave a Comment

There is so much about cooking and eating in the Southwest that is special, including green chile cheeseburgers which top the list for me, especially during the grilling season. I think about burgers made in other places and all the care and effort that goes into coming up with the most creative combination of toppings, or signature burger patties, but at the end of the day it feels like we have an unfair advantage—we have fire roasted green chile. The best burgers I have ever had are in New Mexico and while they vary to some degree, they all have green chile in common. Over time, I have discovered that my favorite burgers tend to be the simplest. I love making this burger and eating it just as is, sometimes with a bun, sometimes wrapped in big pieces of lettuce, but always with melted cheese and a spoonful of poblano jam on top. And I can’t believe I’m saying this, but with this combination, I don’t even add my usual burger go-to’s of mayo, ketchup, and raw slices of onion. 

The cheese

I didn’t want to choose the cheese for you because this is such a personal choice. The day I made these, we melted blue cheese on top of the burgers because this is one of our favorite cheeses, but goat cheese, cheddar, and American would be great too. 

The patty

The most important thing for a good burger is a flavorful burger patty. Here, we accomplish this by adding two kinds of meat, half ground chuck and half-ground sirloin. The chuck brings the texture while the ground sirloin brings the flavor. Combined together with good seasoning and frozen grated butter for additional flavor and moisture, results in my favorite burger patty of all time. You’ll notice that we add a generous (1 tablespoon) of dried herbs to the burger. I have an affinity for the herb blend I make called High Desert Herbs, a combination of marjoram, sage, lavender, rosemary, chile, and thyme (available at stokli.com) but it’s also similar to Herbes de Provence and can be substituted with any or all of the dried herbs listed above.   

The jam

The jam can easily be made a few days in advance and can be adjusted with different chiles. If you want a spicier jam, instead of poblano, you might want to try a hatch, anaheim or even poblano chile. Or, you can create your own signature jam by combining more than one chile together. 

HDT Green Chile Cheeseburger - Poblano Jam
Print

High Desert Green Chile Cheeseburger

HDT Green Chile Cheeseburger - plated
Print Recipe
Pin Recipe

5 Stars 4 Stars 3 Stars 2 Stars 1 Star

No reviews

This New Mexico-inspired green chile cheeseburger combines the heat of green or poblano chiles with the creamy richness of your favorite cheese, creating a mouthwatering fusion that will leave your taste buds craving more.

  • Author: Marianne Sundquist
  • Prep Time: 30 mins
  • Cook Time: 30 mins
  • Total Time: 1 hour
  • Yield: 8 burgers
  • Category: burgers
  • Method: grilling
  • Cuisine: New Mexican Inspired

Ingredients

Units

for the poblano jam:

  • 2 T. olive oil
  • 1 large shallot, sliced
  • 4 garlic cloves, sliced
  • 4 fire-roasted poblano chiles, peeled, seeded & diced
  • 1/4 c. sherry vinegar
  • 1/4 c. brown sugar, packed
  • Salt and pepper to taste

for the burgers:

  • 1/2 c. (1 stick) unsalted butter
  • 1 lb. ground beef chuck
  • 1 lb. ground beef sirloin
  • 1 T. High Desert Herbs or Herbes de Provence
  • 2 t. kosher or flakey sea salt
  • 1/2 t. Black pepper

for everything else:

  • 8 buns
  • your favorite cheese and toppings

Instructions

Making the jam

To make the poblano jam, heat the oil over medium heat in a saucepan. Add the shallots and cook for around ten minutes, until they caramelize. Add the garlic and cook for another few minutes, stirring frequently to prevent burning. Add the diced chiles, vinegar, sugar, and a pinch of salt and pepper. Let this mixture come to a boil, then lower the heat and let it simmer for around 10 minutes, or until the liquid has reduced by around half in the pan. You can leave this as is or transfer the mixture to a blender and pulse a few times to make a slightly smoother consistency. Check seasoning and add more salt and pepper as needed. Transfer the jam to a heat-proof jar and serve warm with the burgers or refrigerate if making in advance.

Making the burgers

To make the burgers, first, grate the butter into a bowl with a box grater and freeze the butter for around ten minutes. In a large mixing bowl, combine both types of ground beef, herbs, salt, pepper, and frozen butter until the mixture is well combined. Form into 8 patties and keep refrigerated. When you’re ready to grill, preheat the grill and cook the burgers to your desired temperature. When they’re almost done, top with cheese, close the grill, and cook the burger for another couple minutes, until the cheese is melted. This is a great time to place the buns cut side down on the grill to slightly toast them. To serve, place burgers on the buns and top with poblano jam. Enjoy with your favorite condiments and other toppings.

Did you make this recipe?

Tag @highdeserttable on Instagram so we can cheer you on! 🌟

Nutrition values are estimates only. See the disclaimer here.

Spring Chicken Posole Verde

Marianne Sundquist · May 12, 2023 · Leave a Comment

When I spooned up a bowl of this authentic chicken pozole for my husband last week, the first thing he said was “this tastes like New Mexico”. I cannot think of a better compliment than this. This is a simple soup that takes some time to make, but I promise it’s worth it. There are many kinds of posole, so to celebrate the full arrival of Spring, I decided to make one loaded with greens. 

When I arrived home after picking up a bag of Posole at the Santa Fe Farmers Market, I noticed a little piece of paper inside the ziplock bag with a recipe for “Raul’s Posole”. The recipe was for a pork and red chile version where you put pork and posole into a pot with water, and let it cook for a couple of hours before adding red chile, salt, pepper, garlic, and tomatoes before garnishing with chopped onions and oregano. The next time I make a pot of posole I will definitely try Raul’s recipe. The generosity of recipe sharing is how I’m learning to cook here and each time is a gift. 

When it comes to posole, I’ve probably learned the most while hanging out in the kitchen with Chefs Lois Ellen Frank and Walter Whitewater. They taught me that while there are many ways of cooking posole, soaking the corn overnight in the fridge is a great way to jump-start the process for cooking the next day. And their favorite way of cooking posole is overnight in a crock pot covered with water. The next day, you will have fluffy and tender posole for however, you plan on using it. So feel free to experiment with cooking posole either of these ways. And as always, you can always shorten the cooking time for this recipe with cans of hominy if you find that helpful.

You’ll notice that in this recipe I give estimates for the number of garlic and tomatillos. The main reason for this is that tomatillos and garlic cloves come in a variety of sizes. If you’re using garlic cloves that are close to the center of a head of garlic, the cloves will be smaller. So just use the number that feels good to you.

When I make this recipe, I like to make the broth, pick the chicken meat and soak the posole the day before. This way, when I actually make the soup the next day, everything feels fast and easy. If you’re crunched for time you can buy chicken broth at the store and/or simmer chicken breasts or thighs in the broth until they are cooked through before pulling the meat into bite-sized pieces. And while you’re at it, if you don’t care about the broth being a bright green, you can skip the blending and simply add minced parsley and cilantro to the warm soup right before serving. 

So while you can make a pot of posole about a hundred different ways, make it work for you. I’d be willing to bet it will still taste like New Mexico in the best of ways.

Print

Spring Chicken Posole Verde

High Desert Table - Easy Chicken Pozole - plated with jalapenos
Print Recipe
Pin Recipe

5 Stars 4 Stars 3 Stars 2 Stars 1 Star

No reviews

When I spooned up a bowl of this Spring Posole for my husband last week, the first thing he said was “this tastes like New Mexico”. I cannot think of a better compliment than this.

  • Author: Marianne Sundquist
  • Prep Time: 2 hours
  • Cook Time: 1 hour
  • Total Time: 3 hours
  • Yield: around 12 servings
  • Category: Soup
  • Method: Slow Cook
  • Cuisine: New Mexico Inspired

Ingredients

Units

for the hominy (posole):

  • 1 1/2 c. dried hominy (posole) or 2 cans of cooked hominy, rinsed and drained

for the chicken & broth:

  • 1 rotisserie chicken
  • 12 c. cold water
  • 2 t. Salt

for the soup:

  • 1 T. olive oil
  • 1 large onion, diced
  • 3–5 garlic cloves, finely chopped
  • 5–7 tomatillos, trimmed and diced
  • 2 c. (or 1, 16 oz. tub) mild green chile, diced
  • 2 fire roasted poblano chiles, peeled, seeded, diced
  • 1 small bunch of spring onions, green parts sliced and white parts sliced and reserved
  • 1 c. parsley leaves and stems, sliced
  • 1 c. cilantro leaves and stems, sliced
  • salt and pepper to taste

for garnish:


  • Jalapeno slices, reserved green onions and/or avocado


Instructions

If you are using canned posole (hominy) skip this step: The day before you cook your dried posole, soak them in the fridge, covered with water by at least three inches. The next day, pour the water and posole into a large pot and add more water to cover. Cook them over medium-high heat until they are tender, around two hours, and drain.

HDT - Spring Posole - hominy prepped

To make the chicken broth

Break the chicken into pieces and place in a large pot. Add the water, salt and bring to a boil. If you are preparing the vegetables for the soup at this time, throw in the ends, skins, and trimmings, but if you’re making this ahead of time, don’t worry about it. Lower the heat to a simmer for around an hour. Pull out the chicken pieces with tongs and strain the broth through a fine mesh strainer. Reserve the broth and pull the chicken meat from the bones once it’s cool enough to handle and reserve.

To make the soup

Place the chicken broth in a large pot and bring to a simmer. Bring a separate, large, heavy-bottomed pot to medium heat. Add the oil and after a minute, add the onions. Let them cook until they are just starting to caramelize. Add the garlic and cook another minute more. Add the tomatillos, mild green chile, fire-roasted poblanos, white parts of the spring onions, the cooked posole, and reserved chicken.

Place the parsley and cilantro in a blender, along with 6 cups of the hot chicken broth. Carefully blend until the broth is a bright green. Pour this and the remaining chicken broth into the pot with the posole mixture. Bring this to a simmer, taste, and adjust seasoning as needed.

Ladle into bowls and garnish with jalapeno, the green parts of spring onions and/or avocado. Enjoy!


Did you make this recipe?

Tag @highdeserttable on Instagram so we can cheer you on! 🌟

Nutrition values are estimates only. See the disclaimer here.

Red Chile & Caramelized Onion Dip

Marianne Sundquist · May 8, 2023 · 1 Comment

In the last few weeks, I have found myself at birthday parties, block parties, and picnics at the park. So this week I wanted to make a homemade dip/spread that would be perfect for crackers, sandwiches, crusty bread, charcuterie, and all the vegetables you can think of. This creamy, red-chile spiked caramelized onion dip is even good with apples, and yesterday, I found myself smearing some on a piece of hot smoked salmon. 

Caramelizing the onions

The secret to a good homemade caramelized onion dip is all about the onions. After around fifteen minutes of cooking, the onions will change to a light caramel color. It’s only natural that one would think you have reached your cooking destination and turn off the heat. But let me assure you, there is far more caramelized traveling to be had. There are many shades of caramelized onions, just like there are many shades of butter turning brown and all of them mean various degrees of (heavenly) depth of flavor. As your onions continue to turn deeper shades of brown (at the lowest heat your stove will allow), you’ll also notice they lose more water and take up less space in the pot. Until, at last, you have a small amount of deeply caramelized onions packed with sweet and savory flavor.

The next step is adding High Desert Herbs or Herbes de Provence, some red chile, sour cream, and a brick of softened cream cheese. You’ll notice the recipe calls for a specific order for mixing everything together. This is so you don’t have any little lumps of cream cheese suspended in the dip, which isn’t too big of a deal since it doesn’t affect the flavor, but does alter the final texture and appearance. 

If you have a number of get-togethers coming up, if I were you I’d double or triple the batch (since caramelizing onions takes a bit of time) and freeze pints of the finished dip. The day before you need some dip, pull one out of the freezer and the next day you’ll be ready to roll.

plated caramelized onion dip ready for sharing
plated homemade caramelized onion dip ready for sharing
Print

Red Chile Caramelized Onion Dip

Red Chile Onion Dip with Appetizer Platter
Print Recipe
Pin Recipe

5 Stars 4 Stars 3 Stars 2 Stars 1 Star

5 from 1 review

This creamy, red-chile caramelized onion dip is perfect for crackers, sandwiches, crusty bread, charcuterie, and all the vegetables you can think of. Made with New Mexico Red Chiles, this appetizer is perfect for any party, picnic, or southwest gathering.

  • Author: Marianne Sundquist
  • Prep Time: 25
  • Cook Time: 35
  • Total Time: 1 hour
  • Yield: 1 pint
  • Category: appetizer
  • Method: Caramelize
  • Cuisine: New Mexican

Ingredients

Units
  • 2 T. butter
  • 1 large yellow onion, sliced
  • 2 t. High Desert Herbs or Herbes de Provence
  • 2 garlic cloves, thinly sliced
  • 1/4 c. Mild New Mexico Red Chile puree
  • 1 1/2 c. Sour cream
  • 1 brick (8 oz) cream cheese, room temperature
  • salt and pepper, to taste
  • minced chives, for garnishing

Instructions

In a heavy-bottomed pot over medium-low heat, melt the butter. Add the onions, cover, and cook for around fifteen minutes. This allows the onions to steam and release a large portion of their water fairly quickly. While they are steaming, stir them every few minutes.

caramelizing the onions in a Le Creuset Dutch oven

Uncover the onions and at this point, they will probably begin to look caramelized. Uncover them, stir, add the dried herbs, and turn the heat to low (as low as it can go). Let them continue to slowly caramelize for around 30 minutes, stirring every five minutes or so. Add the garlic and cook for another five minutes, stirring frequently.

Turn off the heat and deglaze with the red chile puree, scraping the bottom of the pan with a wooden spoon. Carefully transfer this mixture to a blender or food processor and buzz just a few times and let it come to room temperature.

Once the onions are cooled to room temperature, add the cream cheese to the bowl of a stand mixer with a paddle attachment and whisk for about a minute until it’s light and airy. Add the sour cream and mix again. Now add the onion mixture and mix until everything is distributed. Check seasoning and add salt and/or pepper as needed. Transfer to a bowl and garnish with chives.

Did you make this recipe?

Tag @highdeserttable on Instagram so we can cheer you on! 🌟

Nutrition values are estimates only. See the disclaimer here.

  • « Go to Previous Page
  • Page 1
  • Interim pages omitted …
  • Page 6
  • Page 7
  • Page 8
  • Page 9
  • Page 10
  • Go to Next Page »

High Desert Table

Copyright © 2025 · High Desert Table

  • Privacy Policy
  • Nutrition Disclaimer