• Skip to primary navigation
  • Skip to main content
High Desert Table

High Desert Table

Your everyday guide to Southwestern cooking

  • Home
  • Recipes
  • About
  • Shop
  • Private Events
  • Contact
  • Show Search
Hide Search

Marianne Sundquist

Molten Chocolate Chile Cakes

Marianne Sundquist · March 13, 2023 · Leave a Comment

When it comes to dessert making, I have one thing on my mind: ease. Many variables are at play so let’s be honest, a lot can go wrong. There’s time, temperature, humidity, elevation, not to mention texture and stability to keep in mind. I think the key is to make desserts you love, make them often enough so it doesn’t feel like an invasive species has descended upon your kitchen, and try to do as much preparation in advance as you’re able. 

Of course, it’s fun to try new things. I am reminded of this every year when my boys announce their birthday cake requests. At some point very early on in parenthood (I think we thought it was cute?) I’d ask the kids what kind of cake they wanted. Then we started getting their answers and by then it was too late to turn back. “An ocean with fish”, “a volcano with lava”, “a 3-D droid”, etc. We have tried, and we have failed, but by some miracle, according to their delighted faces we have always managed to succeed. There is a time and place for all of that. But this isn’t it.

Here is one of the simplest desserts to make. This isn’t one of those dessert recipes that cuts a bunch of corners so regular folks can do it. This is a true pastry triumph. Not only is it easy to make, but it’s perfection lies in its simplicity. For chocolate lovers and valentine lovers, you can’t go wrong. My favorite thing about this recipe is that you can make the batter in the morning, and pull it out of the fridge an hour before you want to bake it. Then when everyone is finishing dinner, you throw them in the oven for 12 minutes or so, and voila! You’re suddenly transported to a French bistro for dessert.

This recipe launches off the sturdy foundation of the classic molten cake recipe from world-renowned French Chef Jean-Georges Vongerichten. The story goes that his wife fell for him when she tasted his Molten Chocolate Cake. The only variation here is the addition of cinnamon and red chile to give it that Southwestern high desert touch.

Print

Molten Chocolate Chile Cakes

Molten Chocolate Chile Cake Plated
Print Recipe
Pin Recipe

5 Stars 4 Stars 3 Stars 2 Stars 1 Star

No reviews

  • Author: Marianne Sundquist
  • Prep Time: 45 mins
  • Cook Time: 12 mins
  • Total Time: 1 hour
  • Yield: 4 individual cakes
  • Category: Dessert
  • Method: Baking

Ingredients

Units

For the cakes:

  • 1 stick, 4 oz. unsalted butter
  • 6 oz. bittersweet chocolate
  • 2 eggs
  • 2 egg yolks
  • 1/4 c. sugar
  • 1 t. Salt
  • 2 t. ground cinnamon
  • 2 t. ground red chile powder, depending on heat level
  • 2 T. All-Purpose Flour

For the ramekins

  • 4, 6 oz. ovenproof ramekins
  • 1 T. softened butter
  • 1 T. AP flour

Instructions

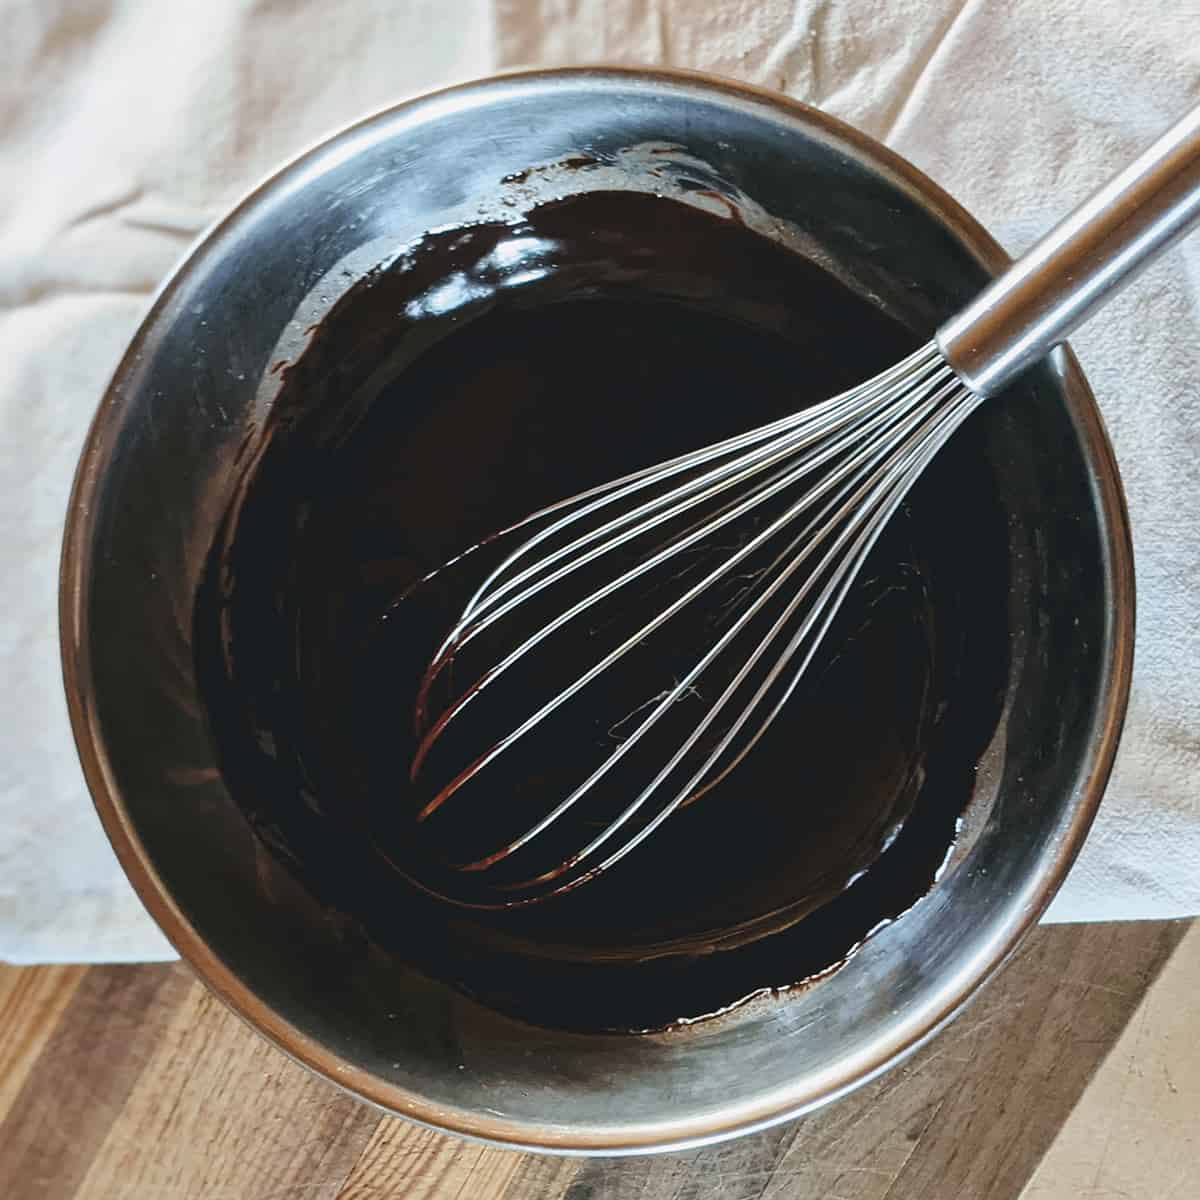
The batter can be made any time during the day and kept in the fridge until an hour before you are ready to bake. To make the batter, the first thing we are going to do is set up a double boiler. A double boiler is a medium saucepan filled with a couple of inches of simmering water. Then place a heat-proof bowl in the pot. You want to use a bowl that is small enough to slightly sink into the pot, but it should be 2-3 inches above the simmering water. You also don’t want to choose a bowl that’s so big it just balances precariously on top. The idea here is that we want to heat the bowl with steam.

Once your double boiler is ready to go, add the butter and chocolate to the bowl until melted. Whisk this melted mixture until smooth.

Molten Chocolate Chile Cake Folding Step 1

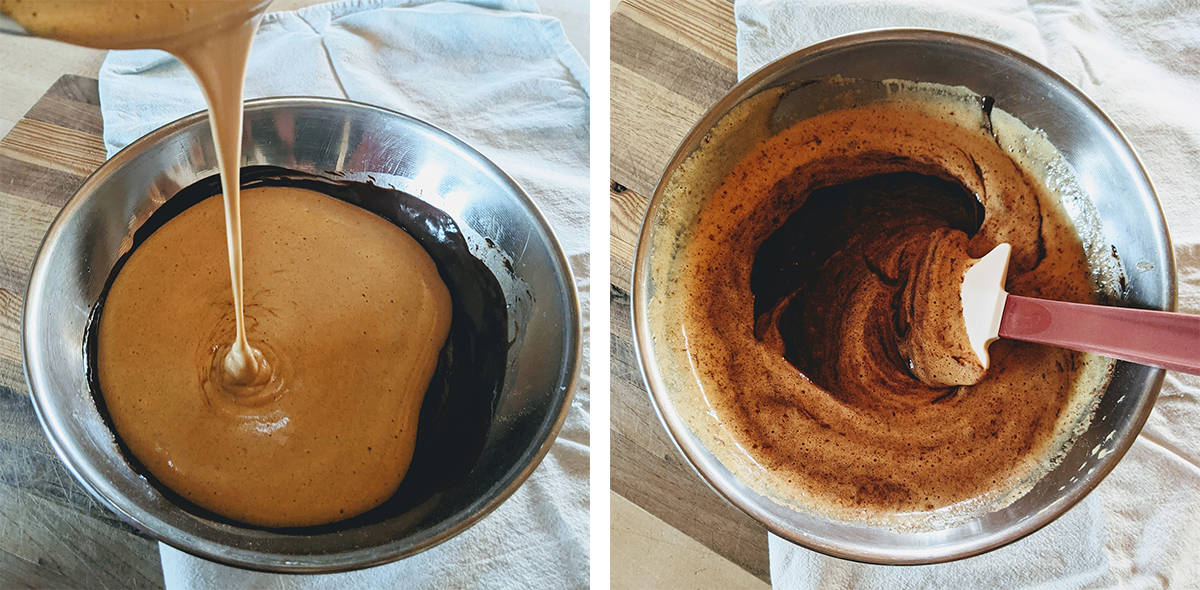
In a separate bowl beat the eggs, egg yolks, sugar, salt, cinnamon, and red chile vigorously with a large whisk, or at high speed with an electric mixer until the mixture is thick and pale. Turn off the heat, carefully remove the bowl from the double boiler and fold the egg mixture into the chocolate mixture, along with the flour.

Molten Chocolate Chile Cake Folding Step 2 and 3
Carefully folding the egg mixture into the chocolate mixture

The batter should be baked right away, or if made ahead of time, brought to room temperature before baking. They only take around 12 minutes to bake, so you will want to throw these in the oven towards the end of a meal.

Preheat the oven to 450 F. Prepare 4, 6 oz. oven-proof ramekins by spreading butter on the inside of each and dusting with flour. Tap out any excess flour. Set the prepared ramekins on a baking sheet. Spoon the batter evening between the four ramekins and bake for around 12 minutes, or until you see the sides of the cake start to firm up, but the centers still look soft. Let them cool for a minute and cover each one with an inverted dessert plate. Carefully turn them over, let them stand for 15 seconds and unmold them. Serve with fruit, whipped cream, or ice cream on the side.

Did you make this recipe?

Tag @highdeserttable on Instagram so we can cheer you on! 🌟

Nutrition values are estimates only. See the disclaimer here.

Cochinita Pibil Chile Tacos

Marianne Sundquist · March 12, 2023 · Leave a Comment

This is a taco recipe that comes from our constant craving for the unequivocal Cochinita Pibil sandwich and our never-ending love for tacos. Cochinita Pibil is a traditional slow-roasted pork dish from the Yucatán Peninsula. Its genius lies in the marinade highs and lows; earthy achiote paste or annatto seed, bright orange and/or grapefruit juice, and rich and roasted flavors from roasted garlic. This taco recipe takes into account the spirit of the Pibil and travels to another galaxy in the form of tacos, made with New Mexican chile of course. 

These can be made vegetarian using all beans, cauliflower or potatoes in place of the meat. The last time I made these I used elk, but any meat you have a hankering for will work. Pork shoulder is wonderful, it just takes more time than a vegetable, ground beef or a picked cooked rotisserie chicken.

This would be a fabulous dish to put in the slow cooker overnight. If you cook it this way, you could easily use dry beans instead of cooked ones. This “taco” filling is just as tasty over nachos, in burritos, over rice, and yes, even salad.

Print

Cochinita Pibil Chile Tacos

Cochinita Pibil Chile Tacos
Print Recipe
Pin Recipe

5 Stars 4 Stars 3 Stars 2 Stars 1 Star

No reviews

  • Author: Marianne Sundquist
  • Prep Time: 1 hour
  • Cook Time: 1-3 hours
  • Total Time: 1-3 hours
  • Yield: serves 6-8
  • Category: Tacos
  • Method: Slow Cook
  • Cuisine: Southwest

Ingredients

Units

For the chile paste:

  • 8 dried red chiles, stemmed and seeded
  • 8 garlic cloves, peels left on
  • 1/2 t. black peppercorn
  • 1/2 t. whole cloves
  • 2 t. whole coriander
  • 1 t. whole cumin
  • 1 T. dried oregano
  • 2 T. maple syrup
  • 1 grapefruit, juiced
  • 1/2 c. water
  • Salt and pepper, to taste

For the tacos:

  • 2 T. olive oil
  • 2 # meat (beef chuck, brisket, ground beef, chicken, bison or elk)
  • 1 large onion, diced
  • 2 green bell peppers, diced
  • 1 can (14.5 oz.) cooked beans OR 1 c. dried chicos
  • 1 can (14.5 oz.) diced fire-roasted tomatoes
  • 2 c. broth (veggie, chicken, or beef)

For serving (optional):

  • tortillas
  • Scallion, sliced
  • Jalapenos, sliced
  • greek yogurt or sour cream
  • Avocados
  • Cilantro leaves
  • Lime wedges
  • Cheddar cheese, shredded

Instructions

First, make the chile paste: Bring a medium saucepan of water to a simmer. While you’re waiting for the water to heat, In a separate cast iron or other heavy-bottomed skillets over medium heat, sear the red chiles pressing them in the pan until they soften and smell aromatic, but not too much that they burn. Turn them, gently cook on the other side and transfer them to the simmering water saucepan. Turn off the heat and let them sit for 15-30 minutes, then strain them and reserve. Add the garlic cloves to the hot cast iron pan (with their peels still on) and brown them on all sides, before removing them and peeling them once they are cool enough to handle. Once again the cast iron will be empty but still hot. Add the peppercorn, cloves, coriander, and cumin to the pan and gently cook until the spicy fragrance wafts up at you. Transfer these spices to a dry blender and blend until it forms a powder. Add the chiles, peeled garlic cloves, maple syrup, grapefruit juice, and water. Blend until smooth and reserve.

To make the tacos: heat oil in a large dutch oven over high heat. Season the meat with salt and pepper and sear on all sides, working in batches as necessary as to not overcrowd the pan. Reserve the cooked meat in a bowl and reduce the heat to medium.

Add to the hot pot the onion, and green bell peppers and let cook for around ten minutes. Add the beans, can of tomatoes, broth, prepared chile paste, and cooked meat back to the pot. Bring to a simmer, cover, and cook anywhere from 30 minutes to 3 hours depending on the type of meat used. Ground beef or already cooked meat will take around 30 minutes, whereas tougher cuts like brisket, stew meat or pork shoulder could take up to 3 hours to tenderize. Once the meat is fully cooked, serve it with tortillas and your favorite taco toppings. Enjoy!

Did you make this recipe?

Tag @highdeserttable on Instagram so we can cheer you on! 🌟

Nutrition values are estimates only. See the disclaimer here.

Everyday Southwest Stew

Marianne Sundquist · March 12, 2023 · Leave a Comment

It’s no accident that our kitchens have long been considered the heart of our homes. They can — and should — be a place of comfort and relaxation. With many of us doing a lot more cooking and a lot more staying at home, I’m fairly sure the heartbeat of our home kitchens has never been louder, or more important than now. Even as a chef with two small kids, I’ll be the first to admit it can be a challenge. But cooking for ourselves and our families can also be grounding and deeply satisfying. 

With our high desert nights still cool and trips to the grocery store unpredictable, I can’t think of a better time to share one of my favorite recipes of all time — Everyday Southwest Stew.

You can follow this recipe exactly and you will undoubtedly notice smiles around your table, although I have to admit I never actually measure anything when making a stew, but offer the amounts more as a guide. You can also tinker with this recipe and make it work for the ingredients you have on hand. Who knows? Maybe your new version will become a family heirloom, passed to children, grandchildren, and neighbors, a culinary snapshot from this historic moment in time.  

Here’s the secret. You don’t have to go to the store for the perfect ingredient, because there are no specific ingredients that are going to make or break this stew. The only requirement is that you trust yourself and let the rest go. I’m considering this a time of invention and innovation in our home kitchens. To start, let’s take a big-picture look at this simple recipe which allows for almost endless variations: 

FAT

First, start with a big, heavy-bottomed pot. Add a splash of oil or other fat to the pan. This is a great way to use bacon fat (aka bacon butter) leftover from breakfast. In this recipe, I render bacon, remove it when it’s crispy and use the leftover fat to sear the meat. You could also use ghee. The only oil I would recommend not using is extra virgin olive oil, which is best used for salads and finishing dishes.

MEAT

Once the pan is hot, sear the meat. My favorite stew meat is local buffalo, but you could use almost any meat you have on hand; beef shoulder (aka chuck), beef round, ground beef, pork shoulder, pork tenderloin, sausage, boneless chicken breasts or thighs, and even bone-in chicken if you’re careful to remove the bones before adding the meat back to the pot after cooking. You could also leave out the meat altogether, use beans or grains instead, and skip to the next step.

MIREPOIX

Now it’s time to add the flavor bomb veggies, roots, and spices that are going to add loads of flavor to your stew, also referred to as mirepoix (meer-pwaa). What does this mean? This is where you choose what direction you want your stew adventure to go. In France, the classic mirepoix is a combination of celery, carrots, and onion. In Italy, cooks will often start with the French mirepoix and add parsley and garlic. Chinese mirepoix consists of green onions, ginger and garlic. If you have a hankering for Thai, try a combo of ginger, lemongrass, basil, and lime zest or leaves. In my house, we often go the Indian route and in addition to the carrots, celery and onion, add red chile, fresh ginger and turmeric, and curry powder or paste. This is the time to look around in your fridge, pantry or produce section of the market and get creative. What looks good, sounds good, and what do you have access to? Do you have any fire-roasted New Mexican chiles hiding in the freezer? I can promise you there has never been a better time to find them. In this recipe, I use herbes de provence because even though the blend originates in the southeastern region of France, it often includes New Mexico herbs like lavender, thyme, and oregano.  

DEGLAZE

After your mirepoix has been hanging out in your pot for a while, now is the time to deglaze! This means add a bit of liquid to get all the caramelly goodness off the bottom of the pot and into the stew. You could add a few glugs of wine. You could add a can of coconut milk or some crushed tomatoes or broth. Scrape the pot with a wooden spoon. 

HEFTY VEGETABLES & LIQUID

Now add your hefty vegetables to add texture and substance to the strew. You can add things like potato, cabbage, celery root, beet, squash, fennel, mushroom, radish, turnip, collard greens, daikon, etc. Then add more liquid to cover. This could be more broth or even water.

FINAL SEASONING & DELICATE GREENS

Depending on the meat and/or vegetables you’re using, you will want to simmer over low heat until everything is tender. This could be 40 minutes or four hours. Check the seasoning and see if you want to add salt, pepper, or other spices. For instance, sometimes when I go the Thai route, this is when I add juice from a lime or a splash of fish sauce. Just a bit to brighten it up. This is where tasting and trusting will get you where you want to go. Once everything is cooked and tender, now is the time to add greens and green vegetables. I like to add greens a few minutes (but not more) before ladling them into bowls.  You can add greens like spinach, kale, broccoli, peas, rapini, chard, asparagus, etc.

My hope is that by making this stew, you’ll create new scent memories of lavender and roasted chiles.

Print

Everyday Southwest Stew

Everyday Southwest Stew
Print Recipe
Pin Recipe

5 Stars 4 Stars 3 Stars 2 Stars 1 Star

No reviews

  • Author: Marianne Sundquist
  • Prep Time: 1 hour
  • Cook Time: 2-3 hours
  • Total Time: 4 hours
  • Yield: 3-4 quarts
  • Category: Soups
  • Cuisine: Southwest

Ingredients

Units
  • 4 slices of bacon, diced
  • 3 lb. beef or buffalo meat, excess fat removed and cut into 2” pieces
  • 4 carrots, peeled and sliced
  • 1 large red onion, diced
  • 1 celery root, peeled and diced
  • 4 cloves of garlic, thinly sliced
  • 2 fire-roasted green or red chiles, peeled, seeded, and sliced
  • 1 T. herbes de provence (or a mix of thyme, oregano, dried lavender)
  • 3 T. tomato paste
  • 1/2 c. red wine
  • 3-4 yukon gold potatoes, diced
  • 1/2 lb. fresh mushrooms, brushed with a dry towel or cloth and quartered
  • 8 cups beef broth
  • 1 c. green peas
  • 1 bunch kale, sliced

Instructions


  1. In a large, heavy-bottomed pot over medium-low heat, add bacon and cook until the fat is rendered and the bacon crispy. Remove the bacon and reserve to a medium bowl, leaving the fat in the pot.

  2. Turn the heat up to medium-high. Dry the meat with clean paper towels and season with salt and pepper. Working in batches so as not to overcrowd the pan, sear the meat on all sides until caramelized. Transfer the seared meat to a bowl.

  3. Once all the meat is seared and removed from the pot, add carrots, onion, celery root, garlic, green chile, and herbes de provence. Stir and let cook for around ten minutes.

  4. Add tomato paste, wine, and stir for another few minutes scraping all the caramelly goodness off the bottom of the pot with a wooden spoon.

  5. Add potatoes, mushrooms, and broth. Bring to a simmer and turn heat to low. Let simmer for 2-3 hours until the meat is completely tender. Check seasoning, and add salt or pepper as needed.

  6. A few minutes before serving, add peas and kale to the stew. Ladle into bowls and enjoy.

Did you make this recipe?

Tag @highdeserttable on Instagram so we can cheer you on! 🌟

Nutrition values are estimates only. See the disclaimer here.

Simple Cinnamon Rolls

Marianne Sundquist · March 12, 2023 · Leave a Comment

Is it frivolous to spend a morning cooking or baking when the world seems to be falling apart? Not one bit. One of my favorite things about cooking is its ability to ground us — to home, to people around us, to ourselves, to gratitude, to our senses. It gets us away from the computer and into the kitchen. It quiets our minds, even for a bit. Normally, cinnamon rolls in our house are reserved for holidays or birthdays. But these days, I’m looking for every excuse to celebrate. A couple of weeks ago we made Thanksgiving dinner just for fun (and of course to eat leftovers throughout the week). I knew cinnamon rolls for breakfast would be the perfect way to kick things off. Starting the day with a batch of these beauties is sure to turn an ordinary day into an extraordinary one.

Variations to consider if you want to get creative: Sometimes I poke a hole in the dough before baking and fill them with spiced pastry cream, or add finely chopped almonds or pecans to the filling to add more texture. I would suggest making the dough and shaping them the night before you want to bake them. Then all you have to do is wake up in the morning, let them warm up a bit, and throw them in the oven.

Print

Simple Cinnamon Rolls

Simple Cinnamon Rolls Plated
Print Recipe
Pin Recipe

5 Stars 4 Stars 3 Stars 2 Stars 1 Star

No reviews

These easy cream cheese frosted cinnamon rolls can be prepped the night before with an overnight rise or made the morning of for a delicious breakfast treat.

  • Author: Marianne Sundquist
  • Prep Time: 2 hours
  • Cook Time: 25 minutes
  • Total Time: 3
  • Yield: 12 rolls
  • Category: Breakfast
  • Method: Baking

Ingredients

Units

for the rolls:

  • 3/4 cup milk, warmed
  • 2 1/4 teaspoon active yeast (1/4-ounce package yeast)
  • 1/4 cup granulated sugar
  • 1 egg plus 1 egg yolk, at room temperature
  • 1/4 cup butter, melted
  • 3 cup flour

for the filling:

  • 2/3 cup brown sugar
  • 1 1/2 tablespoon ground cinnamon
  • 1/4 cup butter, softened

for the cream cheese frosting:

  • 8 ounces cream cheese, softened to room temperature
  • 2 tablespoons butter, softened, softened to room temperature
  • 4 tablespoons real maple syrup
  • 1 teaspoon vanilla extract
  • Pinch of salt

Instructions

Make the dough: Add milk to the bowl and sprinkle yeast on top. The yeast will begin to foam in around five minutes. Add sugar, egg, egg yolk, and butter. Mix well. Add flour, salt, and stir with a wooden spoon until a dough begins to form. On a floured surface, knead the dough with your hands for 8-10 minutes. Transfer the dough ball to a buttered bowl, and cover it with a kitchen towel. Rise for one hour.

While the dough is rising make the filling: Mix together the butter, brown sugar & cinnamon in a small bowl. Reserve.

Make the frosting: In the bowl of a stand mixer fitted with a whisk, beat the cream cheese and butter together on medium speed until smooth, about 2 minutes. Add the maple syrup, vanilla, and a pinch of salt. Beat for 2 minutes. You can also make this by hand with a wooden spoon and some elbow grease.

Shape and bake the rolls: Transfer dough to a well-floured clean surface and roll out into a 14-by-9-inch rectangle. Spread filling on the dough, leaving a ¼-inch border. Tightly roll the dough up, starting from the long side, and place the seam side down. Cut into 2-inch slices with a sharp knife. You should yield 12 rolls.

Simple Cinnamon Rolls - cutting the rolled dough

Line a large cast iron pan or 9” baking dish with parchment paper. Place rolls in the dish and cover with plastic wrap and let rise again for 30 minutes. (At this point you could also put them in the fridge overnight and then pull out the next day 30 minutes before baking.) Bake in a 350 degree oven for 25 minutes or until just slightly golden but cooked through. Allow them to cool for around five minutes before frosting.

Simple Cinnamon Rolls before baking

Did you make this recipe?

Tag @highdeserttable on Instagram so we can cheer you on! 🌟

Nutrition values are estimates only. See the disclaimer here.

High Desert Everything Marinade

Marianne Sundquist · March 5, 2023 · Leave a Comment

This is a marinade that celebrates flavors of New Mexico and at the same time is highly versatile and can be used on all kinds of foods with equally delightful results: asparagus, bell peppers, mushrooms, cauliflower, zucchini, eggplant, tofu, shrimp, salmon, chicken, beef flank steak, hanger steak, skirt steak, sirloin steak, brisket, pork chops, buffalo, elk, etc.

The technique of marinating is twofold. At the end of the day, it’s about tenderizing and adding flavor. Each food falls on a spectrum of absorbability and toughness, some foods benefiting more from tenderizing like a tough skirt steak, and others from the addition of flavor like vegetables.

Marinating times depend on the acidity of the marinade itself and the burliness of the food you’re marinating. Some kind of acid is important, especially if you’re wanting your marinade to do some heavy lifting in the tenderizing department. As the acidity of your marinade increases, the time required decreases otherwise your fish could be at risk for turning into ceviche. Here’s a general guide for marinating times:

  • Vegetables: 20-30 minutes
  • Tofu: 20 minutes – 24 hours
  • Fish & Shellfish: 20 minutes – 1 hour
  • Chicken pieces: 30 minutes – 3 hours
  • Whole Chicken: 24 hours
  • Pork, Beef, Wild Game: 30 minutes – 24 hours

This recipe is so versatile because it’s medium acidity (from the yogurt) and loaded with flavor. After the marinating time is over, what you do next is up to you. You can grill, bake, roast or saute. My only suggestion? Call it a party, just because you can.

Print

High Desert Everything Marinade

Print Recipe
Pin Recipe

5 Stars 4 Stars 3 Stars 2 Stars 1 Star

No reviews

This is a marinade that celebrates the flavors of New Mexico and at the same time is highly versatile and can be used on all kinds of foods with equally delightful results.

  • Author: Marianne Sundquist
  • Prep Time: 30
  • Total Time: 30 minutes
  • Yield: 1 cup
  • Category: spring

Ingredients

Units
  • 2 dried ancho chiles
  • 2-4 dried chipotle chiles depending on size
  • 4 garlic cloves, skin left on
  • 1 large lime, zest only
  • A handful of fresh cilantro, stems, and leaves roughly chopped
  • 2 t. honey
  • 1/2 t. Cumin, ground or seeds
  • 1/2 t. Coriander, ground or seeds
  • 1/4 c. plain yogurt
  • 1 T. olive oil
  • Salt and pepper

Instructions

  1. In a large heavy-bottomed pot over medium heat, add the whole peel-on garlic cloves and both types of chile. In a separate kettle or pot bring around 2 cups of water to a boil. The garlic will take longer to brown on all sides, but keep your eye on the chiles. We want them to smell fragrant and slightly brown on all sides but not char. Remove the chiles and place them on a clean board or plate. Remove the stems and seeds (or leave the seeds if you like it hot) and place them in a heat-proof bowl and pour over hot water to cover them. Let the chiles relax in the hot water for around 20 minutes.
  2. While the chiles are soaking in their bath, prepare the rest of the marinade. Once the garlic is finished toasting on all sides, carefully remove the cloves from the pot and when cool enough to handle, the cloves should slip right out of their skins.  Add the garlic cloves to a blender or food processor (I use my nutri-bullet).
  3. Now add the lime zest, cilantro, honey, cumin, coriander, yogurt, olive oil, and a generous pinch of salt and pepper. Once the chiles are finished soaking, remove them from the water and add this to the blender as well. Blend until smooth. Viola! A marinade that shouldn’t be confused with the word serenade even though it’s sure to make whatever you’re cooking sing.

Did you make this recipe?

Tag @highdeserttable on Instagram so we can cheer you on! 🌟

Nutrition values are estimates only. See the disclaimer here.

  • « Go to Previous Page
  • Page 1
  • Interim pages omitted …
  • Page 8
  • Page 9
  • Page 10
  • Page 11
  • Go to Next Page »

High Desert Table

Copyright © 2025 · High Desert Table

  • Privacy Policy
  • Nutrition Disclaimer